
purge-app
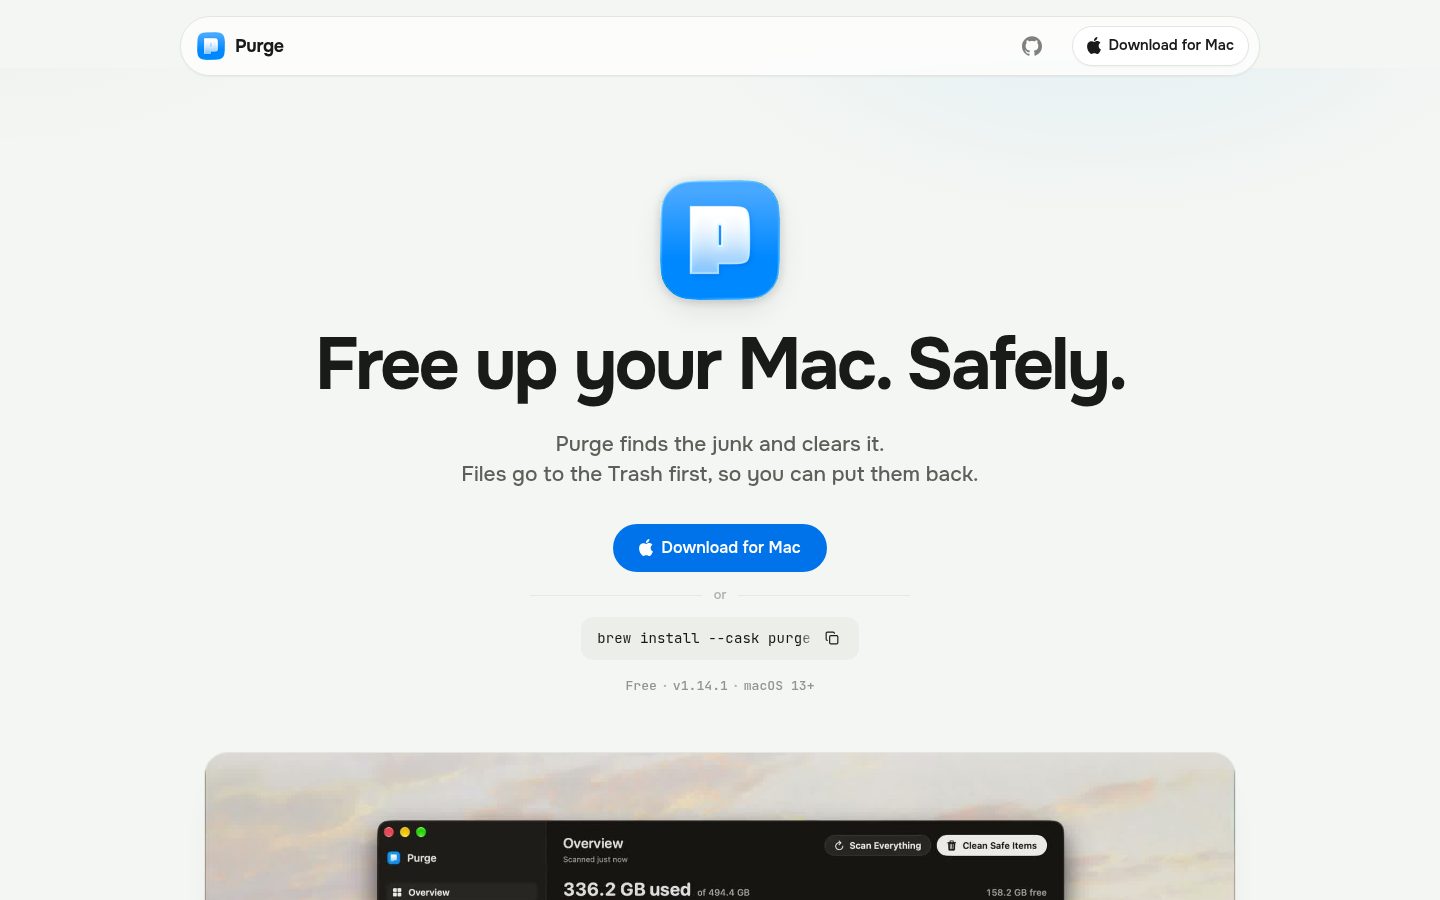
Free up your Mac. Safely. A free, open-source native Mac app that clears the cache and junk your Mac piles up on its own. Files go to the Trash by default, so you can put them back.
Automatically checked · GitHub checked 2026-11-17
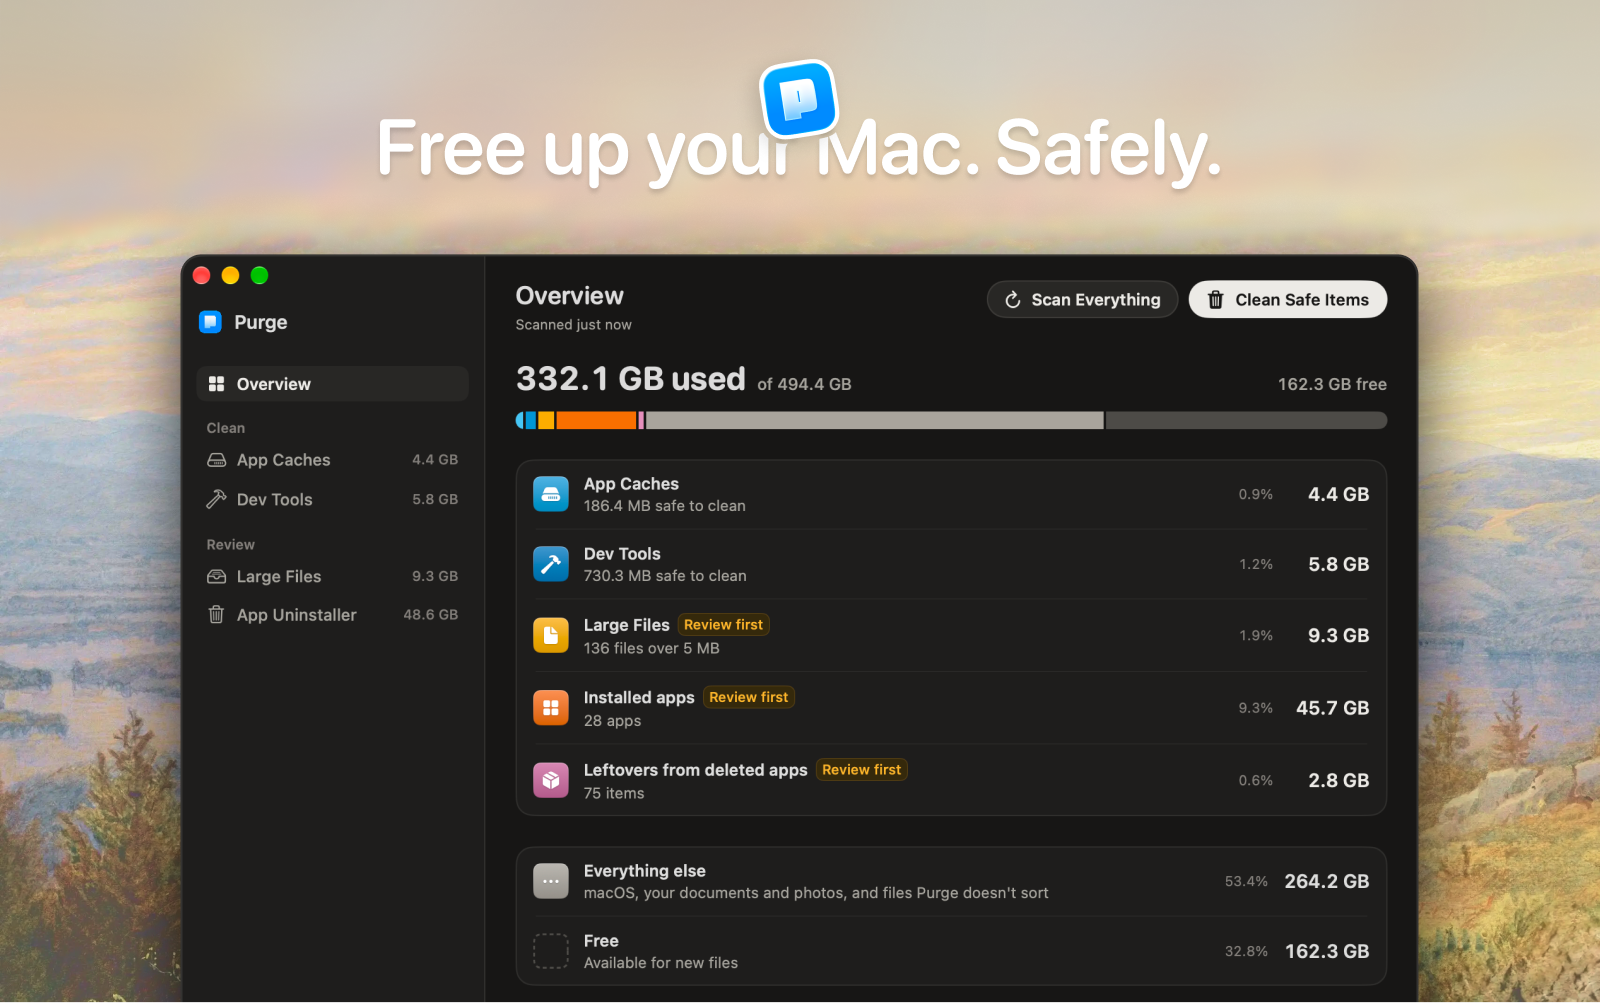
Overview

Purge
Free up your Mac. Safely.
English | 简体中文 | Русский | Українська
A free, open-source native Mac app that clears the cache and junk your Mac piles up on its own.
Files go to the Trash by default, so you can put them back.


Download · Install guide · Build from source · Security
Your Mac quietly fills up with cache and junk you never see and never asked for. Purge finds it, marks what is safe, and clears it in one click.
[!NOTE] Files and folders go to the Trash by default, and Purge never empties the Trash, so you can put them back until you empty it yourself. Deleted permanently: iOS simulators and simulator runtimes, through Xcode's
simctl; Xcode's optional Metal Toolchain, throughxcodebuild -deleteComponent(Xcode downloads it again when a project needs it); Time Machine local snapshots, throughtmutil(Purge keeps the newest and the one from your last backup); the Apple Intelligence models on macOS 27, which Apple's asset service releases and Purge can download again; command-line tools and Homebrew cask apps that their package manager uninstalls, when you choose that in the review sheet. Docker Desktop's folder goes to the Trash. Purge does not rundocker system prune.
You do not need to understand any of it to use it. But if you ever want to check, every item carries a plain-language explanation and a safety label, so nothing gets touched that you cannot see and verify first.
Features
Overview
- Where your space went: one bar for the whole disk. Used, free and total come straight from the volume, so they match System Settings. App Caches, Dev Tools, Large Files, installed apps and leftovers from deleted apps each get their own segment, and the rest is shown as everything else
- A row per category with its size and share of the disk. Click one to open its tab
- Everything else opens too. Click the row and a page shows what it holds: four figures for what you can do about the space, over a map where each group is a frame with its biggest folders drawn inside, sized by space and coloured by kind. The kinds are space you free in another app (Photos, Mail, Steam, the Trash), your own files (projects, documents), what Purge leaves alone because it doesn't consider it safe to delete (caches off its list, app data no installed app claims), and what macOS manages. Point at a tile to name it, and click it to see what it is, with Show in Finder or the owning app's own way to free it. It is read only: nothing on it moves a file
- Scan Everything (⇧⌘R) scans every category, one at a time so the Mac stays responsive. When you open Purge it does the same on its own. Large Files, the app list and leftovers need Full Disk Access. Without it Purge still scans App Caches and Dev Tools, and skips the places macOS protects, such as sandboxed apps' caches
- Each byte is counted once: an app's cache folder counts under App Caches, not again under the app
- Hidden in System Data: a card under the categories for space macOS counts as System Data. Its Time Machine snapshots row is where you remove local snapshots, and on macOS 27 it also holds the Apple Intelligence models
- Apple Intelligence models (macOS 27, Apple silicon): the on-device models macOS files under System Data, with no switch to remove them. Remove releases them through Apple's asset service and installs a profile, which you approve once, so they don't download again. Download Again asks you to remove the profile in System Settings, then asks macOS for the sets Purge removed, in your Siri language. The size shown is Apple's figure; Purge records what the disk really gave back. If a removal fails, Details says what to try and shows everything macOS answered, and when nothing was removed the button reads Remove Profile
App Caches
Scans ~/Library/Caches, sandbox container caches (these need Full Disk Access), and common system junk:
- Per-app cache folders with friendly names, brand icons, and a plain-language explanation if you want to read it
- System Junk like application logs, crash reports, macOS installers, and leftover macOS update files
- Large media caches from creative apps like Premiere Pro and After Effects
- Duplicate cache locations for the same app merged into a single row
- Results stream in as they are found
Dev Tools
Five groups in one view:
- Global dev tool caches: Xcode (Derived Data, Archives, DeviceSupport), Homebrew, npm, pnpm, Yarn, CocoaPods, Gradle, the Dart and Flutter pub cache, Docker Desktop, VS Code, Cursor, JetBrains, Cargo, Terraform, and more
- iOS Simulators: every simulator that is shut down, one row each. A running simulator is listed so its space is counted, but it can't be selected
- Simulator Runtimes: one row per runtime that
simctlreports as deletable - Xcode Components: Xcode's optional Metal Toolchain (about 900 MB), removed with
xcodebuild -deleteComponentwhen a full Xcode lists it as installed - Developer projects:
node_modules, Python virtual environments, Rusttarget, Flutter build output, XcodePods, Android.gradle, and other artifacts grouped by project
Simulators, runtimes and Xcode components are always Check First. They are deleted permanently, not moved to the Trash, and their section headers say so.
In Settings → Cleaning, choose Projects count as stale after (1 month to 2 years, or Show all) to control which projects appear. Age is measured from the last time anything in the project changed, including git activity, not from the date on node_modules or target. A project in use right now, with a terminal or dev server running inside it or a git command in progress, never appears.
Developer projects also come from the folders and drives you add under Settings → Other folders to scan. Projects found outside your home folder are always Check First, so Clean Safe Items and scheduled cleans never take them. A folder you add inside your home folder keeps the usual rules. Without Full Disk Access, only added folders inside your home folder are searched.
Git worktrees made by AI coding tools (Cursor, Codex, Conductor, T3 Code, and Claude Code) appear under Orphaned Git Worktrees only once their repository no longer lists them. A worktree Git still uses never appears however old it is, and neither does one a terminal or agent is working inside.
Large Files
Find space-hogging personal files without digging through folders:
- Scans Documents, Desktop, Downloads, Movies, Music, and Pictures, plus
~/Parallelsand~/Virtual Machines.localizedfor virtual machines only, and iCloud Drive's own folder for files you can keep only in iCloud - Also scans the folders and drives you add under Settings → Other folders to scan, on disks attached to your Mac only, never a network share or a cloud drive. A folder whose drive is unplugged is skipped and named, not shown as empty. Copies of a Mac or a home folder, Time Machine backups, app bundles and folders kept by Dropbox, Syncthing, Resilio Sync, ownCloud, Nextcloud or older OneDrive are never scanned there. Purge recognises those services by their marker files, so a folder another service syncs may still be scanned. Files there go to that drive's Trash
- A folder you moved and replaced with a link, such as
~/Documentspointing to another drive, is scanned where the link leads when that is inside your home folder or on a drive under/Volumes, on a disk attached to your Mac. Its files are listed by their real path and go to that drive's Trash. A link anywhere else, such as into~/Library/CloudStorage, to a network share, or to a whole drive or a copy of a Mac, is not followed, and the scan says where it leads. Links inside the folders are never followed - Skips managed libraries (Photos, iMovie, Music, and similar), hidden folders, and project folders like
node_modules,Pods,DerivedDataand build output. Deleting a single file out of a dependency tree only breaks the install, so those belong in Dev Tools, which removes them a folder at a time - Search filters the list as you type, matching the file name, the folder it sits in, and its source label
- Filter by size (5 MB to 1 GB) and last used (any time up to over 1 year ago)
- Category chips for videos, audio, images, PDFs, archives, documents, AI models, virtual machines, and other files
- Duplicates: a byte-for-byte scan finds identical copies, groups them together, and shows how much you'd reclaim by keeping one. A Duplicates chip gathers them in one place. Delete extra copies clears a whole tab of duplicates in one go. It suggests a copy to keep per set and marks the rest for Trash, and you can move the keeper to a different copy before anything is deleted. Nothing is removed until you review and confirm
- Sort by size, date, or name; select files and review before deleting
- Quick Look preview and Show in Finder from each row
- Deletions move files to Trash, so nothing is permanently erased
- Keep Only in iCloud frees the space an iCloud file takes on this Mac and keeps the file in iCloud, the same as Finder's Remove Download. The iCloud chip lists the synced files that also use space here, with how much you'd free, and the action sits there and in each synced file's right-click menu. The file stays in its folder in Finder with a cloud mark, and opening it downloads it again. Purge offers it only for files fully uploaded to iCloud, with no sync conflict, not set to Keep Downloaded, not hard-linked and unchanged for five minutes. It checks all of that again just before it acts on each file, and skips any file that is open in an app. Files in iCloud Drive's own folder are never offered for the Trash, since trashing them removes them from your other devices. It is never part of Clean Safe Items or a scheduled clean
Large Files is separate from cache cleanup: these are your personal files, not rebuildable caches.
Restore images, virtual machines, and unfinished downloads
Some big files carry a label that says what they are. Hover it for the full explanation.
- Restore image: a macOS
.ipsw, often 15 to 25 GB. It's only needed to set up a Mac, a device, or a virtual machine. - Virtual machine: a Parallels (
.pvm), UTM (.utm), or VMware Fusion (.vmwarevm) bundle. It's one row and goes to the Trash whole, never a disk file from inside it. If the app is still installed, the label says to remove the VM there, since the app keeps its own list. A VM whose app is open, or that holds a lock file, stays off the list until you quit the app. - Unfinished download:
.crdownload,.part, and Parallels'.prlupd-partfiles, and Safari's.downloadbundle when it sits directly in Downloads.
Local AI models
Downloaded models are often the largest files on a Mac and are easy to forget. They appear in Large Files under the AI Models category, one row per model, named the way you installed it, with the app or library that downloaded it as the location. Purge knows the stores of Ollama, LM Studio, the Hugging Face Hub cache (~/.cache/huggingface/hub; HF_HOME and HF_HUB_CACHE are honoured when they are set for apps, not only in a shell profile; Ollama's OLLAMA_MODELS is also read from launchctl setenv, the way Ollama's Mac app reads it), swift-transformers, apps that keep models under ~/Library/Caches/huggingface, PyTorch Hub, Whisper, GPT4All, Jan, DiffusionBee and Draw Things. Weight files over 100 MB in ~/Library/Caches, ~/Library/Application Support and ~/.cache that belong to no known store are listed too, by the folder they sit in, so you can tell which app downloaded them.
Purge understands Ollama's content-addressed storage, so a model's size counts only the bytes that would actually be reclaimed rather than blobs shared with another model. A Hugging Face model is its whole cache folder, so a blob two snapshots share is counted once and never removed from under the other. Models always go to the Trash and are never part of Clean Safe Items or a scheduled clean. When an app keeps its own list of installed models that Purge can't update, the row says the app may still show the model as installed.
App Uninstaller
Dragging an app to the Trash leaves most of it behind: caches, preferences, containers, saved state, logs, cookies and website data, and login helpers pile up on disk. The Uninstaller removes the app and those leftovers in one pass.
- Lists the apps you installed in Applications and ~/Applications, in the Applications folder at the top of any drive you plug in, and in folders you add under Settings > Where Purge looks for apps (or from the hint under the app list), skipping system apps and Purge itself. Each tile shows what an uninstall would free: the app bundle plus the leftovers Purge matched to it
- Apps from one vendor that share a folder, such as the four apps in
/Applications/DaVinci Resolve, show as one entry that opens to its apps - Select one or more apps, then review a sheet with a section per app that lists every item with its path and size
- Matching is strict, so uninstalling one app can't sweep in files shared across a vendor's apps. Every match arrives checked, and you untick what you want to keep. Three kinds start unticked: a hidden folder in your home folder that holds the app's settings, an Application Scripts folder with scripts in it, and anything another installed app still uses, which is held back and marked "Kept, still used by" that app
- A running app is asked to quit first, and only gracefully. If it won't, it's left installed and the rest of the batch still goes through
- Everything confirmed moves to Trash through the same delete engine as the rest of Purge, so it can all come back. The one exception is an app Homebrew installed as a cask: the review sheet offers two buttons, Remove with Homebrew and Move All to Trash, and says that Homebrew deletes the app permanently and runs the cask's own uninstall steps, which can stop its background services and delete its helper tools and installer files permanently too. A cask that installs several apps is never offered to Homebrew. Its leftovers still go to the Trash, and if Homebrew refuses, the app goes to the Trash instead
- Optional, off by default: turn on Review leftovers when an app is deleted in Settings. A small background watcher then notices when an app leaves one of those folders — even if Purge is quit — opens Purge with just that app's leftovers, and gets out of the way after you confirm or dismiss. Nothing moves without that review. In this review only exact bundle-id and app-group matches inside your home folder arrive checked; looser name-only matches arrive unchecked for you to confirm
- Some apps are installed under an administrator, so your account can't move them to the Trash, and the same goes for their leftovers in
/Library. Turn on Remove admin-locked apps without a password in Settings and a small helper that runs as root moves them to your Trash. It moves only paths the uninstaller approved, and leftover macOS update files. On a standard account the setting reads Remove admin-locked apps, and Purge asks for an administrator's name and password each time - You can start from Finder too: turn on Uninstall from Finder's right-click menu in Settings, then right-click an app and choose Uninstall with Purge. Dropping an app on Purge's Dock icon does the same
The Uninstaller has two more lists beside Installed Apps. Each appears when its scan finds something:
- Leftovers: files left behind by apps that are already gone, grouped by how Purge matched them to the app. Nothing is selected for you
- Command-Line Tools: tools installed by a script go to the Trash: the tool's folder in your home folder, the commands in
~/.local/binthat start it, and its background jobs. Tools installed by Homebrew, npm, pipx, uv or Cargo are removed by that manager's own uninstall, permanently. The confirmation lists the two groups separately
Safety labels
Purge assigns a safety label to every item it recognizes:
| Label | Meaning |
|---|---|
| ✅ Safe to Clean | Known cache or rebuildable artifact, safe to remove |
| ⚠️ Check First | May be safe, but could cause inconvenience |
Filter with All, Safe to Clean, or Check First (⌥⌘1–⌥⌘3). Sort by size, date modified, or name.
Unidentified folders are left out of the list entirely. Purge only shows what it knows about.
The labels and explanations are there to be checked, not read cover to cover. Select the safe items and clean them, or open the reasoning behind any single row first. Either way is fine.
Cleaning
- Clean Selected: pick specific rows, review in a confirmation sheet, then delete. Git and lockfile checks run before anything is removed
- Clean Safe Items: on the Overview, moves every Safe to Clean item to the Trash after one confirmation
- Clean Safe Files: the same safe cleanup from the menu bar
- Scheduled cleaning: in Settings → Cleaning, turn on Clean automatically and choose how often (weekly, monthly, every 3 months, or a Custom interval you set in days, weeks, or months). Purge sends a local reminder when a clean is due and runs it the next time you open or switch to Purge, so the cleanup keeps happening without you thinking about it. It never cleans in the background
- Files and folders move to the Trash. Purge never empties the Trash. iOS simulators and simulator runtimes are deleted permanently through Xcode's
simctl. The Metal Toolchain is deleted permanently throughxcodebuild -deleteComponent, and Xcode downloads it again when a project needs it. Time Machine local snapshots are deleted permanently throughtmutil; Purge keeps the newest and the one from your last backup. The Apple Intelligence models are released through Apple's asset service and can be downloaded again. Tools and cask apps a package manager installed are removed by that manager's own uninstall, permanently, when you pick that in the review sheet
Settings
Settings is a tab in the sidebar (⌘,) with five groups:
- General: Keep Purge in the menu bar, which is off on a new install. When it is on, Purge keeps running after you close the window, and you can also choose Launch Purge at login and Hide Dock icon. Appearance is Auto, Light, or Dark
- Cleaning: Clean automatically, with a frequency and the next-clean date. Projects count as stale after, the threshold for Developer Projects. Other folders to scan, the folders and drives Large Files and Developer Projects scan besides your home folders. Excluded folders, the folders you've told Purge to leave alone, each with its current size. Right-click a row in App Caches, Dev Tools or Large Files and choose Exclude from scans to add one. An excluded simulator runtime is listed by name and build, with the size it had when you excluded it. Excluding only ever narrows what Purge looks at
- Uninstalling: Uninstall from Finder's right-click menu, Where Purge looks for apps, Review leftovers when an app is deleted, and Remove admin-locked apps without a password
- Updates and History: Check for updates automatically, Install updates automatically, and Cleaning history, which lists every automatic and manual clean with the space freed and the item count, and shows a summary of the last one. Open a clean to see what was moved to the Trash, what was deleted permanently, and what was skipped
- Uninstall: Uninstall Purge, covered under Uninstalling
More
- First-run onboarding: a welcome, a first scan, and the results with a button that moves the safe items to the Trash. Last comes an optional request for Full Disk Access, shown only if Purge doesn't have it
- Menu bar companion: recoverable space at a glance, quick open, and scan/clean actions. It is optional and off on a new install; turn on Keep Purge in the menu bar in Settings
- Shortcuts and Spotlight: three actions, Scan for Junk, Clean Safe Junk, and Uninstall an App
- Languages: the app is in English, Simplified Chinese, Russian and Turkish, and follows your system language
- Disk summary: the Overview shows used and free space; the sidebar shows what is already in the Trash, and each scan tab's size
- In-app updates: the About screen checks for, downloads, and installs new versions
Keyboard shortcuts
| Shortcut | Action |
|---|---|
| ⌘R | Scan the current tab (Scan Everything on the Overview) |
| ⇧⌘R | Scan Everything, from any tab |
| ⌘1–⌘5 | Go to Overview, App Caches, Dev Tools, Large Files, or App Uninstaller |
| ⌥⌘1–⌥⌘3 | Filter by All, Safe to Clean, or Check First, on App Caches and Dev Tools |
| ⌘F | Search on Large Files and App Uninstaller |
| ⌘, | Open Settings |
Download

Installation
There are two ways to install Purge: with Homebrew if you live in the terminal, or by downloading the app directly. Both land in the same place.
Install with Homebrew
brew install --cask purge
This installs Purge from the official Homebrew cask, and Homebrew verifies the download's checksum for you automatically.
Install manually
The steps below walk through the direct download.
Step 1: Download
Click the download link above and download the .dmg.
Step 2: Verify your download (optional but recommended)
[!TIP] Since Purge deletes files, verifying the checksum confirms your download is byte-for-byte the one that was published, with nothing altered in transit.
Each release includes a matching .dmg.sha256 checksum file. Download both the .dmg and its .dmg.sha256 file into the same folder, then in Terminal:
cd ~/Downloads
shasum -a 256 -c Purgev*.dmg.sha256
A result ending in OK means the file matches the published release.
Step 3: Install
Open the .dmg and drag Purge to your Applications folder.
Step 4: Open Purge
Double-click Purge to open it. Purge is notarized by Apple, so it opens normally with no extra steps.
Step 5: Let Purge look deeper (optional)
Purge works without Full Disk Access: it scans App Caches and Dev Tools. With it, Purge also finds App Store apps' caches, large files, installed apps and deleted apps' leftovers.
- At the end of the first run, or later from Look deeper, click Let Purge in. System Settings opens
- Find Purge in the list and turn on its switch
- Come back to Purge. It notices the change by itself. If macOS offers to reopen Purge, go ahead
Choose Not now to skip it. You can turn the access off anytime in System Settings.
Updating
Purge updates itself in place. Once a day it checks for a new version, and when one is available the update window appears with the release notes. Choose Install Update and Purge downloads it, verifies its signature, installs it, and relaunches. You don't need to visit the release page or drag anything.
By default nothing is installed without your confirmation. You can also check whenever you like from the About screen, and if you'd rather Purge didn't check on its own, turn off Check for updates automatically in Settings → Updates and History.
If you'd rather not be asked, turn on Install updates automatically in the same place, or tick the matching box in the update window. New versions then download in the background and install the next time Purge quits. Once one is ready, Restart to Update in the Purge menu, the menu bar menu or the About screen installs it straight away. That helps if you keep Purge in the menu bar and rarely quit it.
Updates are delivered through Sparkle, the standard update framework for Mac apps outside the App Store. Each update is signed with a key that lives only on the developer's machine, and Purge refuses any download that doesn't carry a matching signature.
Updating with Homebrew
If you installed through Homebrew, you can update from the terminal instead:
brew upgrade --cask purge
Either route is fine. Your settings, cleaning schedule, and history are kept whichever way you update; they live separately from the app. You won't need to grant Full Disk Access again either, since the permission stays with Purge.
You can also browse past versions on the releases page anytime.
Uninstalling
Choose Uninstall Purge… in the Purge menu, or Settings → Uninstall → Uninstall…. Purge lists what it runs in the background on your Mac (the deleted-app watcher, the admin helper, the Finder right-click item, the cleanup reminder and launch at login), turns each one off and checks it really stopped, then moves itself to the Trash and quits.
Your settings and cleaning history stay on your Mac, so a reinstall picks up where you left off. Tick Also move settings and history to the Trash to move them too. Nothing is deleted permanently; you empty the Trash when you're ready.
macOS doesn't let an app remove its own Full Disk Access. If Purge had it, the last screen offers Quit and Open Full Disk Access. In System Settings, select Purge and click the minus button.
Already dragged Purge to the Trash? Download it again, open it, and choose Uninstall Purge…, so nothing it ran keeps running. To check nothing is left, Purge should be gone from System Settings → General → Login Items & Extensions, and this should print nothing:
pgrep -fl io.getpurge
Build from source
Prefer to build Purge yourself instead of downloading the release? Here is how.
Prerequisites
- macOS 13.0 or later
- Xcode 26 or later (from the Mac App Store). The project uses Swift 6.2 build settings (default actor isolation and approachable concurrency) and
@concurrent, which need Xcode 26; earlier versions won't build it - Node.js 18+ and npm, only needed if you want to regenerate brand icons
Dependencies are resolved by Swift Package Manager when you first build. The only one is Sparkle, which handles in-app updates.
Step 1: Clone the repo
git clone https://github.com/jithin-sabu/purge-app.git
cd purge-app
Step 2: Build and run
Open the project in Xcode and run:
open purge.xcodeproj
Then select the purge scheme and press ⌘R.
The project is set to sign with the developer's Developer ID certificate, which you won't have. In Xcode, open Signing & Capabilities for each target and choose your own team or Sign to Run Locally.
Or build straight from the command line, with signing turned off:
# Build a Debug app
xcodebuild -project purge.xcodeproj -scheme purge -configuration Debug build CODE_SIGN_IDENTITY="" CODE_SIGNING_REQUIRED=NO CODE_SIGNING_ALLOWED=NO

# Build a Release app
xcodebuild -project purge.xcodeproj -scheme purge -configuration Release build CODE_SIGN_IDENTITY="" CODE_SIGNING_REQUIRED=NO CODE_SIGNING_ALLOWED=NO
The built Purge.app is written under Xcode's DerivedData folder (the build output ends with its path). macOS treats each build without your signature as a new app, so Full Disk Access has to be granted again after a rebuild.
Optional: regenerate brand icons
The app cache icons are generated from simple-icons. To rebuild them:
npm install
npm run generate:icons
Running the tests
xcodebuild test -project purge.xcodeproj -scheme purge -destination 'platform=macOS' CODE_SIGN_IDENTITY="" CODE_SIGNING_REQUIRED=NO CODE_SIGNING_ALLOWED=NO
The signing flags matter: without a development certificate on the machine, the test build fails before a single test runs. Continuous integration builds the same way.
Requirements
- macOS 13.0 or later
- Full Disk Access (optional; Large Files, the App Uninstaller and leftovers need it)
- Xcode (optional, for iOS simulators and simulator runtimes). If you deleted Xcode, Purge still finds the simulators it left behind
Privacy
Purge runs entirely on your Mac. Your excluded folders, cleaning history and last scan stay in its Application Support folder, and your settings in its preferences. Nothing is uploaded. The last scan is saved so Purge has something to show while it scans again. Nothing from Desktop, Documents, Downloads or iCloud is written to it, and Large Files keeps only its totals, by kind of file, never a file name.
The one time Purge talks to the network is the update check: once a day it fetches a small XML file from GitHub to see whether a newer version is available. It sends nothing about you or your Mac, and you can turn it off in Settings → Updates and History.
Purge reads some file contents, on your Mac only. To find duplicates it compares files of the same size byte for byte. To work out which app or tool a file belongs to, it reads small files such as an app's Info.plist, LaunchAgent plists, and the scripts that start command-line tools. It never sends file contents anywhere.
Purge does not use AI. Nothing you scan or clean is sent to an AI service.
Security
Purge deletes files, so safety is the point. A few things worth knowing:
- Trash by default: Files and folders move to the macOS Trash, and Purge never empties it. You can restore them until you empty the Trash yourself. iOS simulators and simulator runtimes are deleted permanently through
simctl. Xcode's Metal Toolchain is deleted permanently throughxcodebuild -deleteComponentand downloads again when a project needs it. Time Machine local snapshots are deleted permanently throughtmutil; Purge keeps the newest and the one from your last backup. The Apple Intelligence models are released through Apple's asset service and can be downloaded again from Purge. Command-line tools and Homebrew cask apps you choose to remove through their package manager are deleted by that manager, permanently. Docker Desktop's data folder goes to the Trash. Purge does not rundocker system prune. - Allowlist-based deletion: Only paths that match an explicit safety allowlist are ever eligible for cleanup. Anything Purge does not recognize is never touched. The safety page lists every allowed location and everything cleaning will never touch, generated from the app's source.
- You choose what goes: Purge shows what is reclaimable and you decide what to clear.
- Root helper, off by default: To move apps an administrator installed, Purge can install a small helper that runs as root. It stays off until you turn on Remove admin-locked apps without a password and approve it in System Settings. It does one thing: it moves a path the uninstaller approved, or a leftover macOS update file, to your Trash. Its source is in
PurgeHelper/. - Open source: The full deletion logic, including the allowlist, is in this repo for you to read or build from source yourself.
- Notarized by Apple: The app is signed and notarized, so macOS can verify it hasn't been tampered with since release.
- Signed updates: In-app updates are verified against a signing key before they are installed. An update that isn't signed by that key is refused, so a compromised download can't become a compromised install.
Found a safety gap or a path that could be deleted when it shouldn't be? Please report it. See SECURITY.md for how.
Contributing
Bug reports, safety findings, and pull requests are welcome. CONTRIBUTING.md covers how to set up the project and what makes a change easy to review. Anything touching the safety allowlist, the never-delete protections, or the scanning logic gets extra scrutiny and takes longer to review, which is deliberate.
Security issues are the exception: report those privately through SECURITY.md rather than opening an issue.
License
Purge is released under the MIT License. You are free to use, read, modify, and distribute it.
Support
Purge is free. If it saved you some disk space, you can chip in toward the running costs from the About screen inside the app, or directly at Buy Me a Coffee.

Jithin Sabu


