
pnlcs
Open-source, self-hosted hosting billing platform — a free WHMCS alternative.
Automatically checked · GitHub checked 2026-11-12
Overview
PNLCS
Open-source, self-hosted hosting billing platform — a free WHMCS alternative.
Client portal · invoicing · domain & SSL management · support tickets · reseller hosting.
Customers manage their hosting from the billing portal itself — files, mail,
databases, FTP, subdomains, DNS, cron and backups.






Questions, ideas and show-and-tell live on the PNLCS Community — ask there first, and see what others build with PNLCS.
Quick Start · Installation · First Steps · Features · Modules · Proxmox VPS · Screenshots · Contributing · Community
About — Open-Source WHMCS Alternative
PNLCS is a free, open-source, self-hosted hosting billing platform and client portal — an open alternative to WHMCS for web hosting companies, reseller hosts, and infrastructure providers. It covers the full customer lifecycle: product catalog, checkout, recurring invoicing, domain registration, SSL certificate management, support tickets, knowledge base, and affiliate tracking.
If you have used WHMCS, you will feel at home: the data model, workflows, and module ecosystem (servers, gateways, registrars, SSL providers) are deliberately familiar. The difference is that PNLCS is MIT-licensed, self-hosted, and free to fork, study, and extend.
PNLCS is built and maintained by the PNLCS team. It began at Panelica, the server management panel, whose team wanted an open, self-hosted billing system that integrates natively with Panelica and works with other control panels too. Hosting companies, our own included, run their sales on it.
What it does today:
- Client portal, admin panel, and core billing flows
- Invoicing, orders, services, domains, tickets, knowledge base
- Server modules for Panelica, cPanel, Plesk, DirectAdmin, HestiaCP, aaPanel, Proxmox VE (VPS) and Vultr
- Payment gateways: Stripe, PayPal, Authorize.Net, iyzico, Mollie, Razorpay, Tpay and bank transfer
- Domain registrars: Enom, Namecheap, ResellerClub, OpenProvider, DomainNameAPI, HRD and OVH
- Multi-language UI (30 locales, admin-editable translations)
Bug reports, typos and translation improvements are always welcome. We read every issue; reproduction steps or a patch help us move fast.
Built for Panelica — The Modern Hosting Control Panel
PNLCS was first built for Panelica, a modern server management panel for web hosting — a fresh alternative to cPanel, Plesk, and CyberPanel.
Why Panelica?
- No CloudLinux required. Per-user isolation — CPU, RAM, I/O, and process limits — is built in natively via cgroups v2, Linux namespaces, per-user PHP-FPM pools, and SSH chroot. You get CageFS/LVE-style tenant isolation without paying for a separate CloudLinux license.
- Universal migration. Move whole accounts in from cPanel, Plesk, DirectAdmin, and CyberPanel — sites, databases, emails, DNS, and SSL — with file and database hashes preserved, so passwords and configs keep working.
- Affordable. A modern, fully isolated hosting stack at a fraction of the typical cPanel + CloudLinux bill.
- All-in-one, isolated stack. Nginx, Apache, multiple PHP versions, PostgreSQL, MySQL, Redis, BIND, mail (Postfix/Dovecot), FTP, ClamAV, fail2ban, and ModSecurity — each service isolated and managed from one panel.
PNLCS integrates natively with Panelica through the built-in Panelica server module: sell hosting plans and accounts are provisioned on your Panelica servers automatically — and the customer then manages that hosting (files, mailboxes, databases, FTP, subdomains, DNS, cron, backups) from the billing portal itself, with every action fenced to their own account. See Hosting Management from Inside Billing.
Not only Panelica. PNLCS is control-panel agnostic — you can connect and provision on cPanel, Plesk, DirectAdmin, HestiaCP, aaPanel, Proxmox, and Vultr too, right alongside your Panelica servers. Mix and match panels in a single install; Panelica is simply where PNLCS feels most at home.
👉 Learn more at panelica.com
Screenshots — Admin Panel & Client Portal
Admin Panel
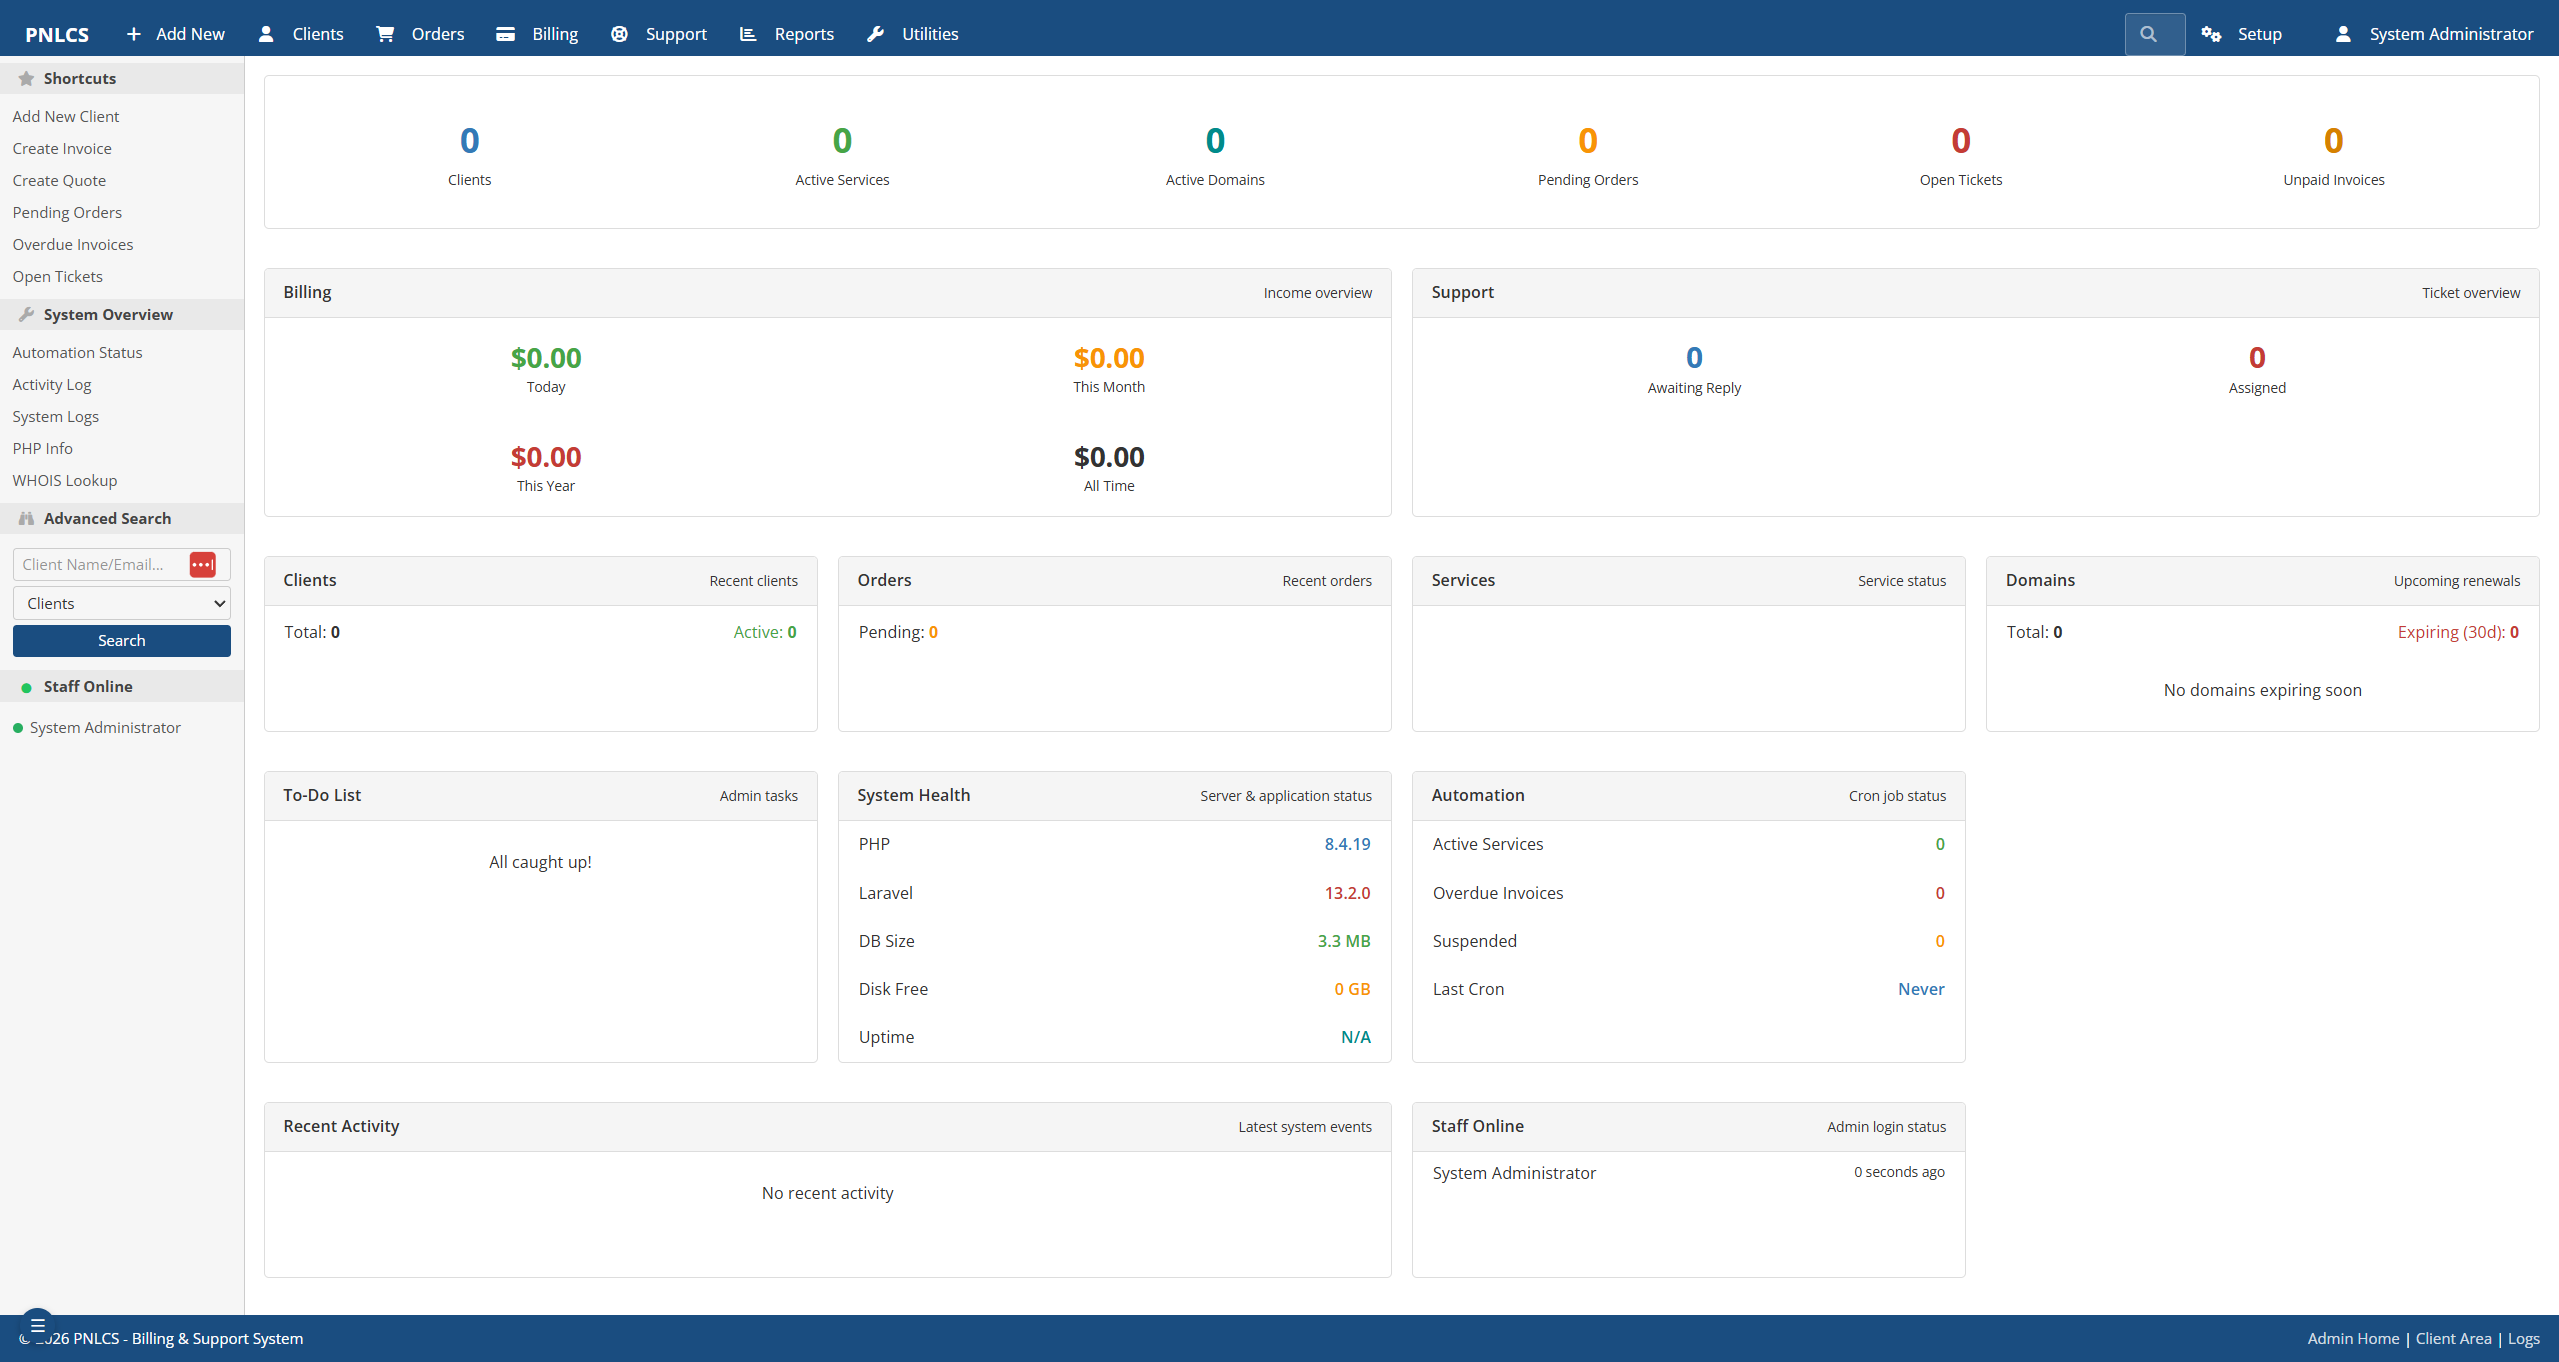
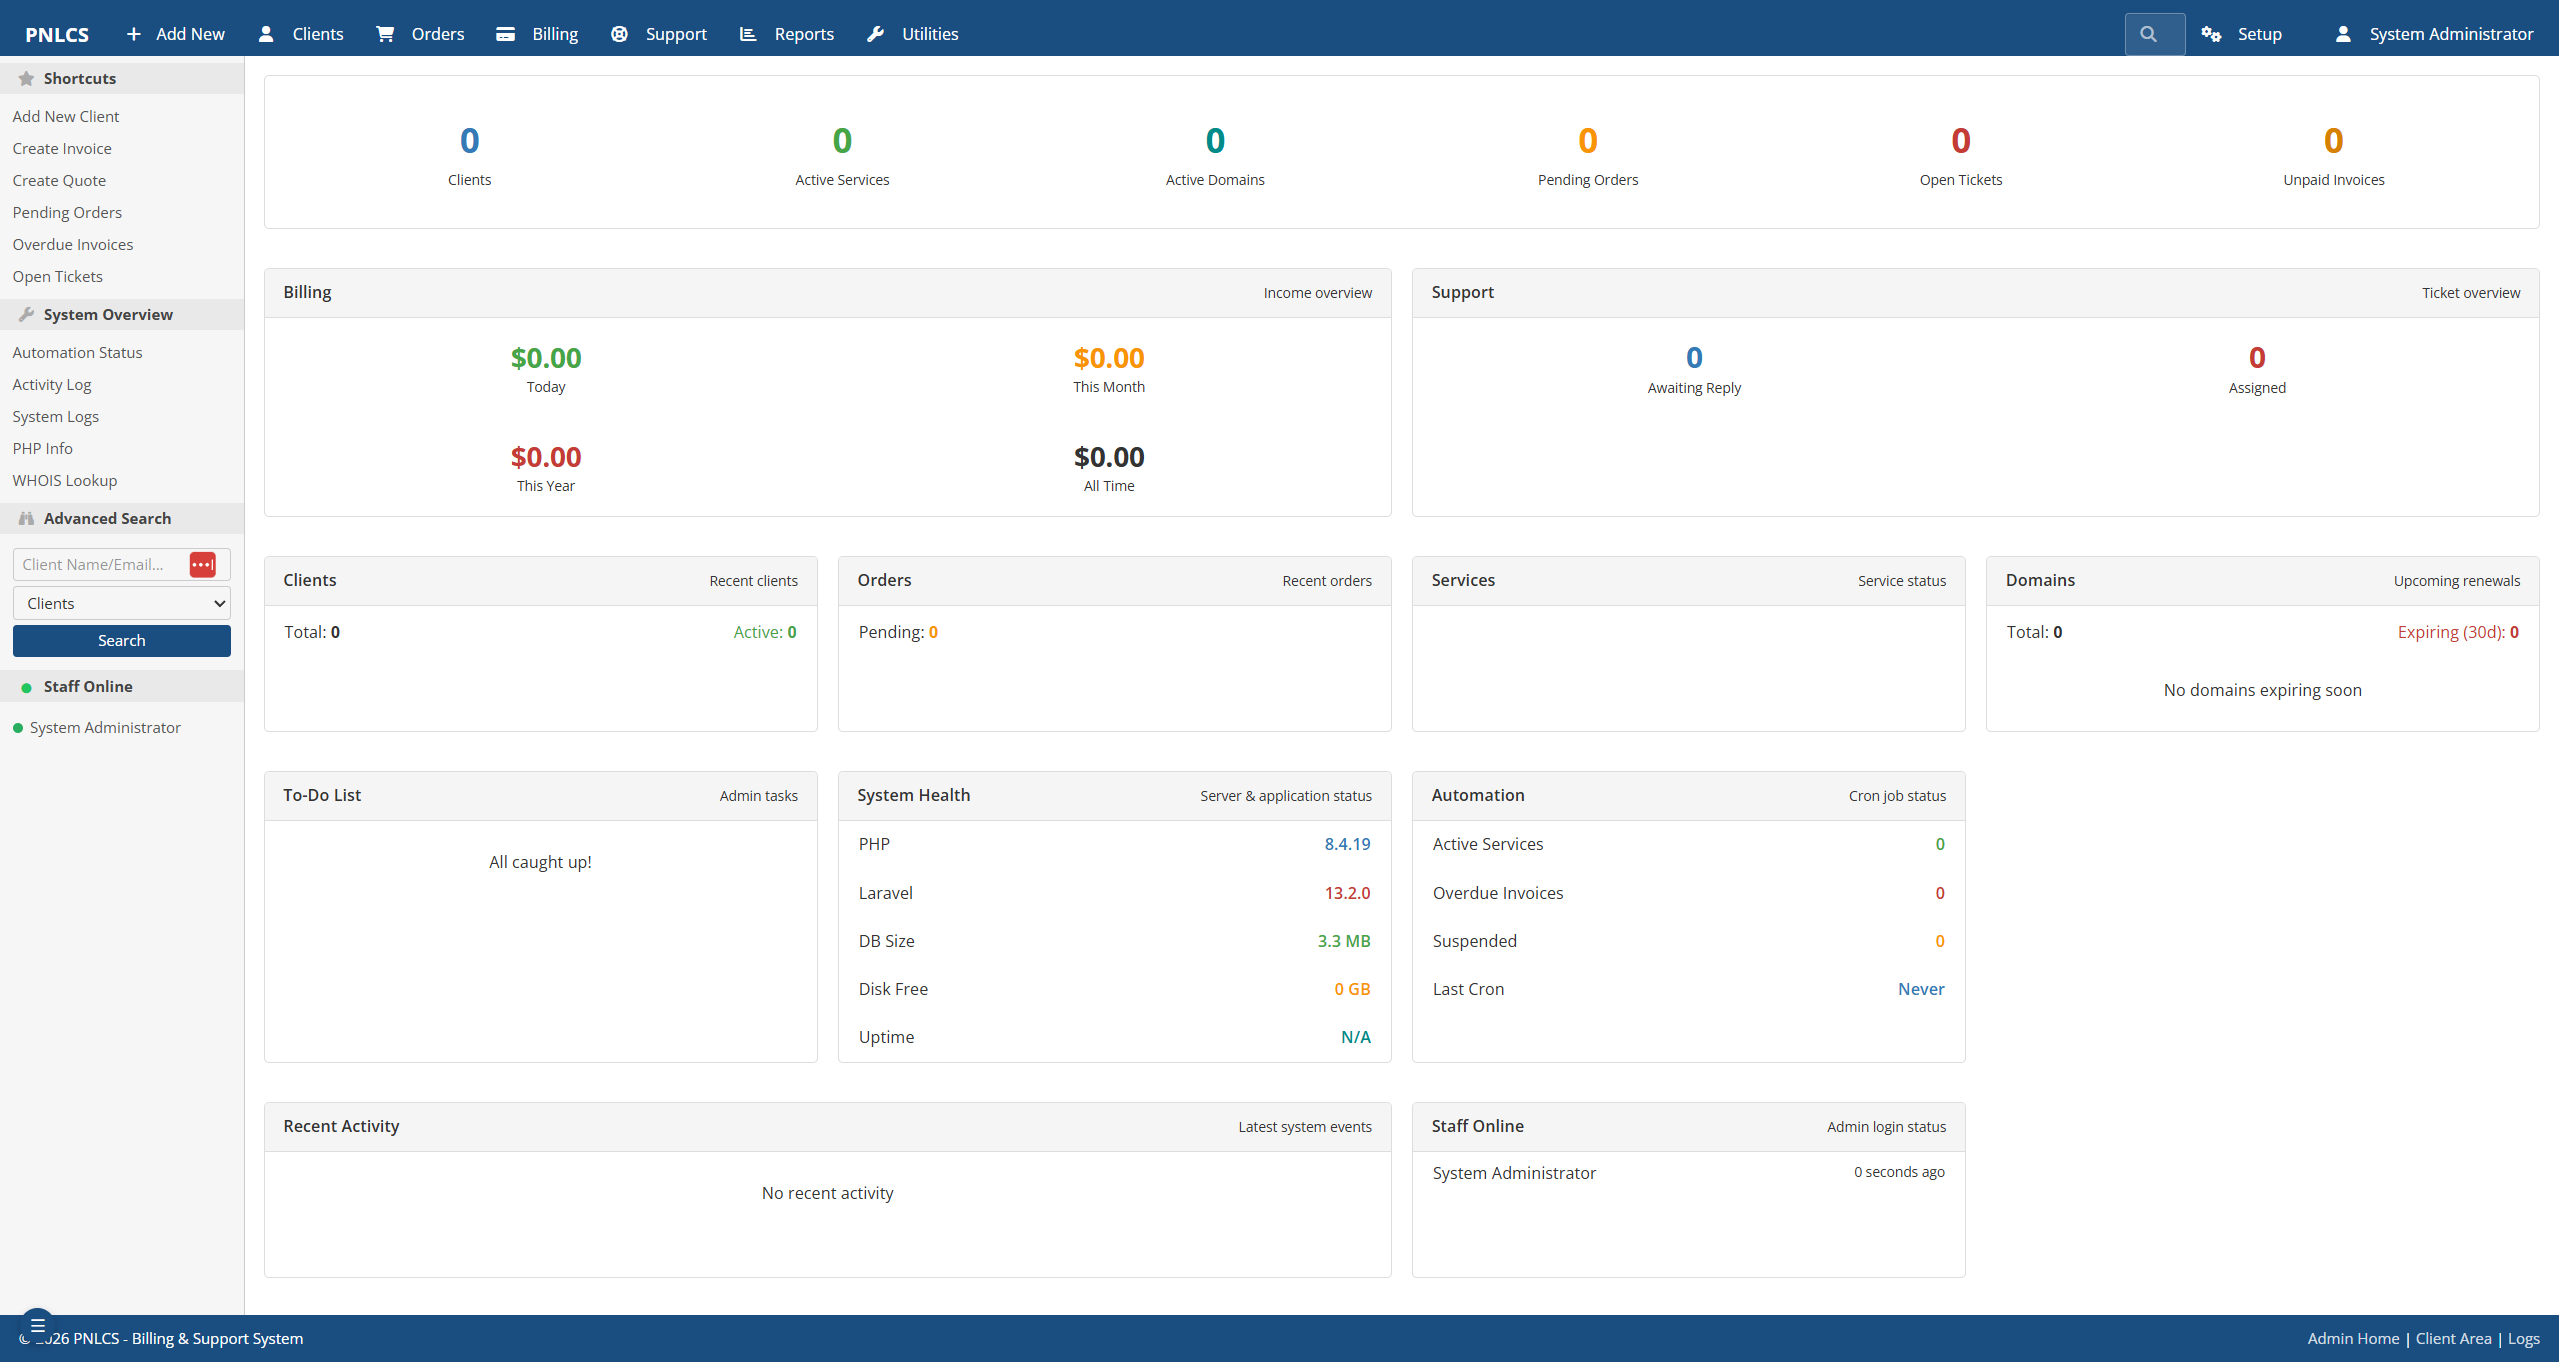 Admin dashboard with revenue, orders, and ticket overview
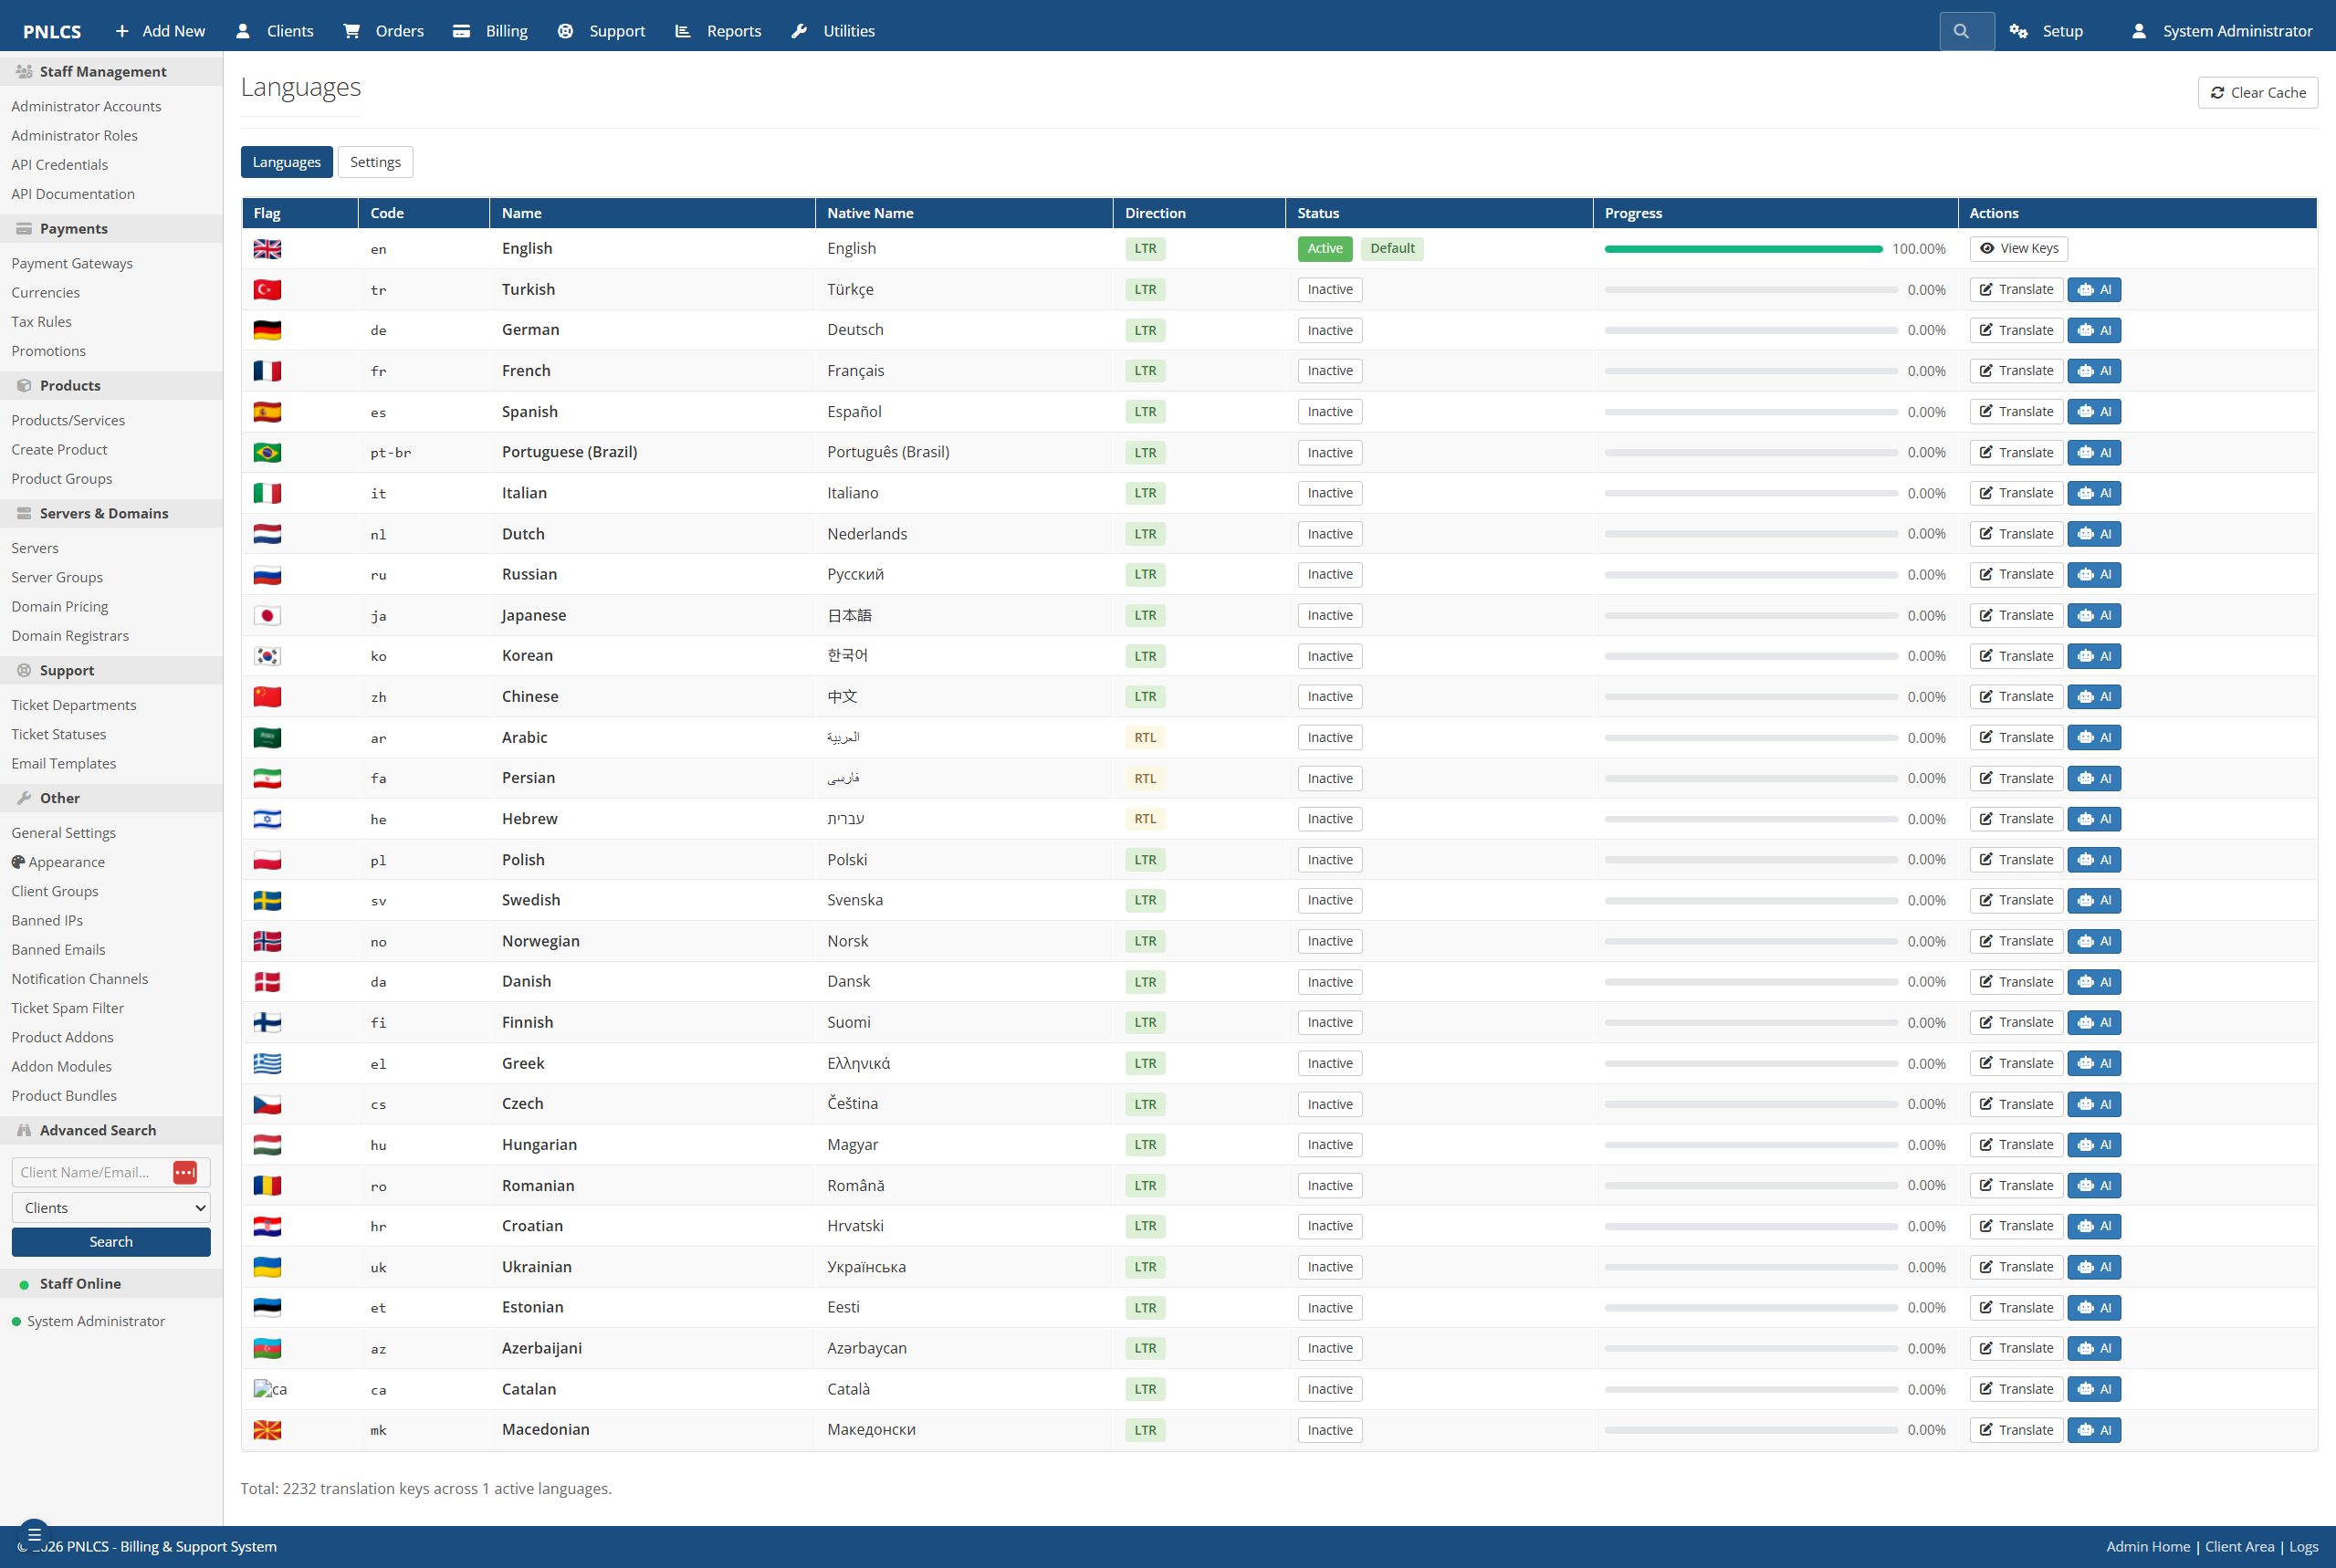 Built-in translation editor — 30 locales, over 8,000 translation keys, AI-assisted bulk translate
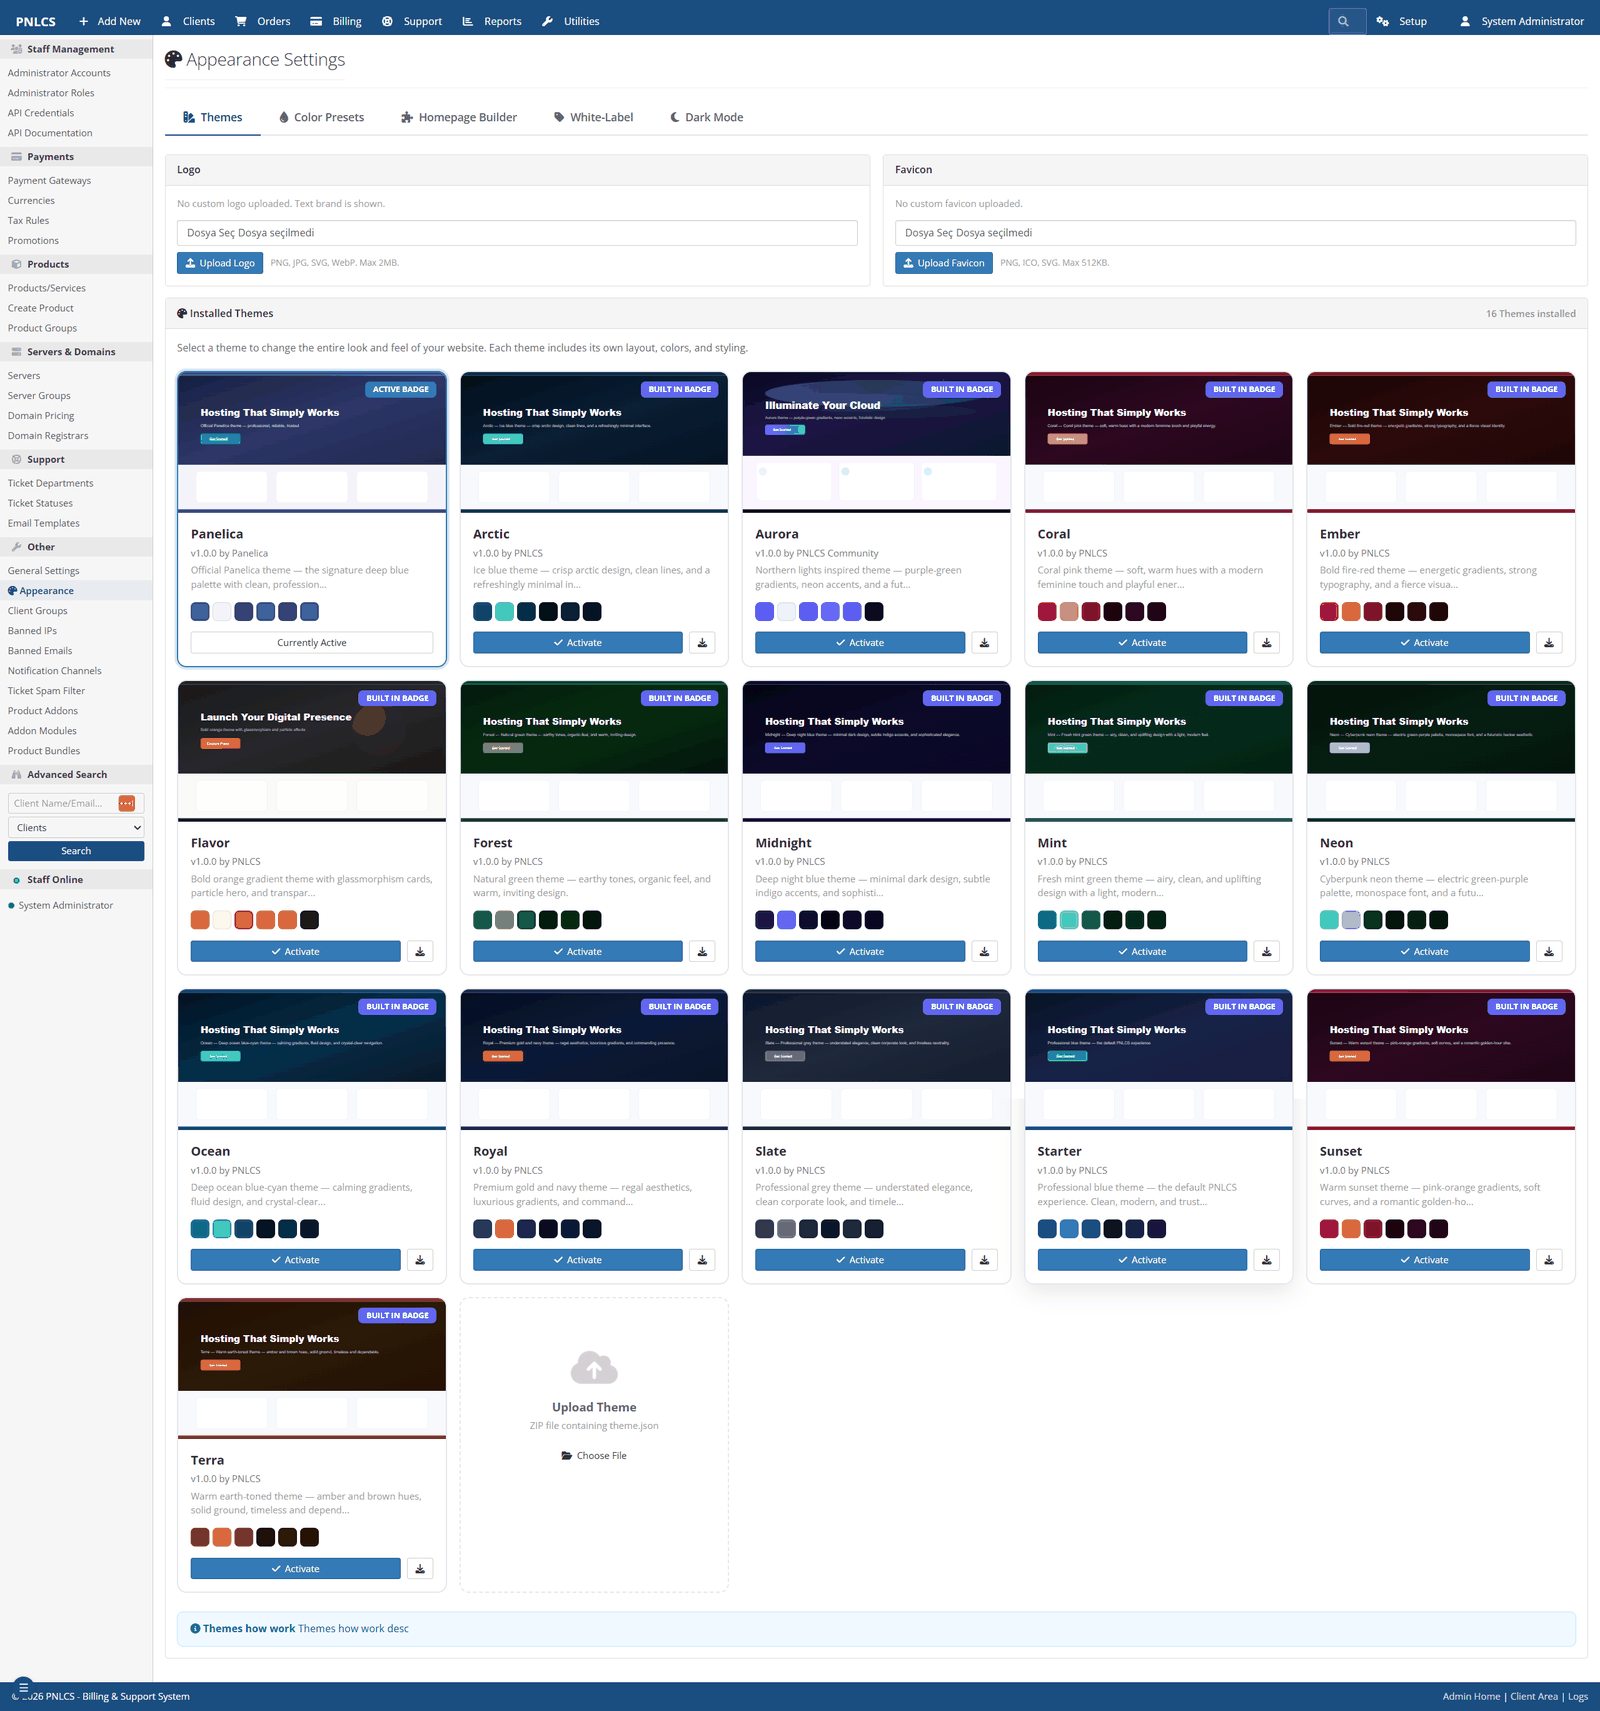 WordPress-style theme system with 16 built-in themes, logo/favicon upload, dark mode toggle, and homepage builder
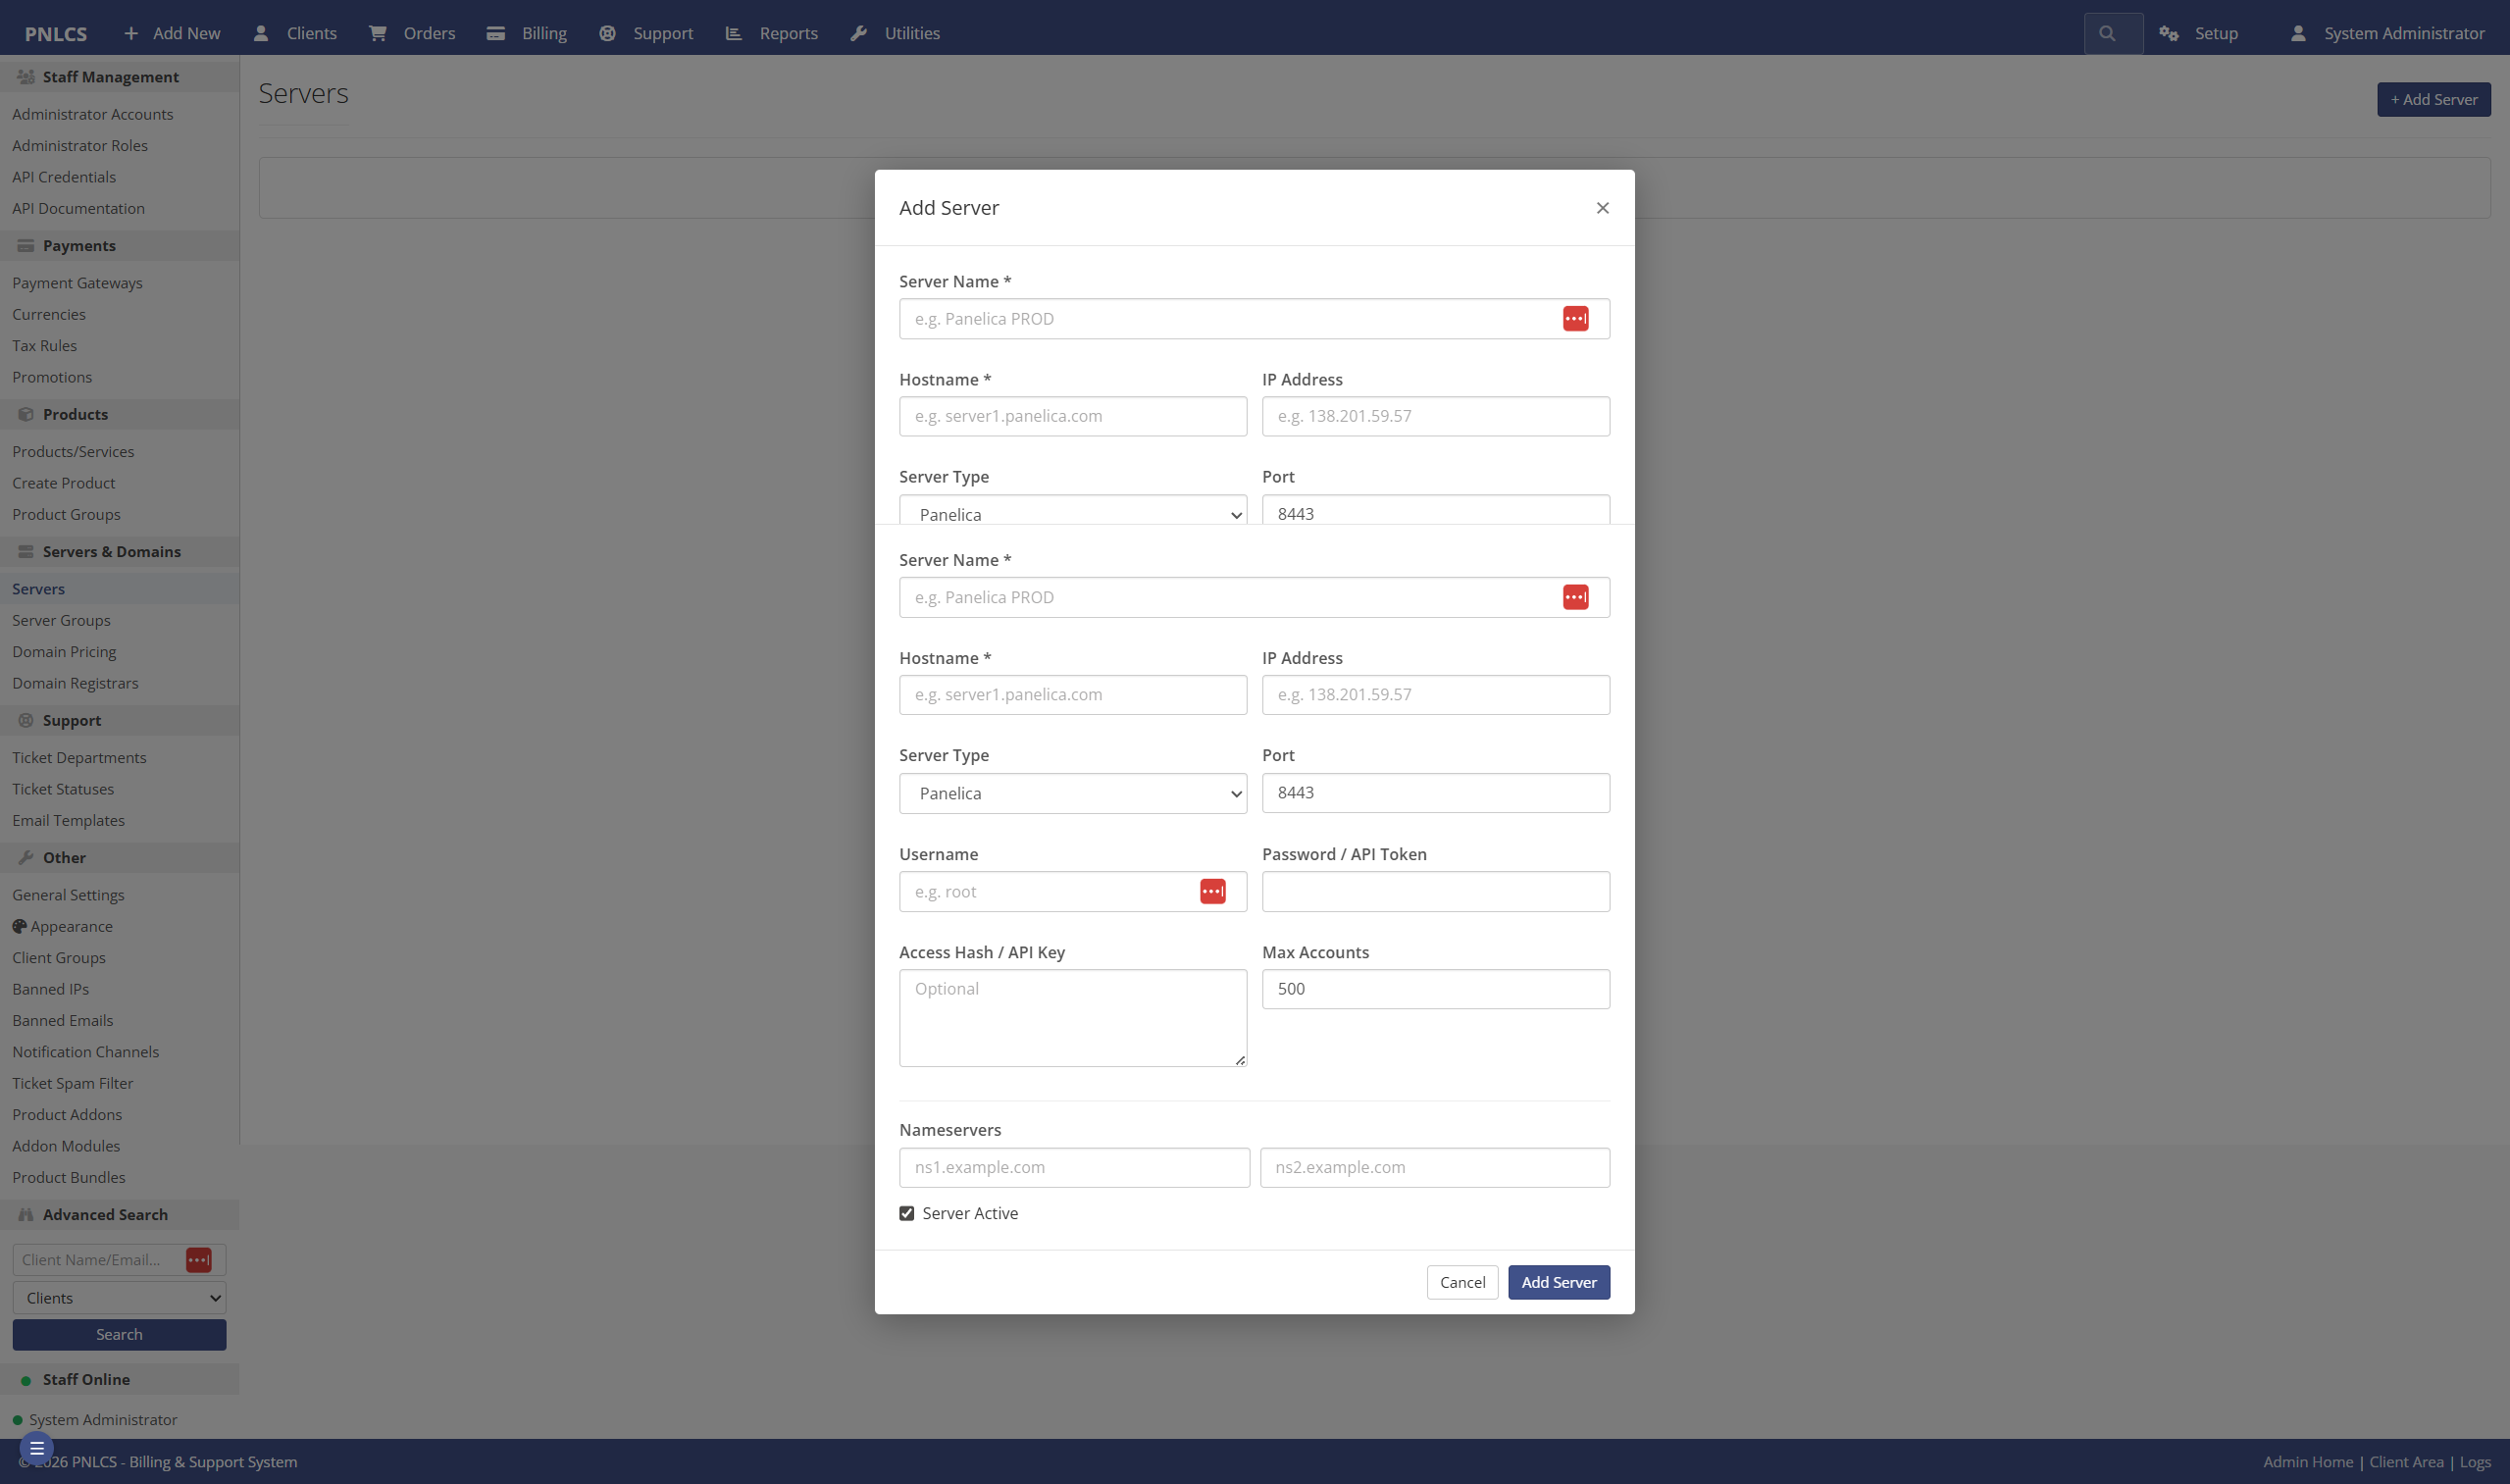 Server module management — connect Panelica, cPanel, Plesk, DirectAdmin, HestiaCP, aaPanel, Proxmox, Vultr or custom servers
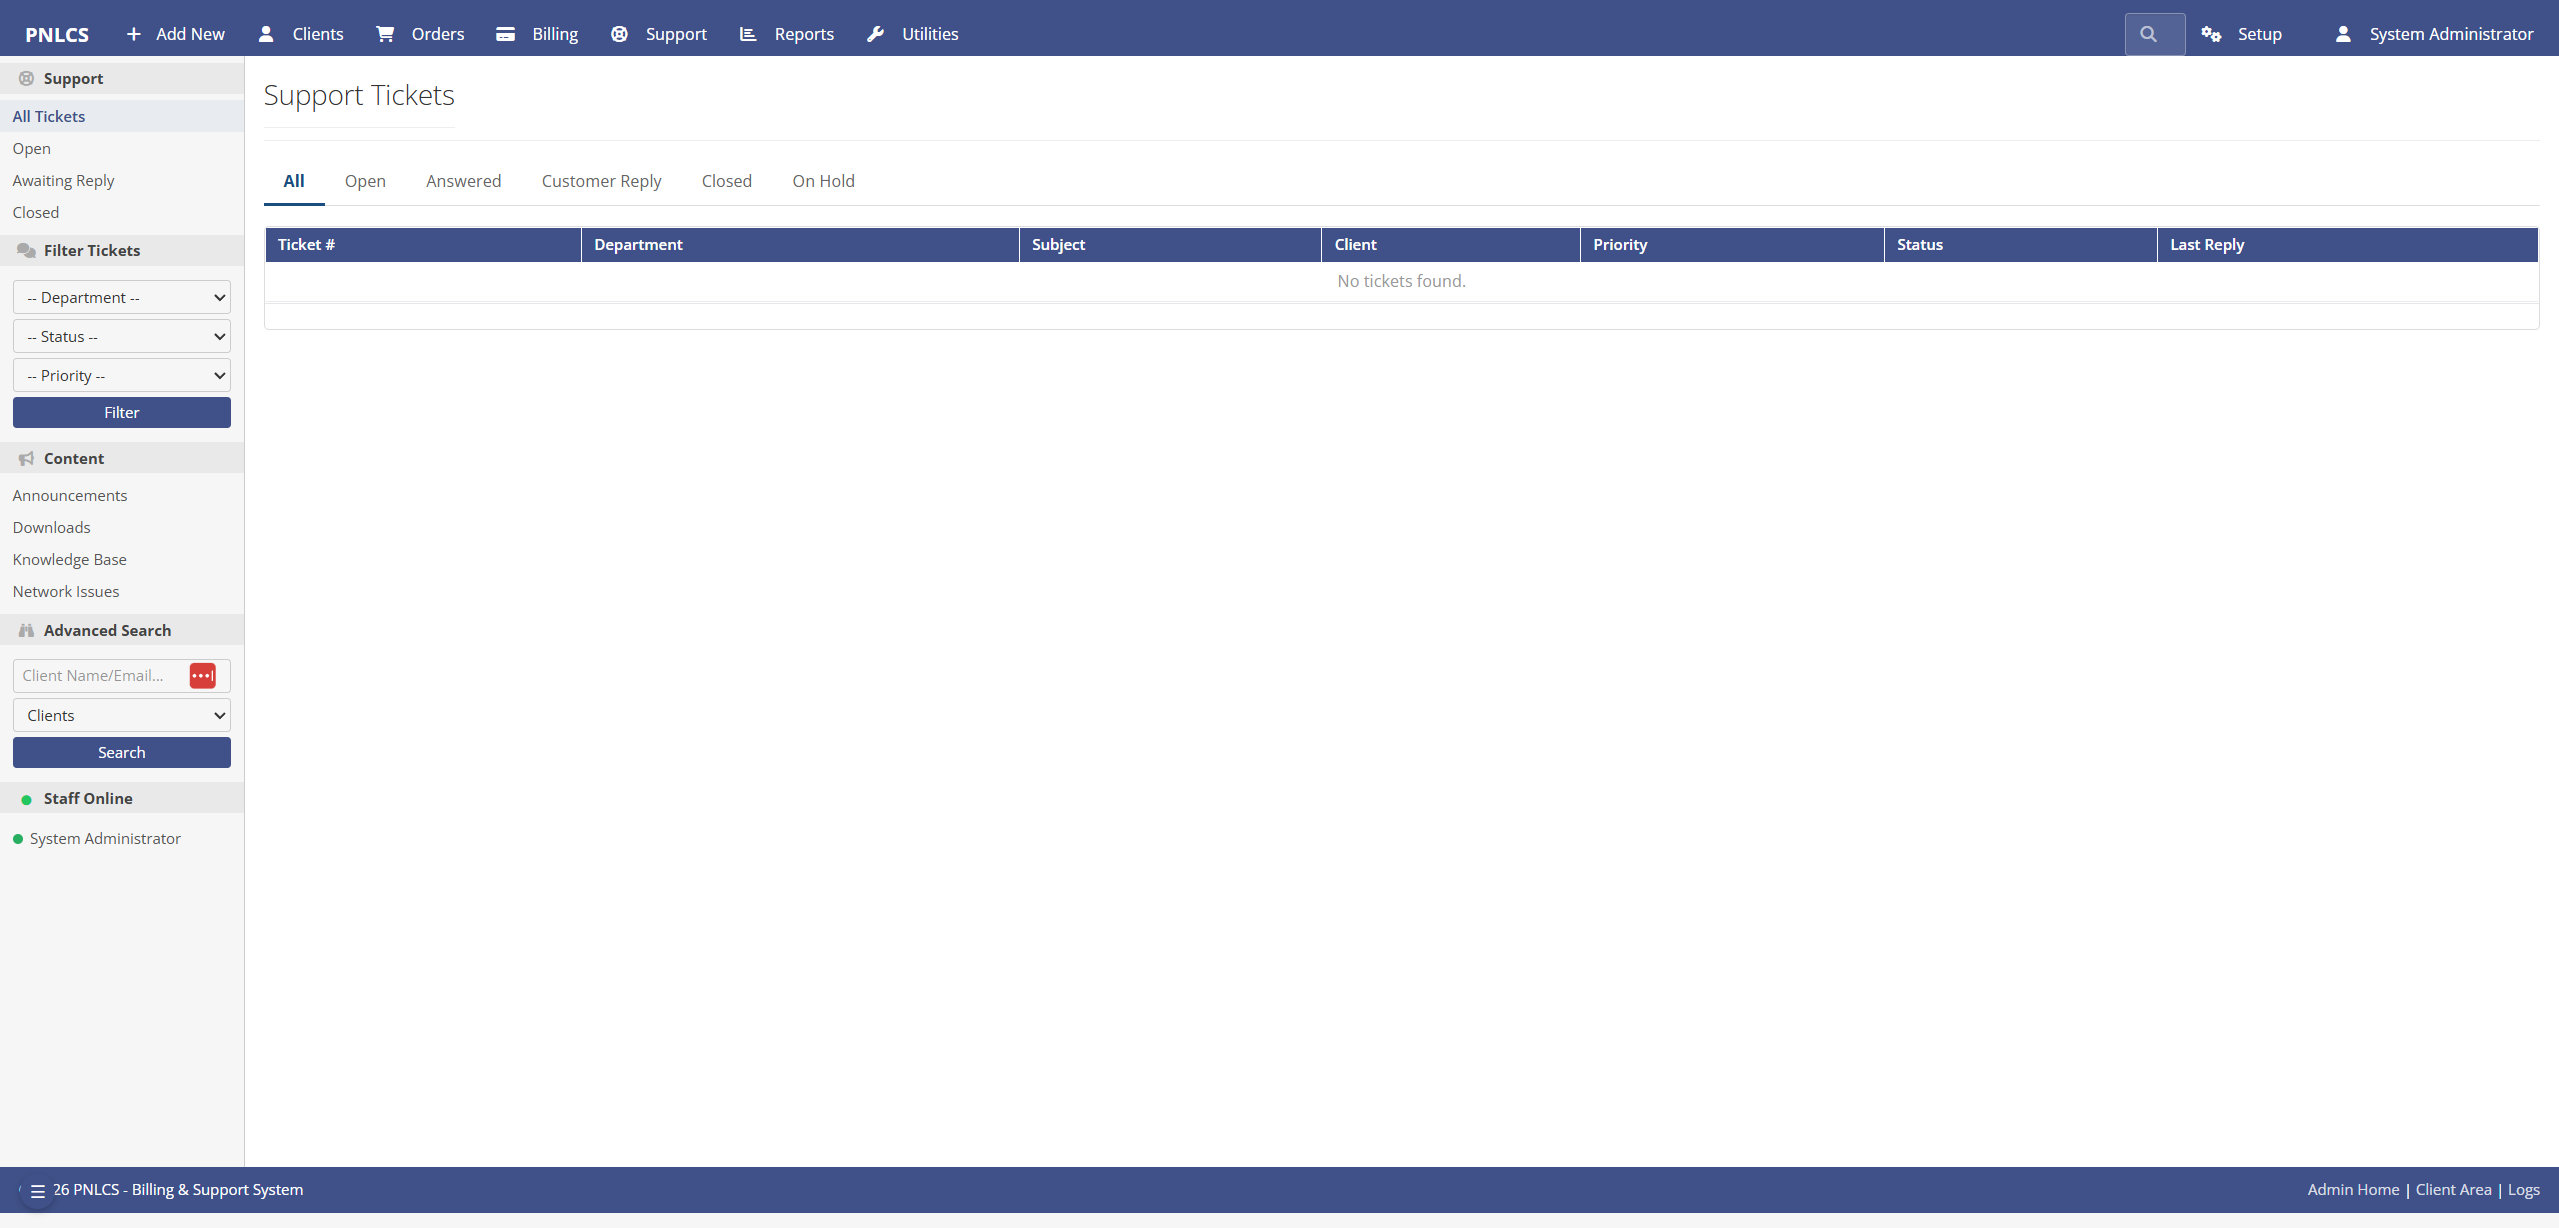 Ticket system with departments, priority routing, internal notes, and escalation rules
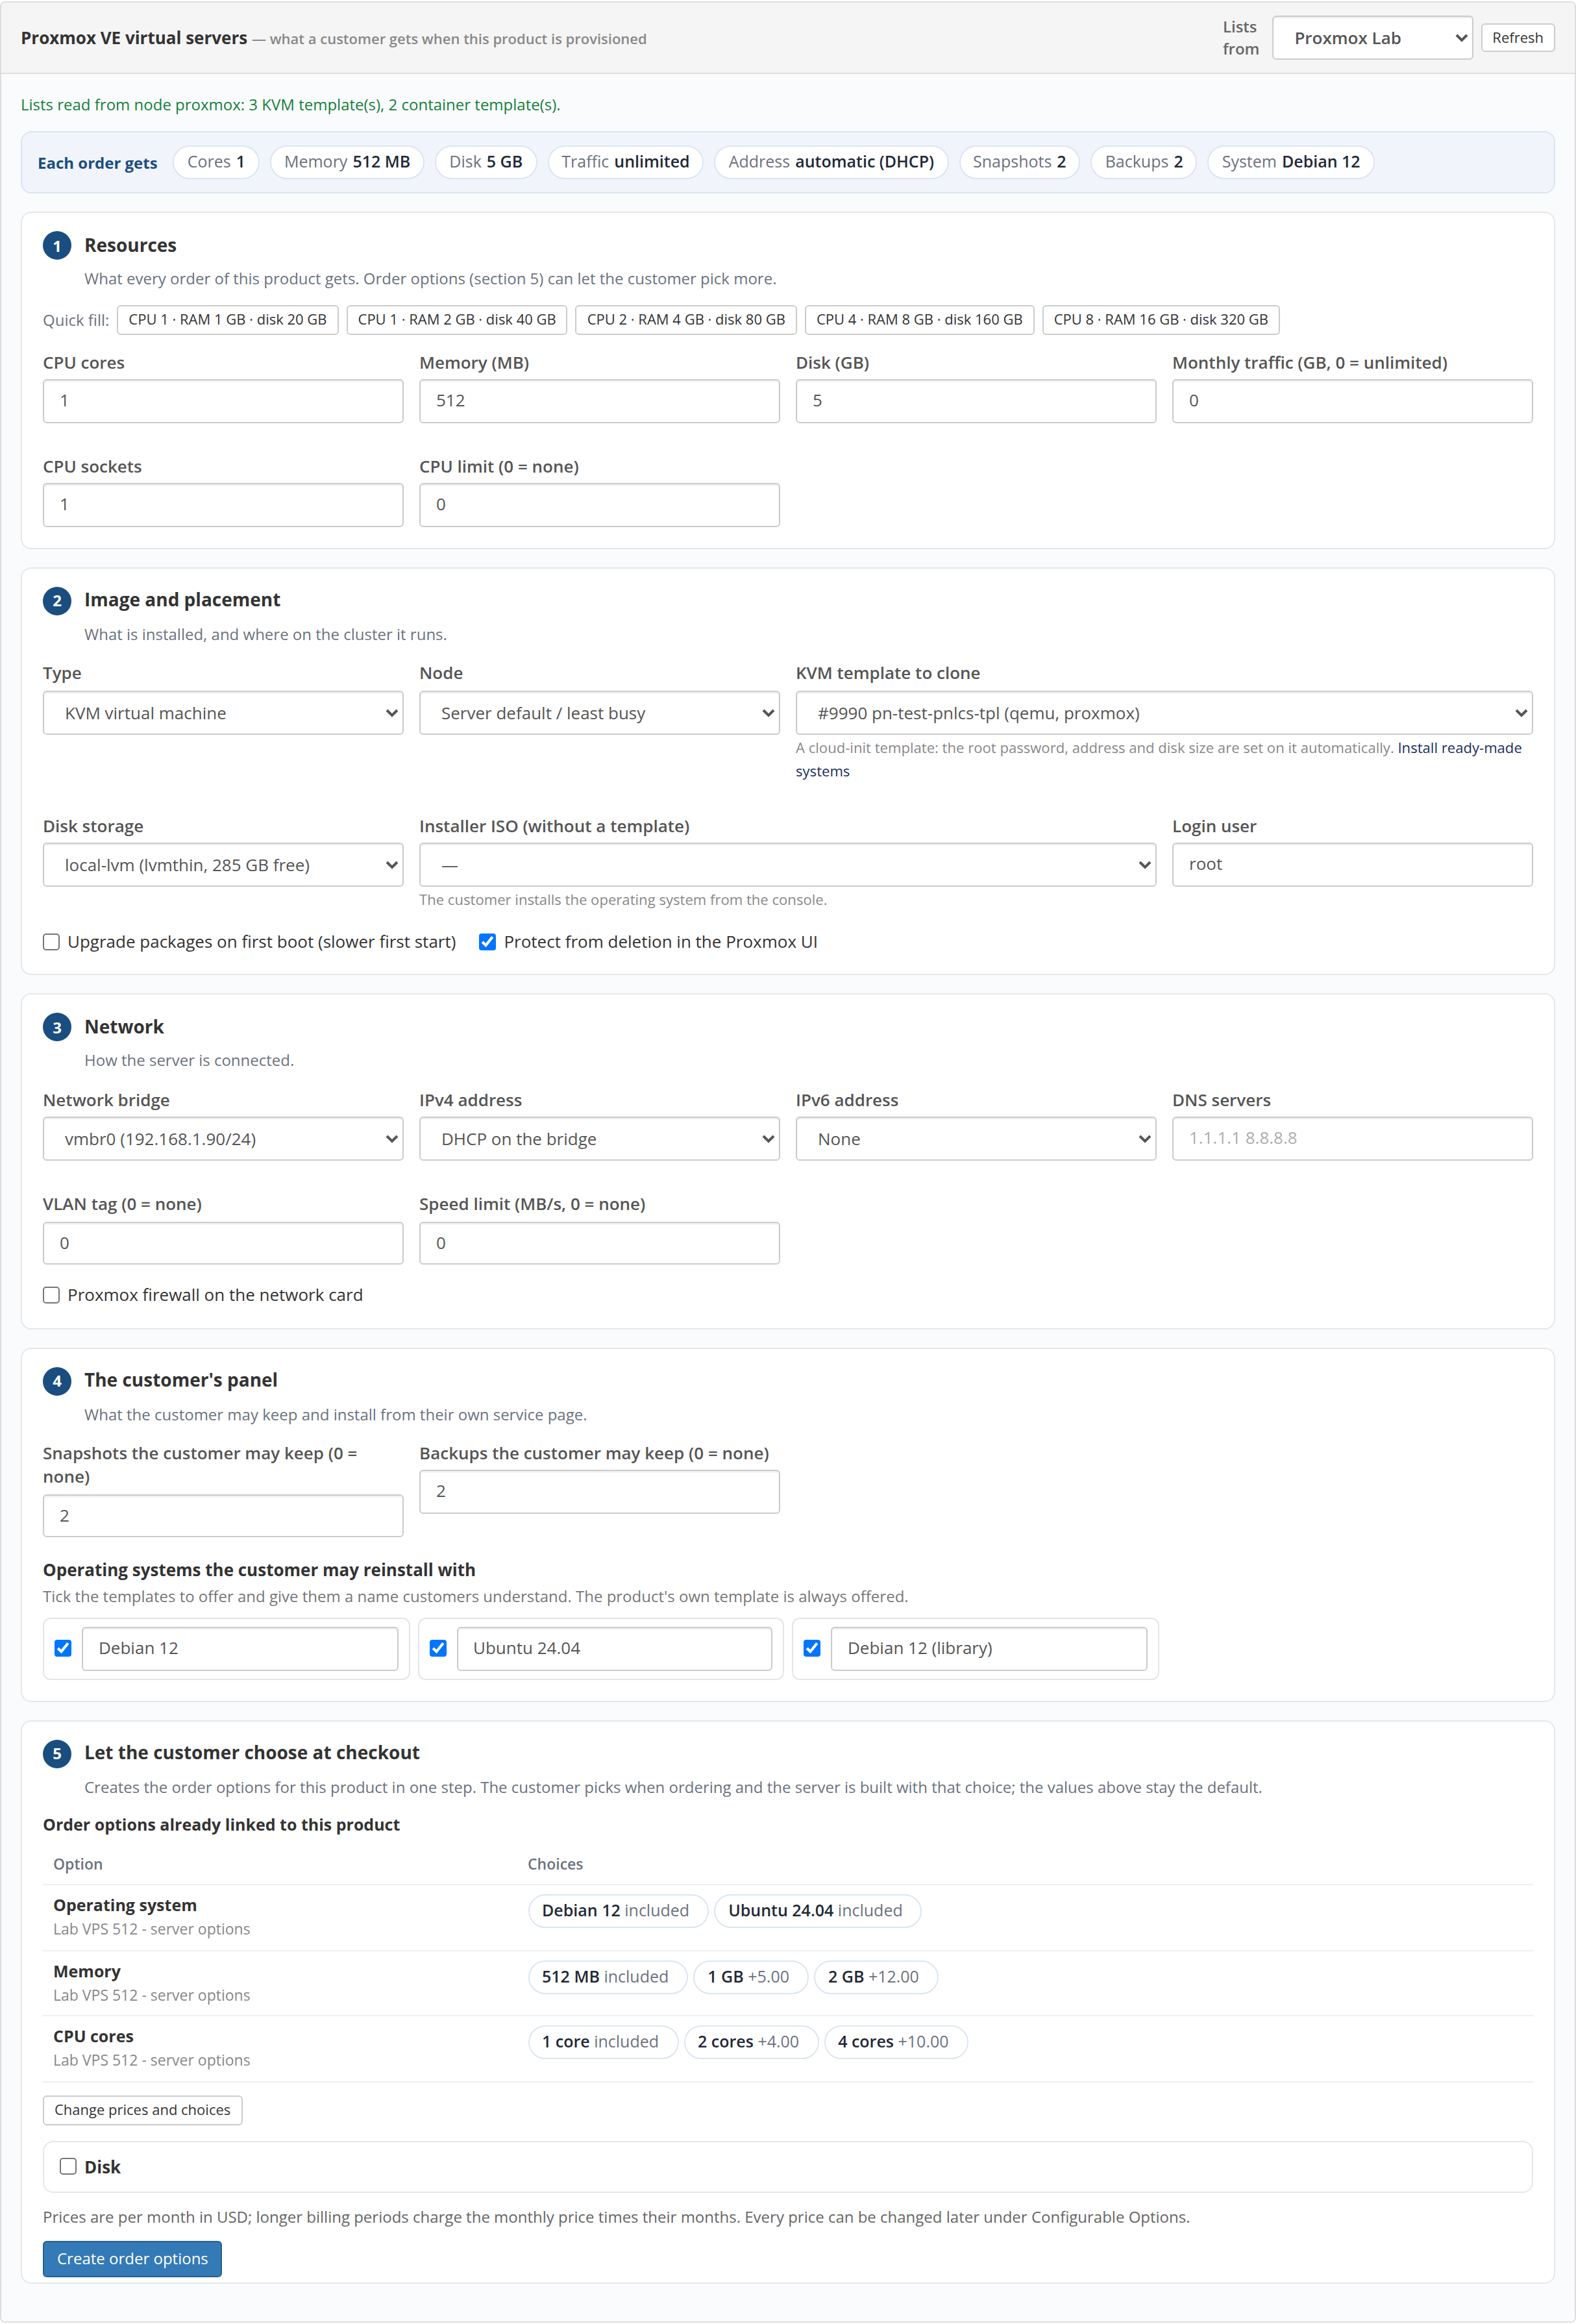 A Proxmox VPS product: resources with quick-fill sizes, template and placement
read live from the cluster, network, what the customer may keep, and order
options built in one step. Full detail below
Client-Facing Site
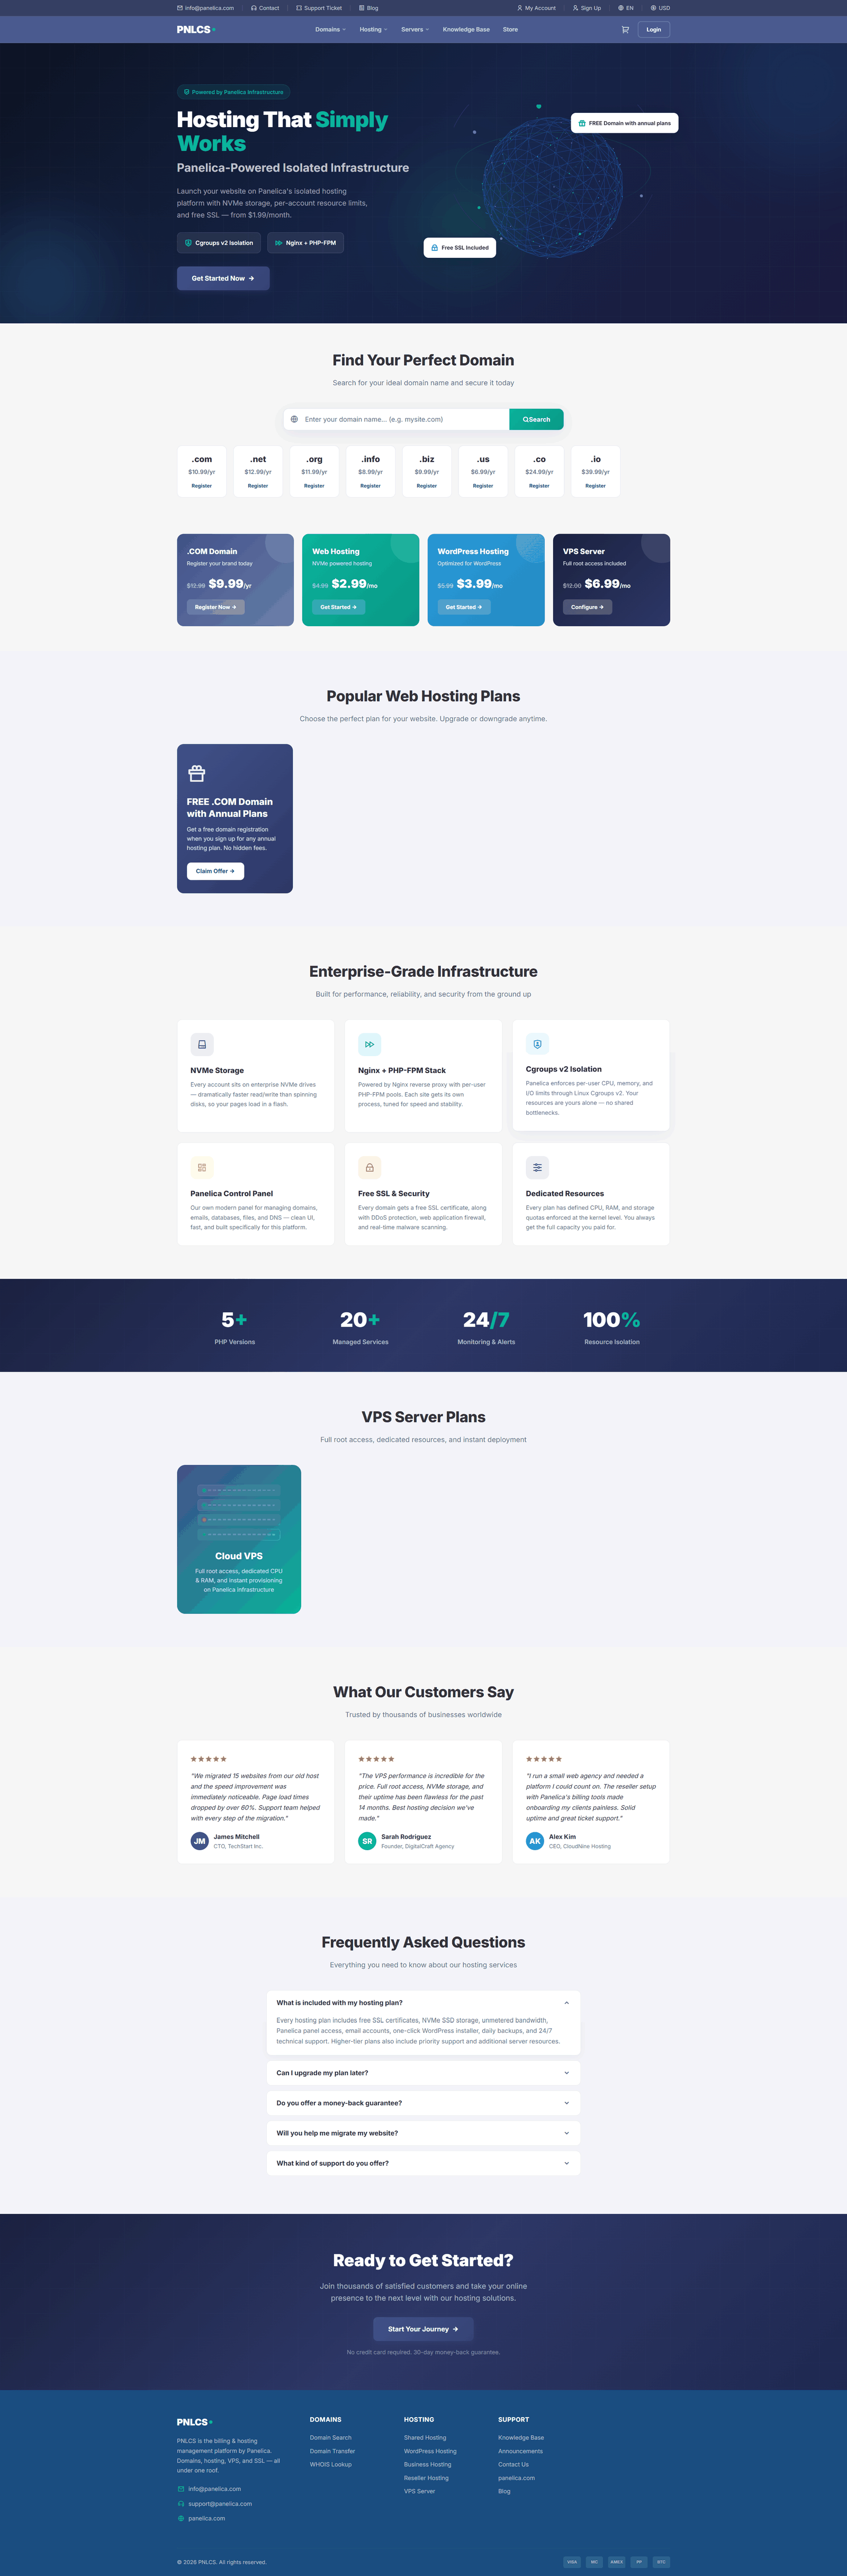 Customer-facing landing page with domain search, hosting plans, VPS servers, and FAQ — fully configurable
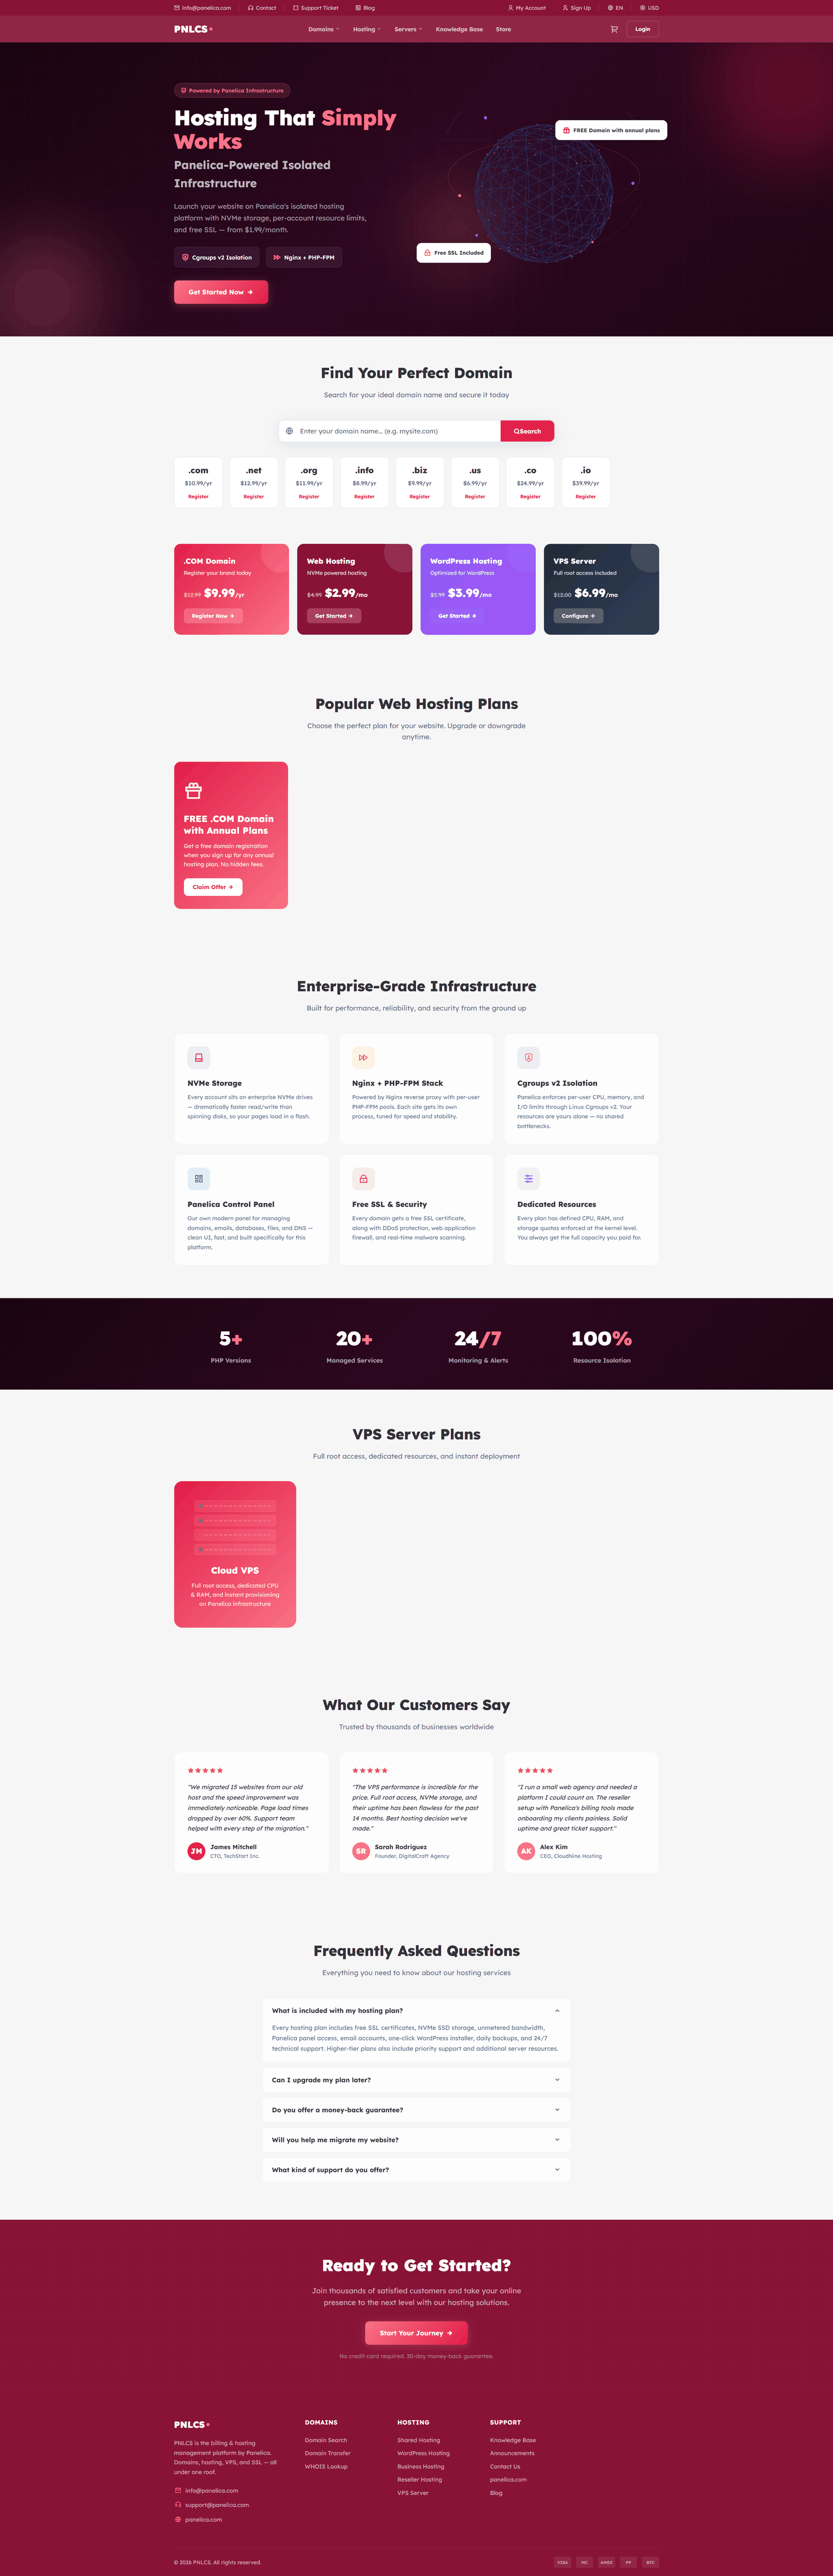 Same site with a different built-in theme applied — one click to switch
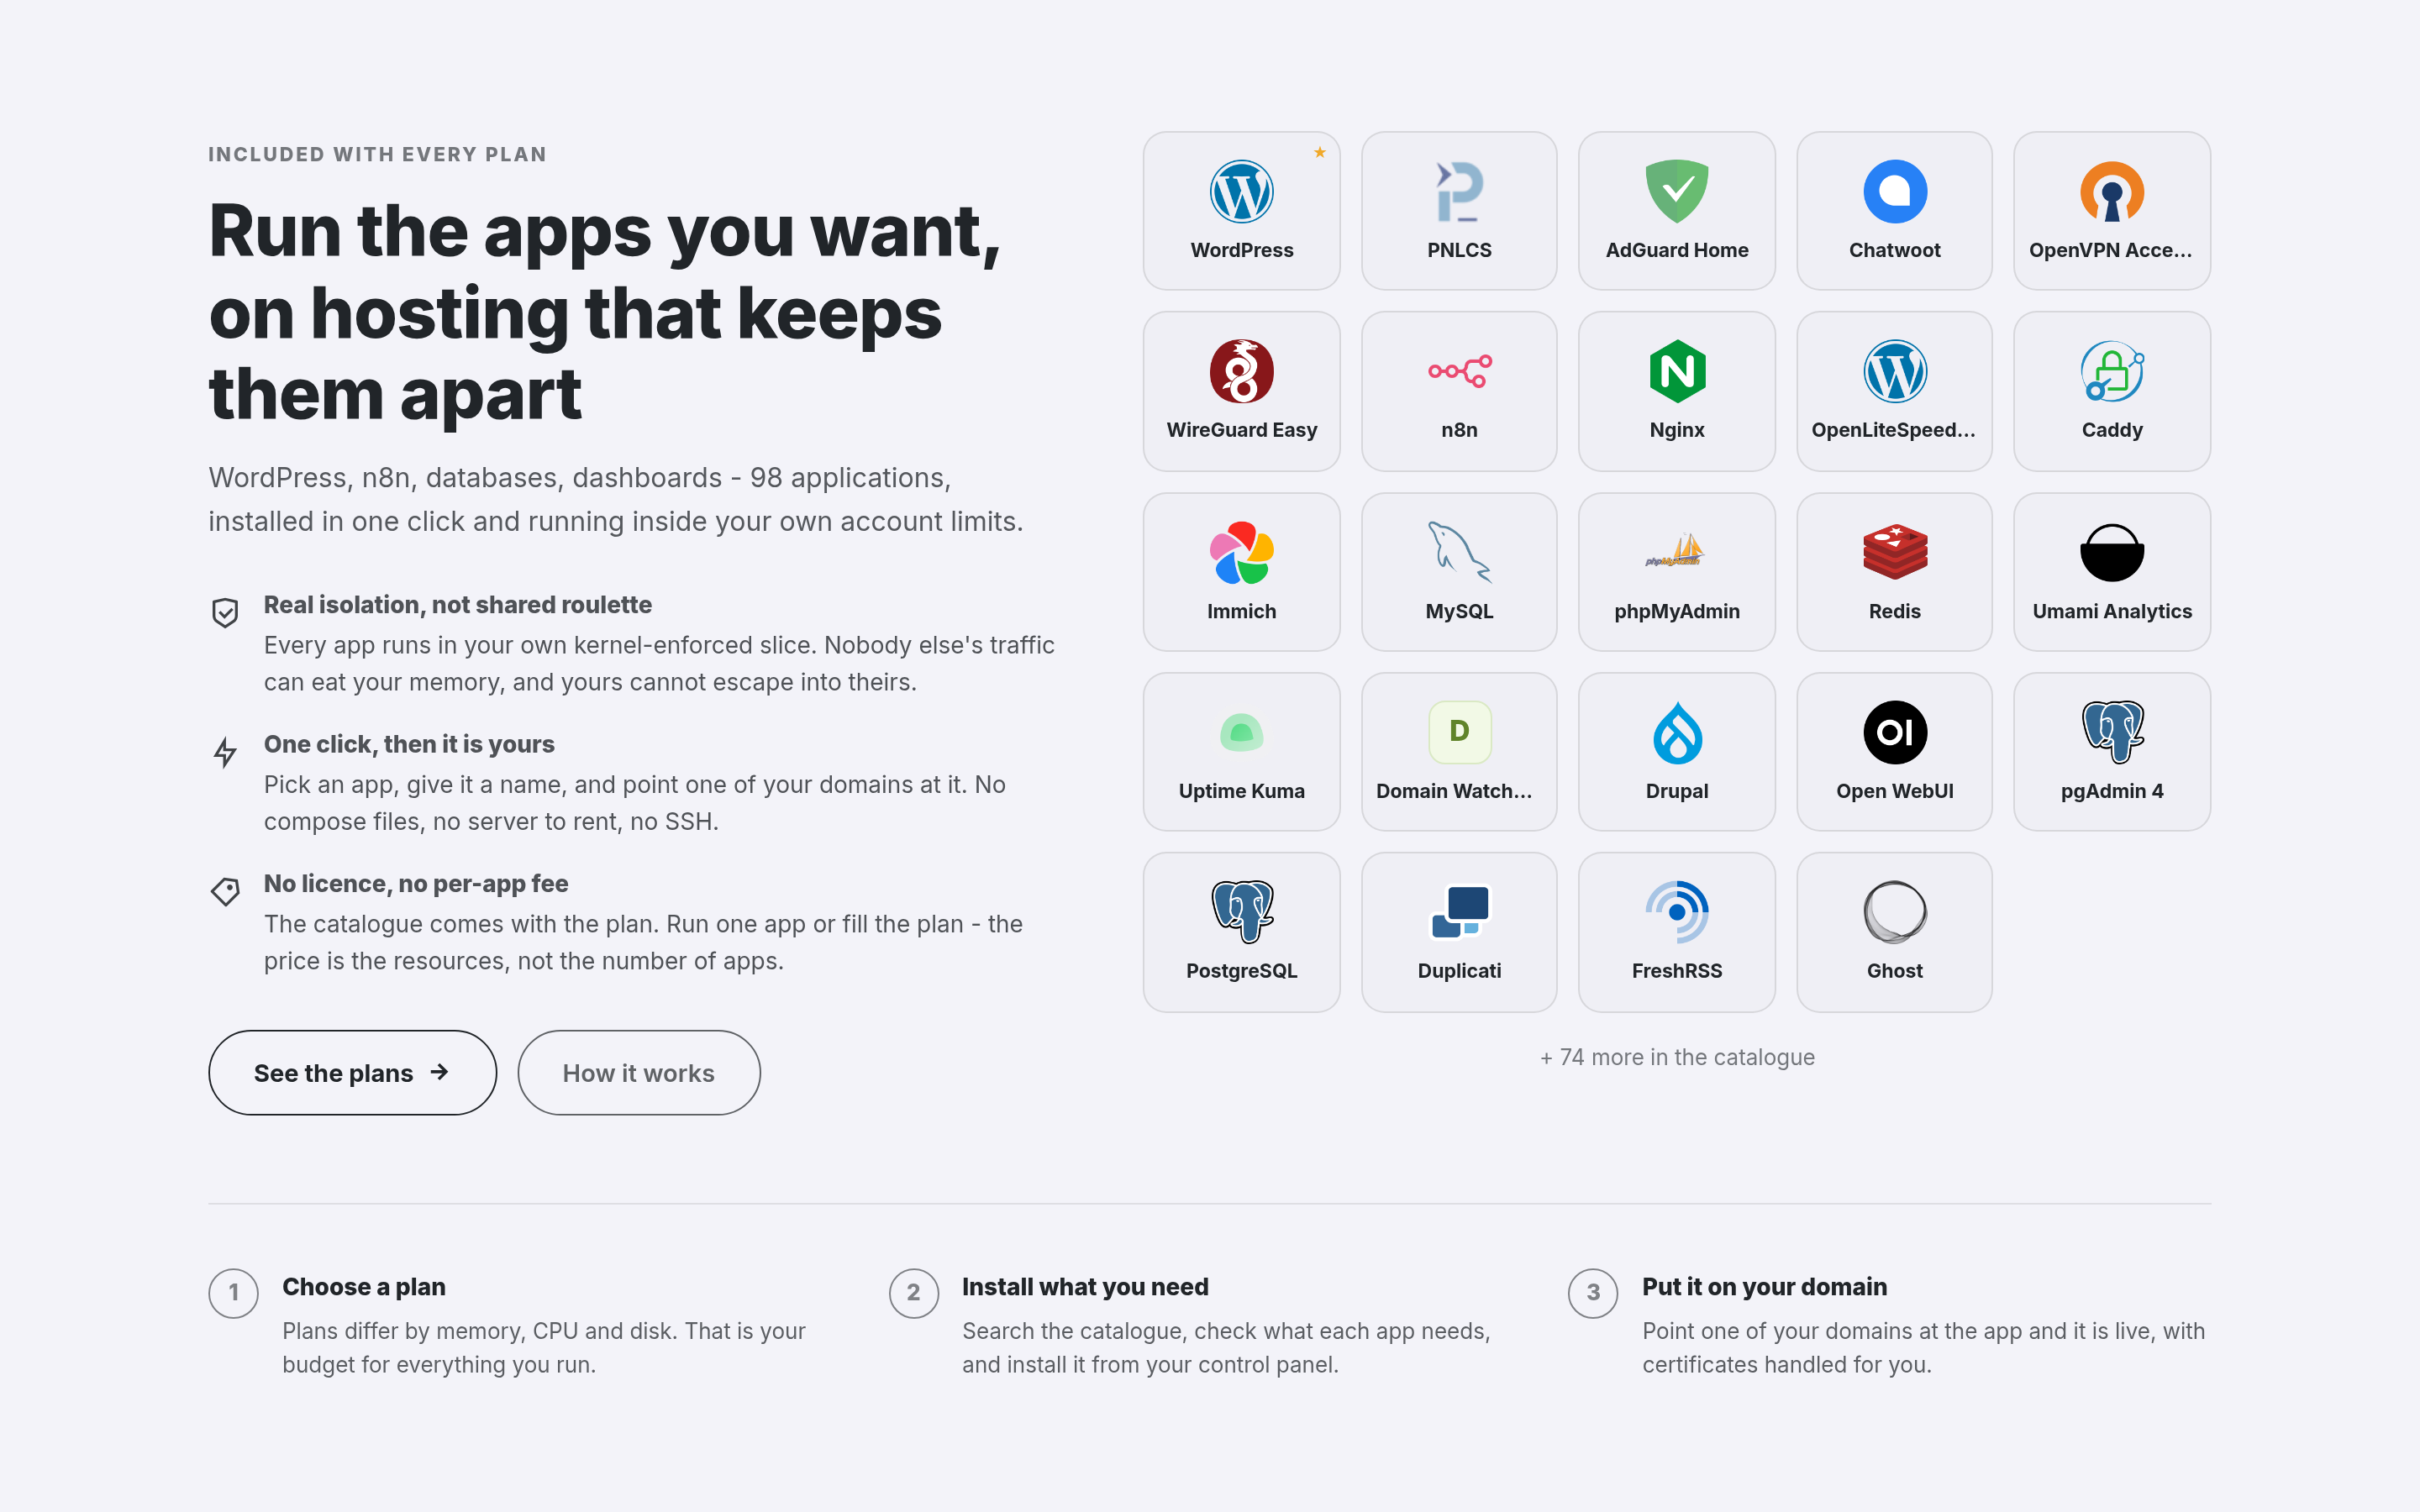 The app showcase: 98 applications a customer can install into their hosting,
95 of them with a logo shipped in the repository. Heading, copy, button and how many
apps to show are all editable from the admin Homepage screen
Client Portal — Virtual Servers
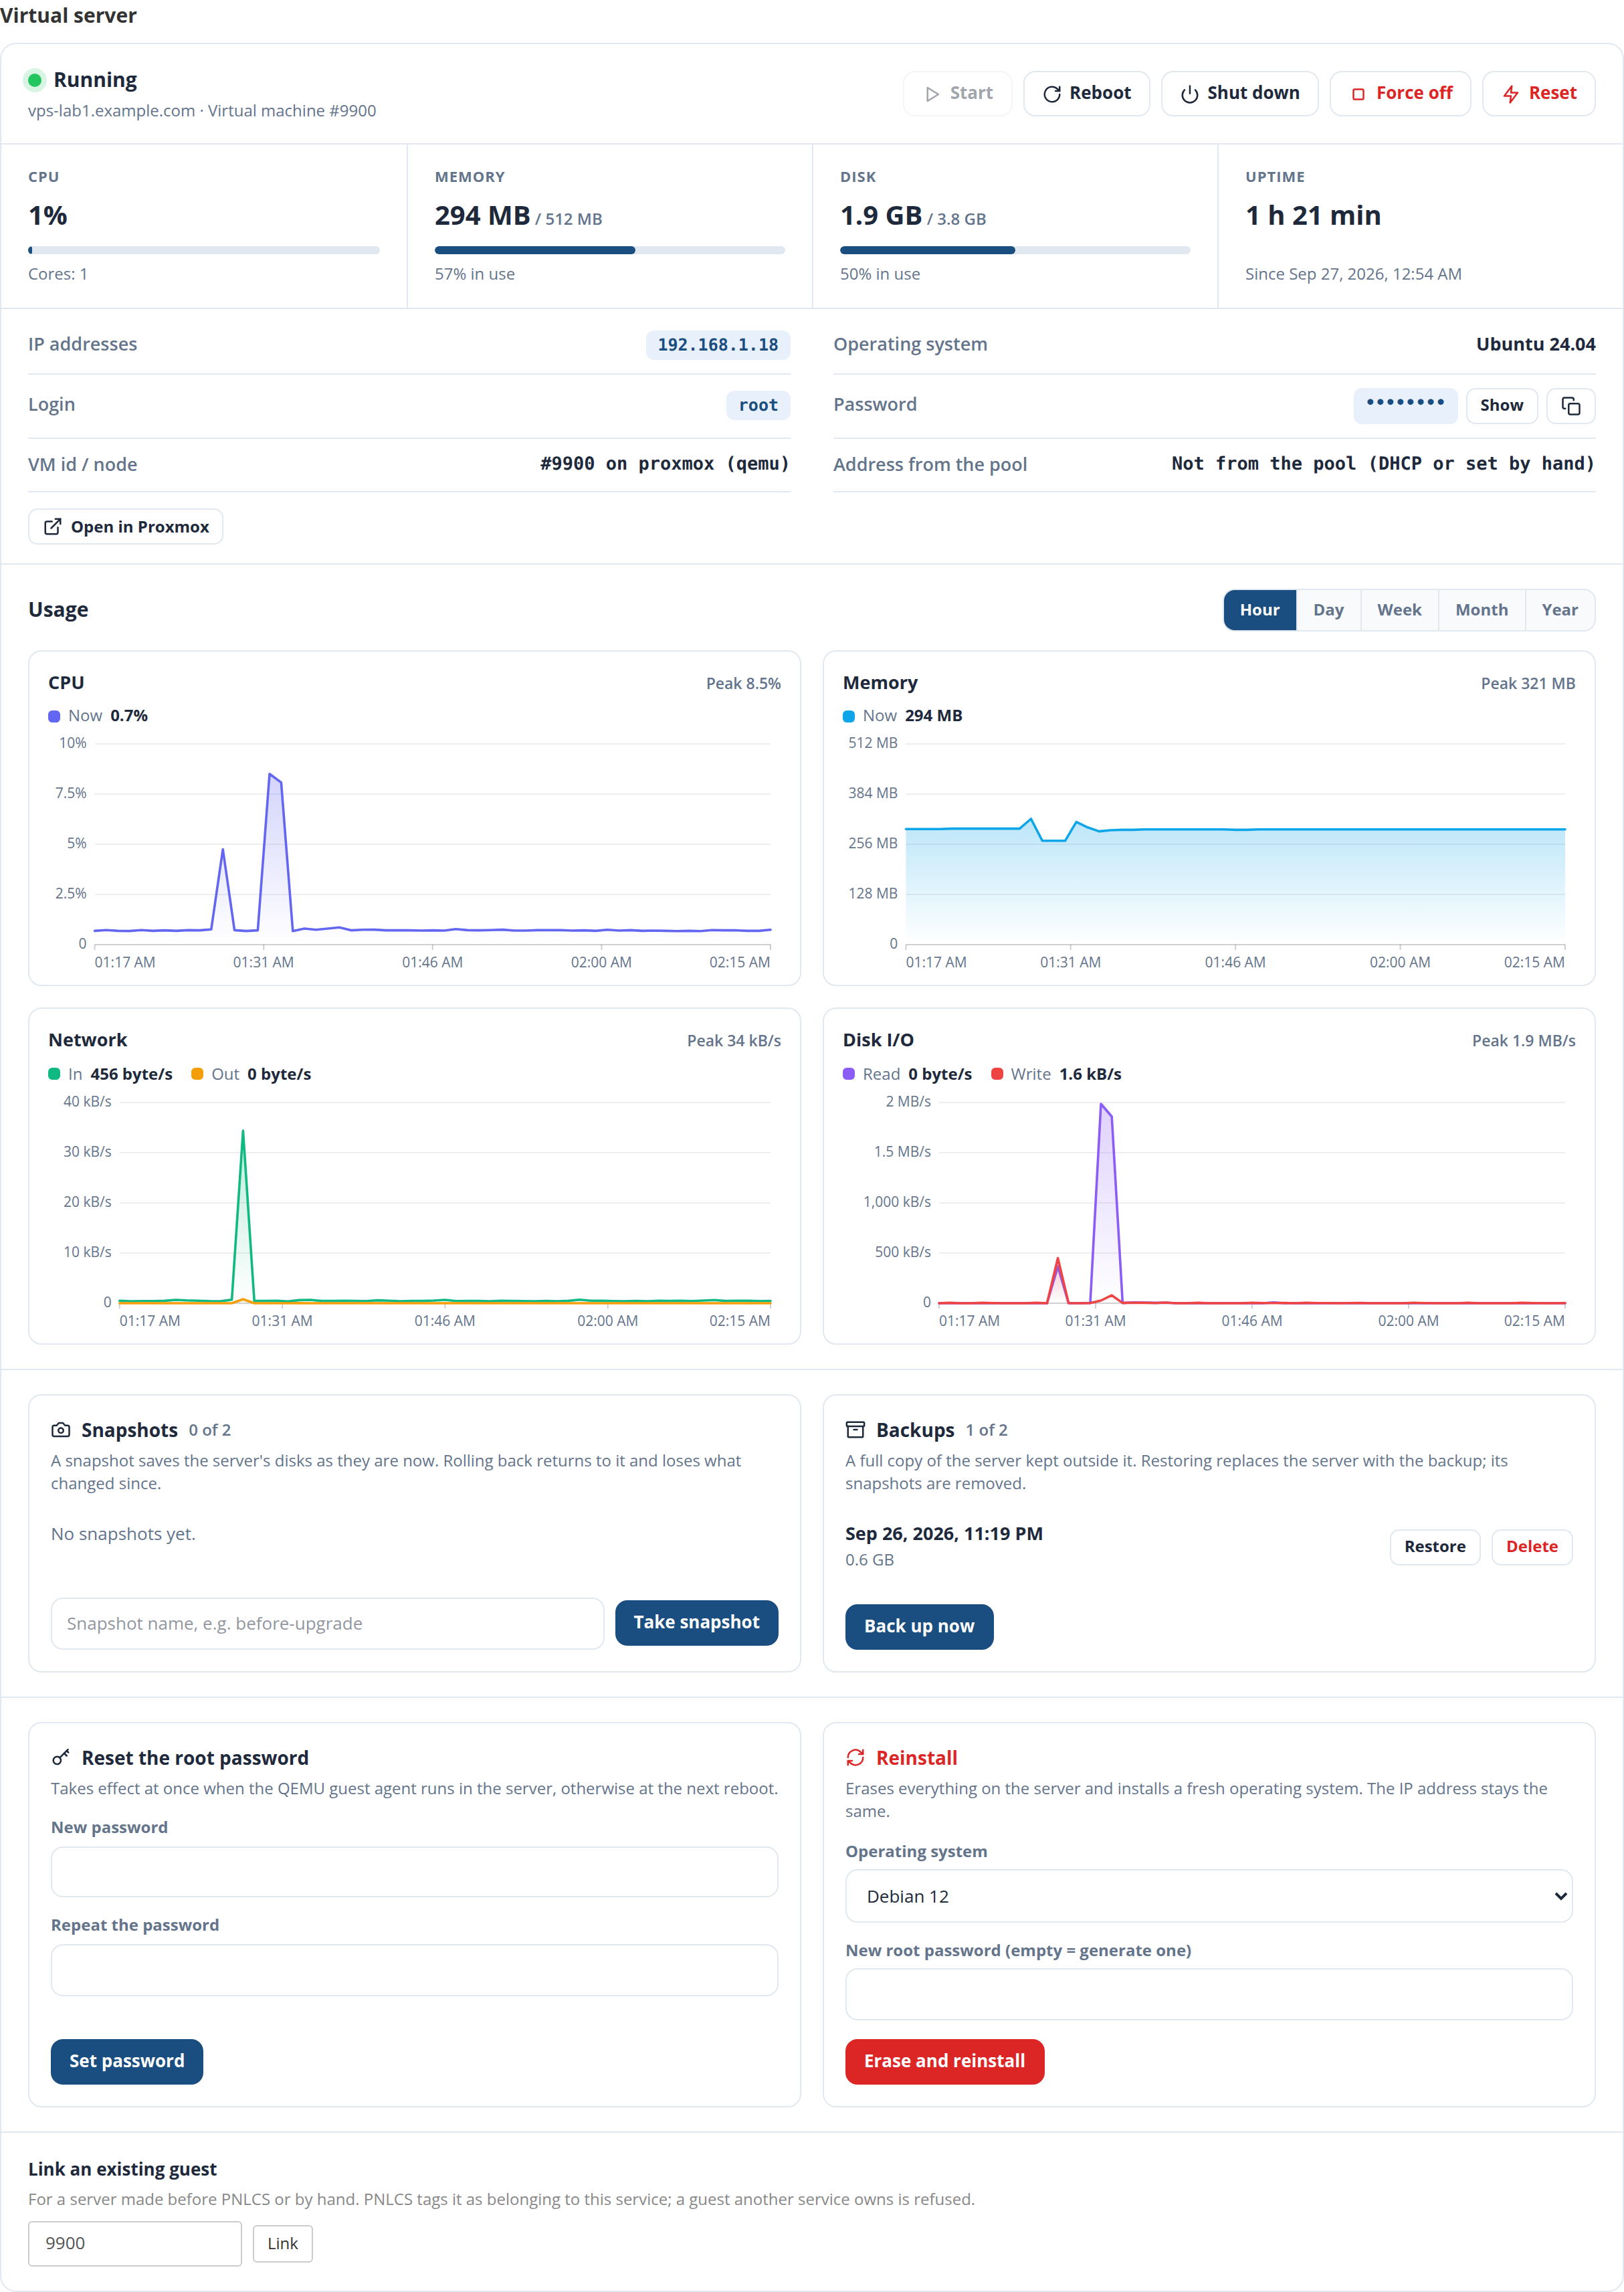
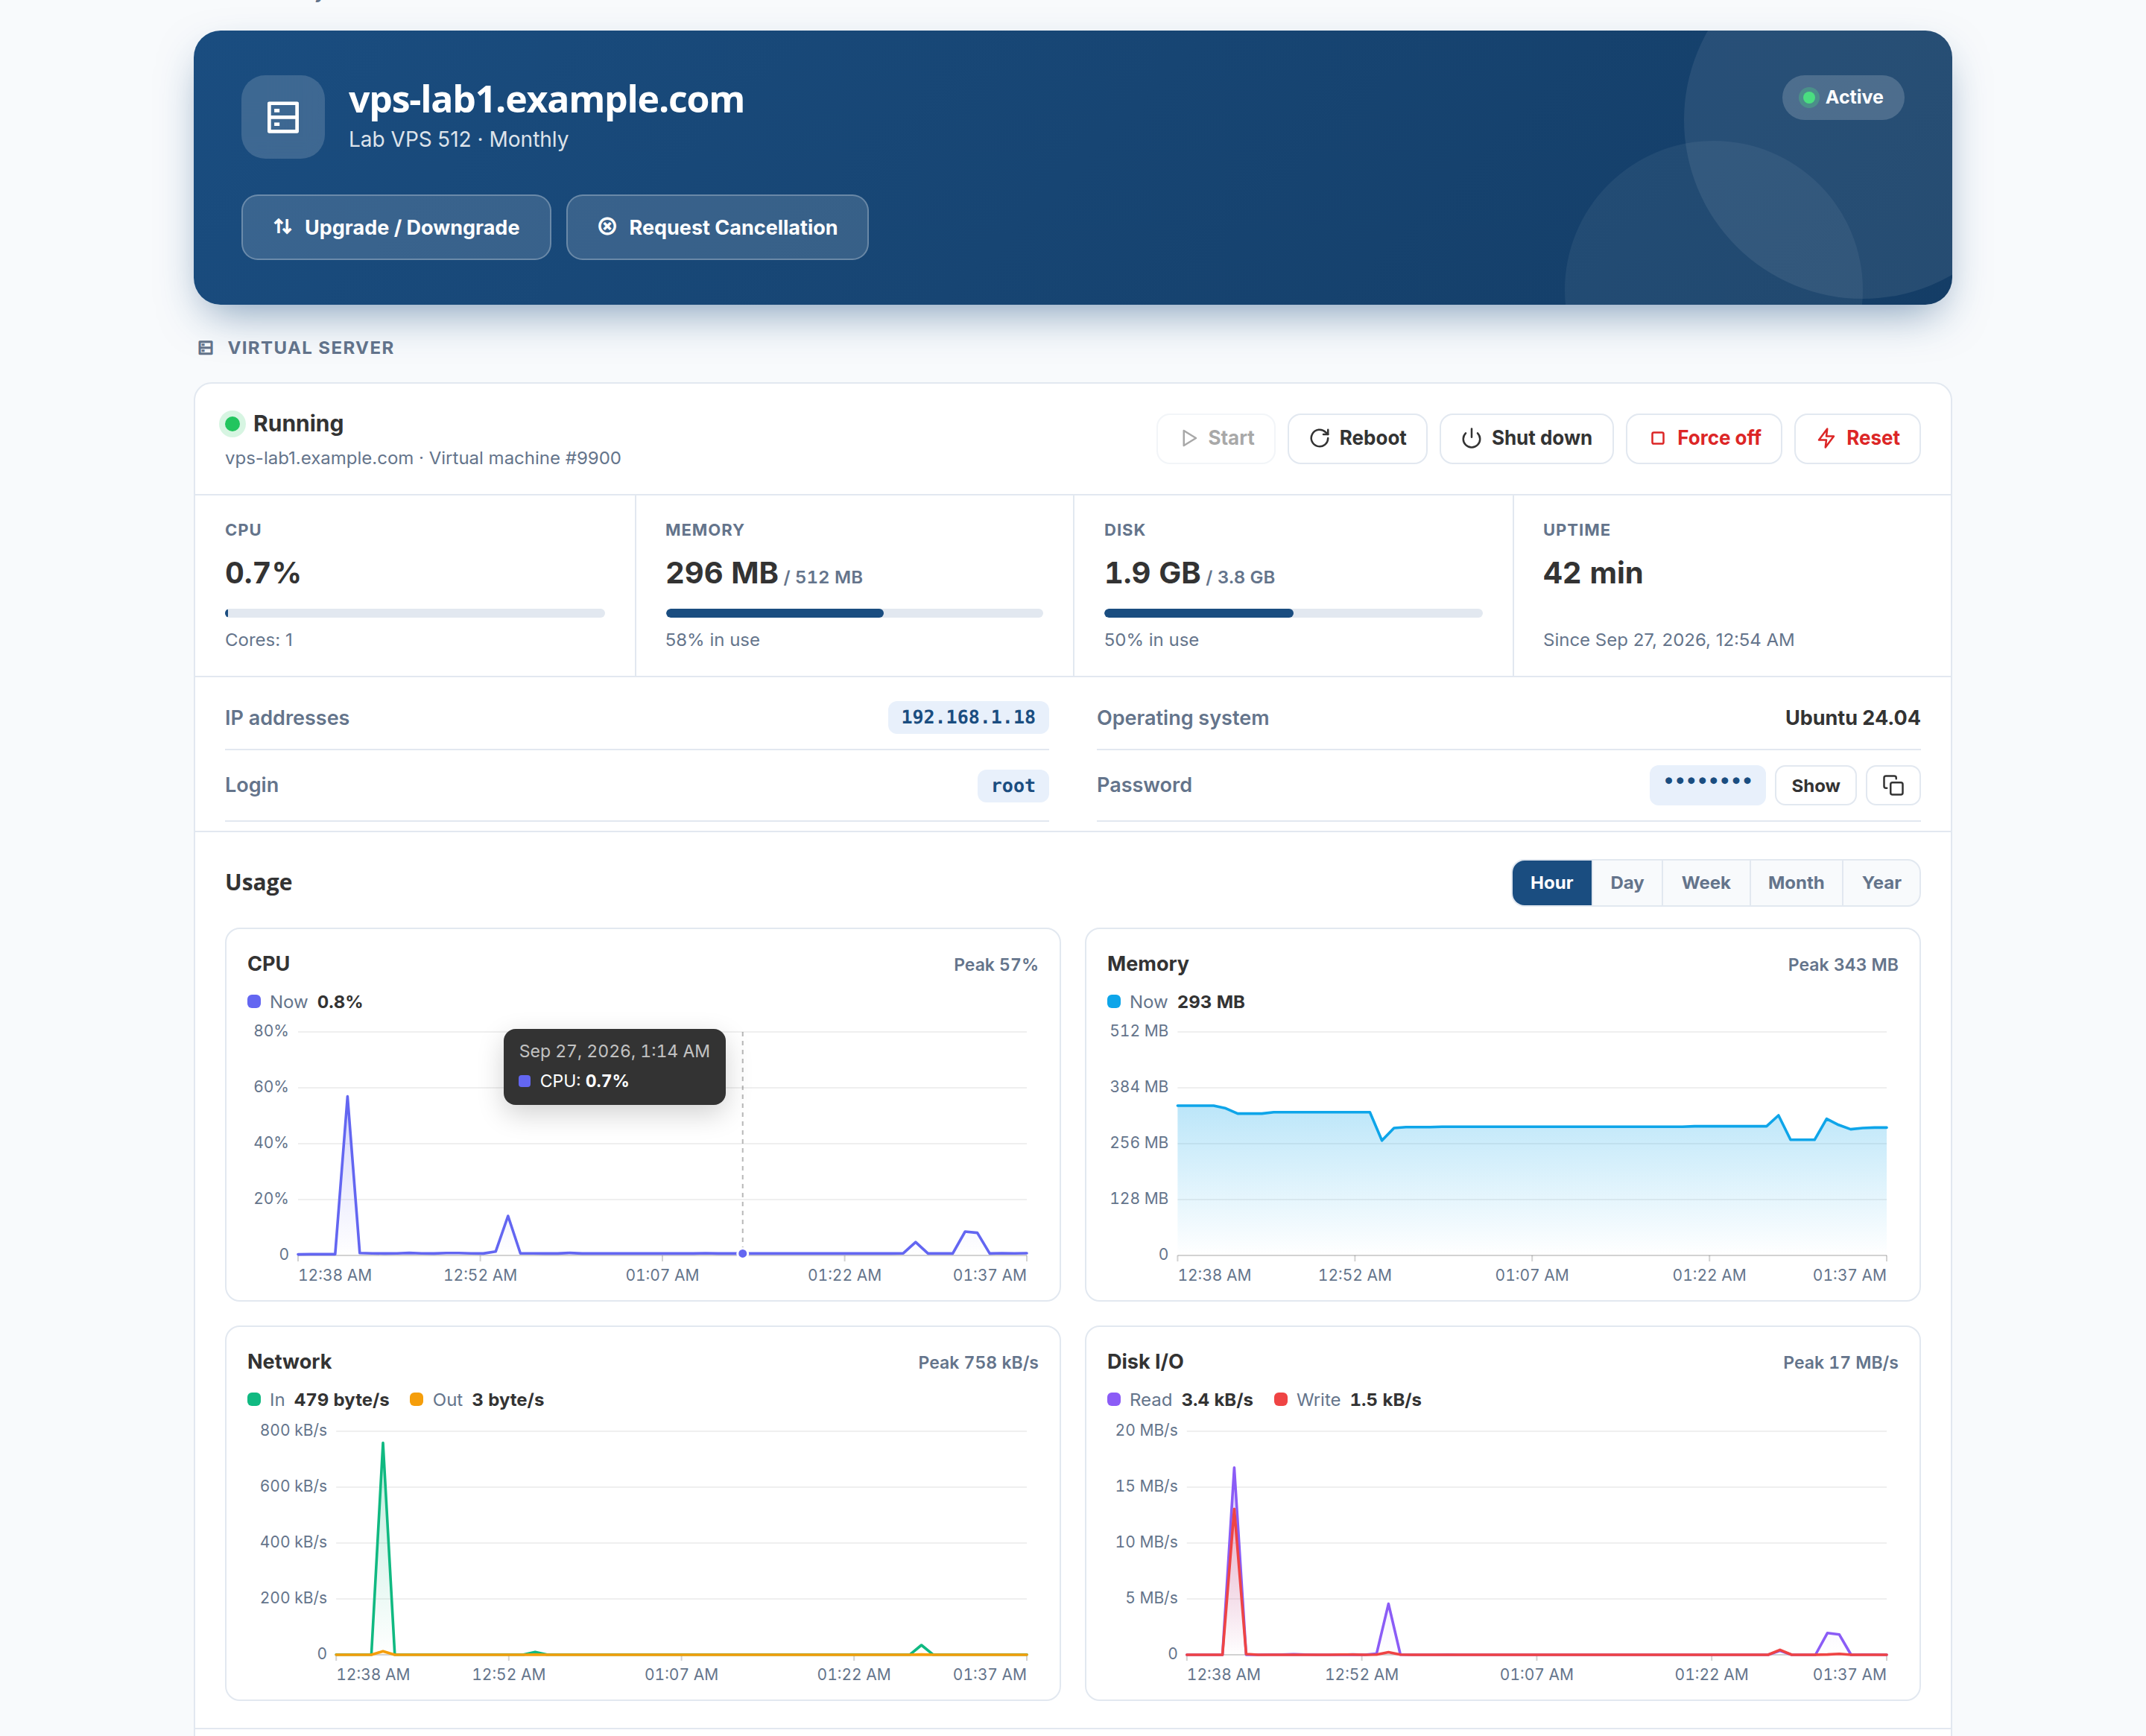 A customer's VPS on Proxmox VE: power buttons including reset, live CPU,
memory, disk fill and uptime, addresses, and usage graphs with axes, times and
values on hover. The admin's service page shows the same panel.
Full detail below
Client Portal — Hosting Management
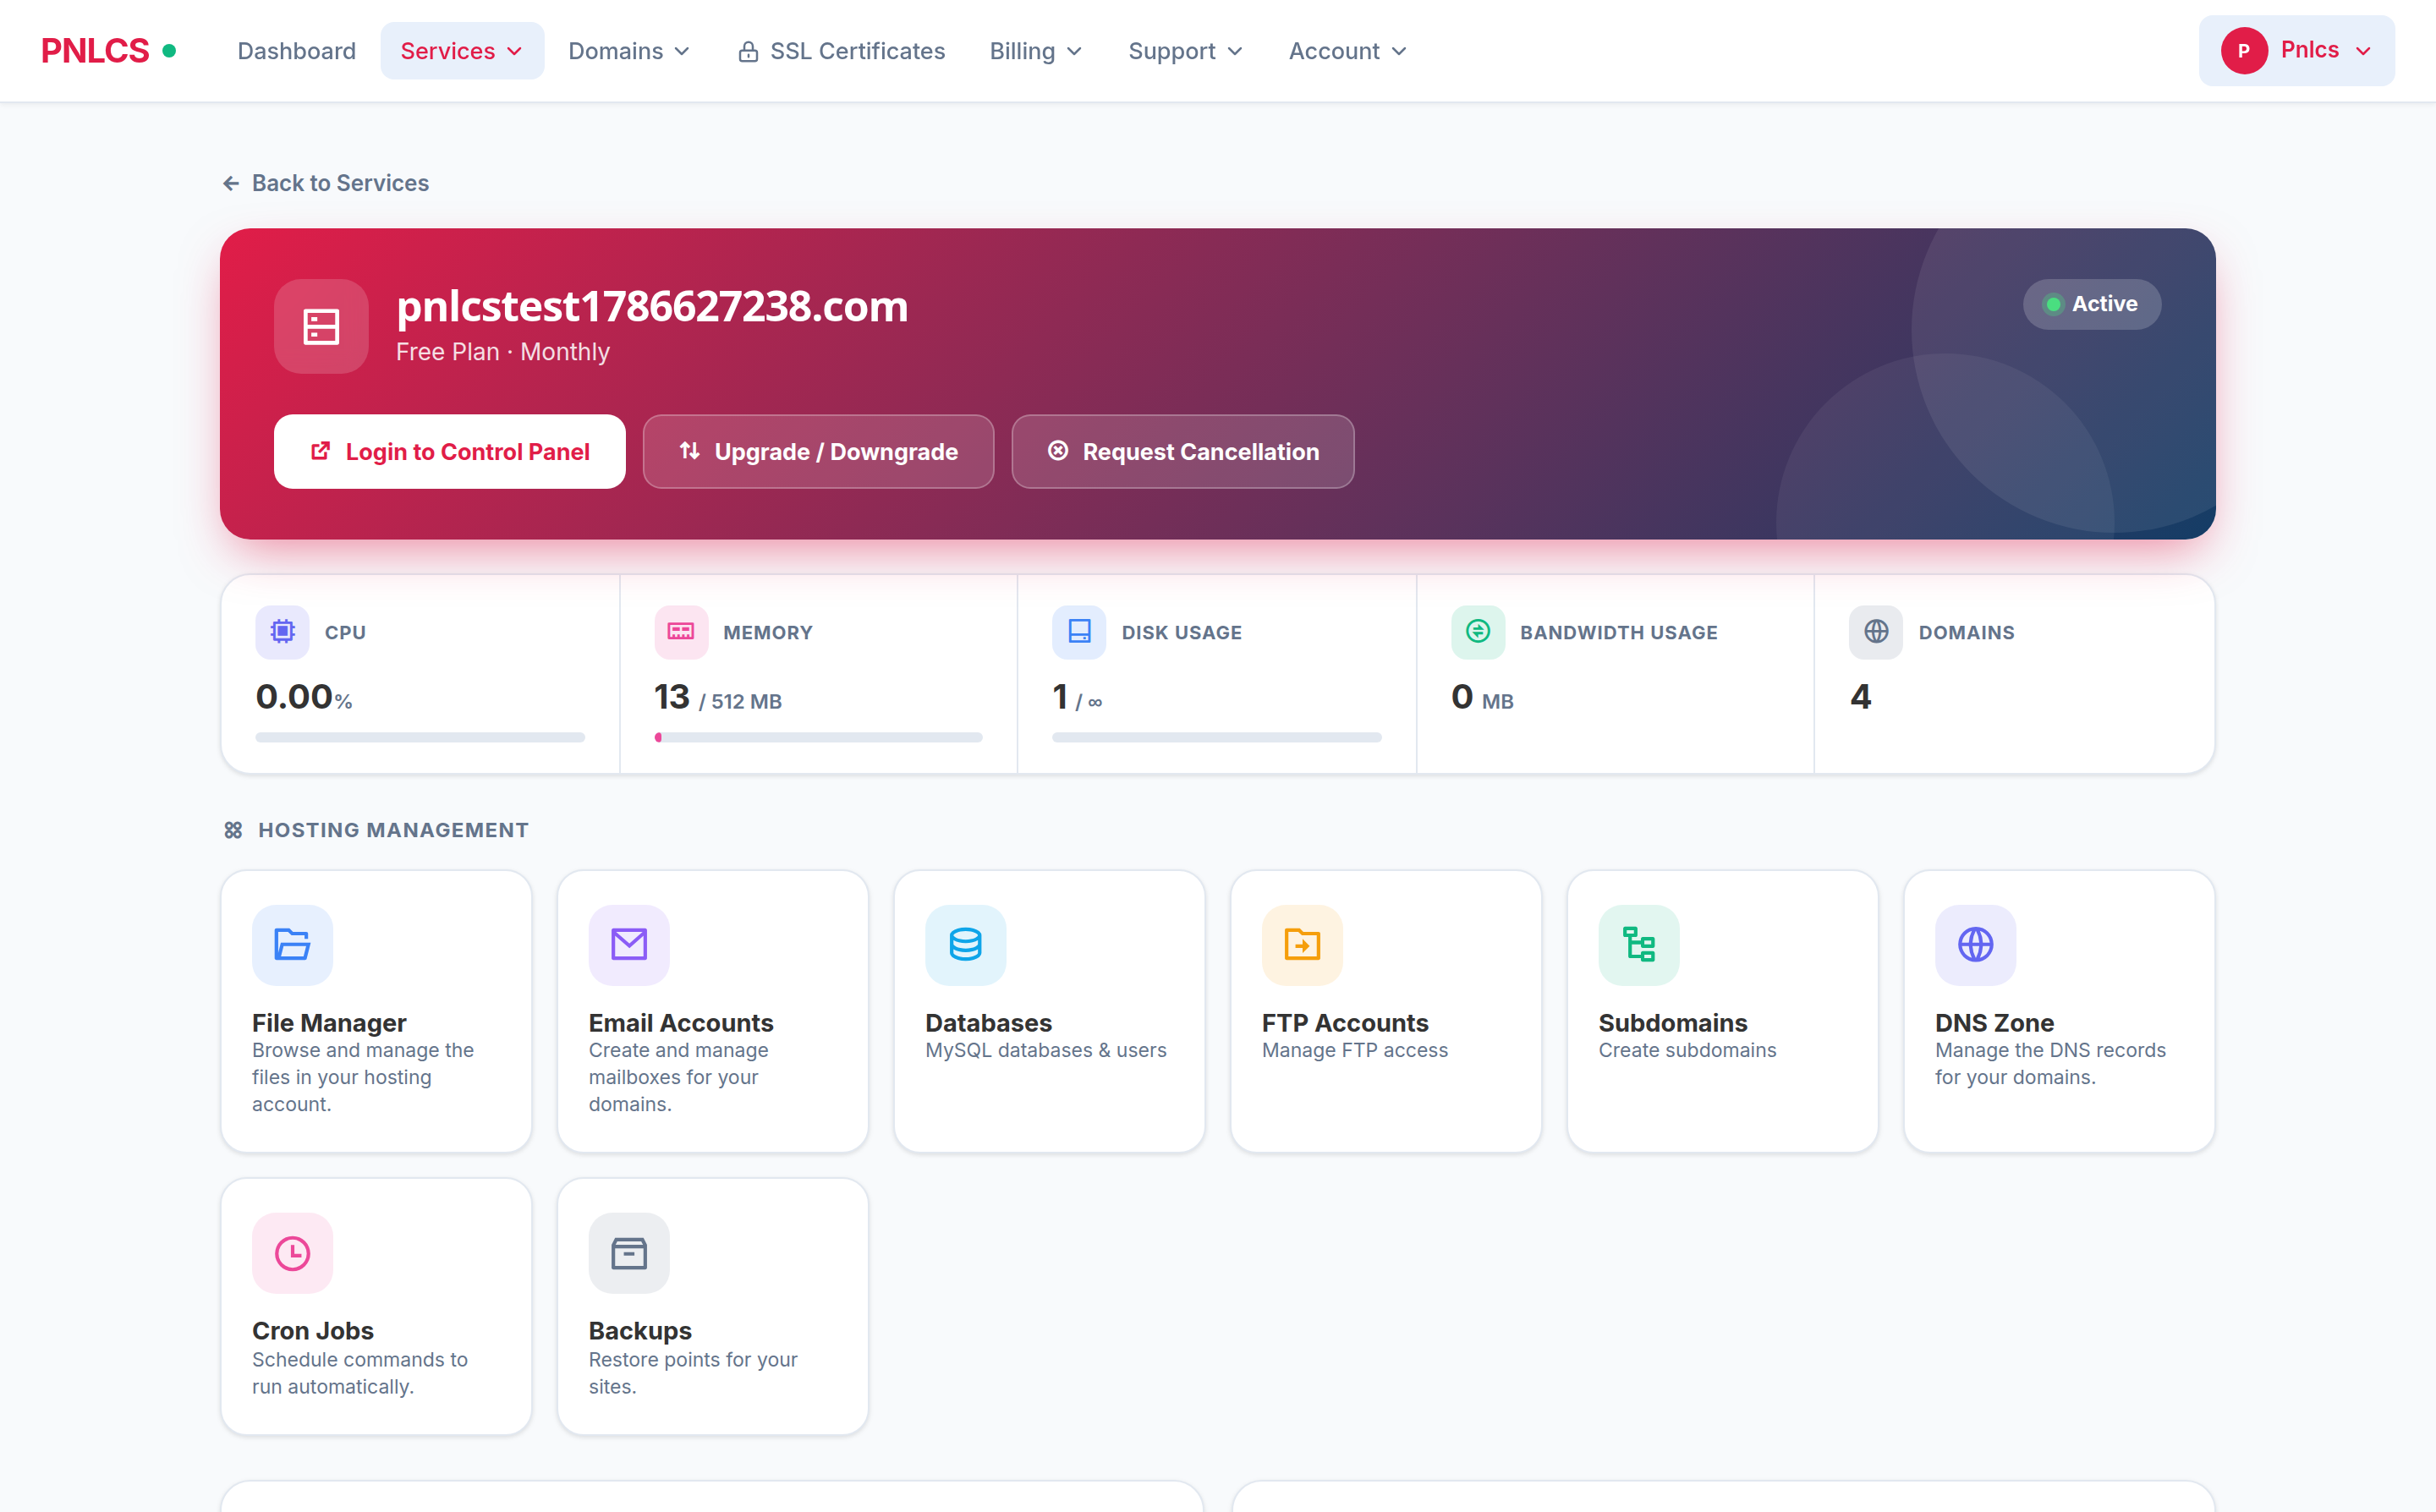 A customer's hosting service: live resource usage from the server and eight
working tools — files, mail, databases, FTP, subdomains, DNS, cron, backups.
Full detail below
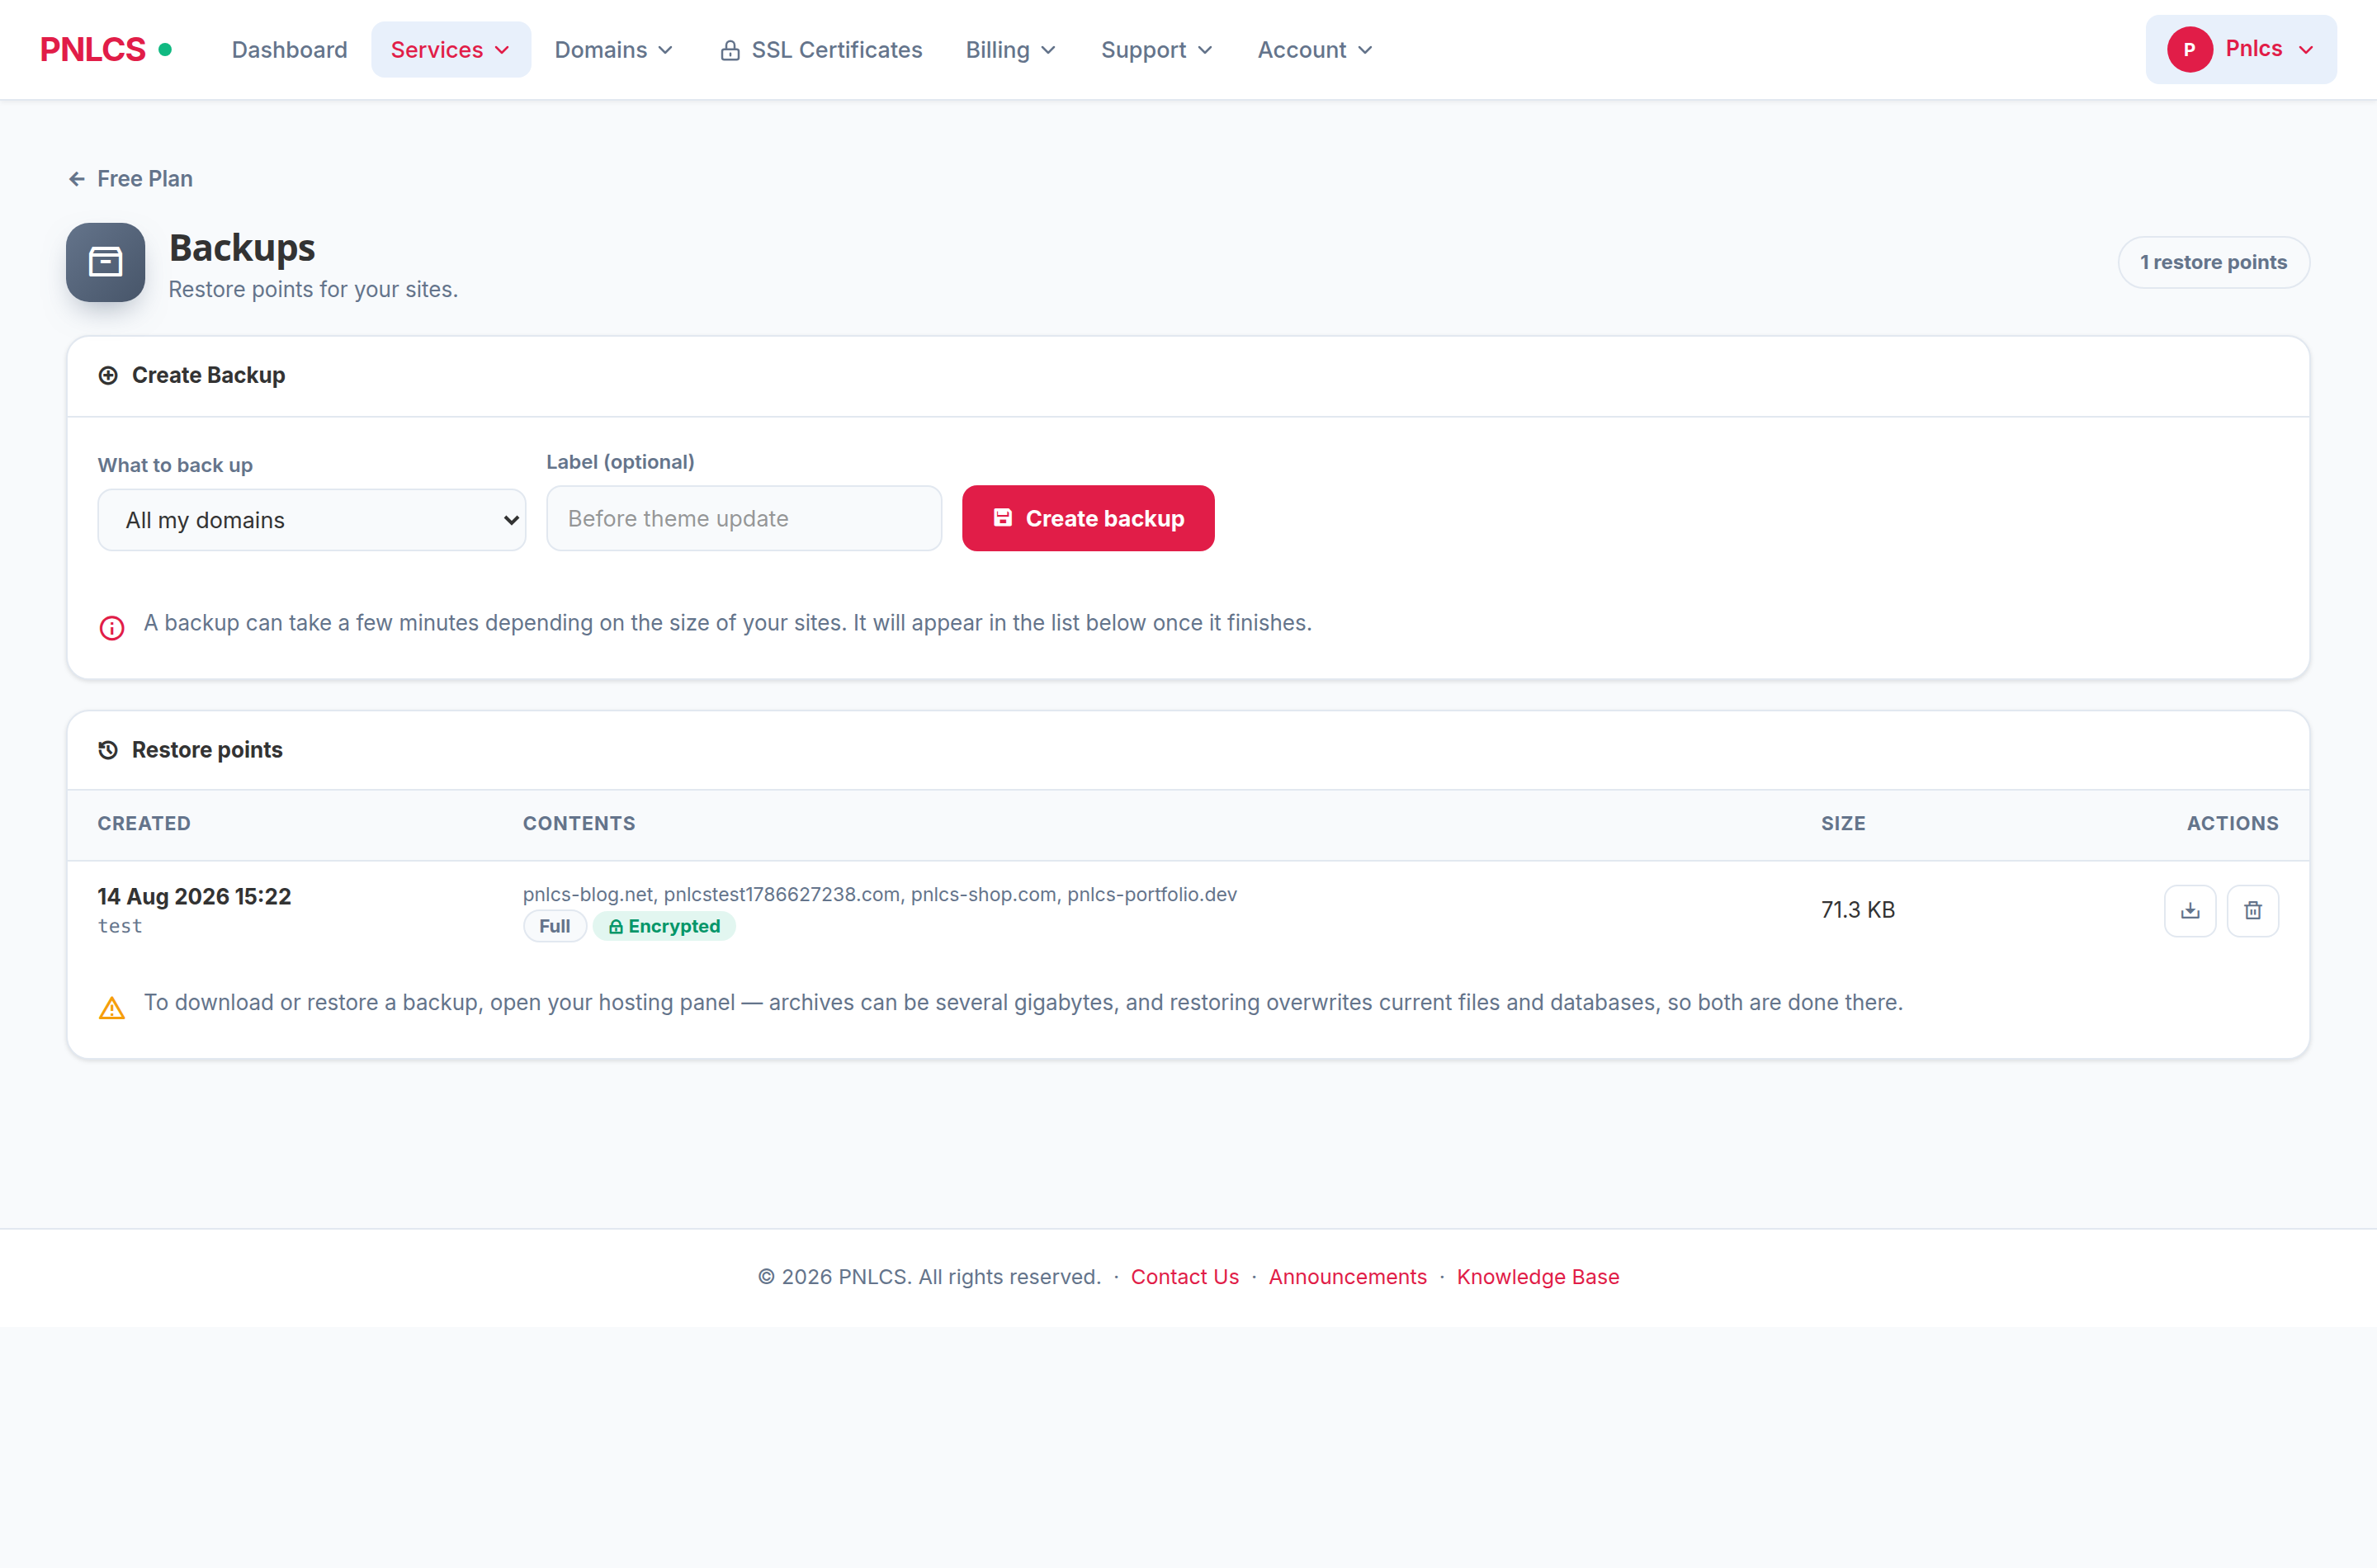 Restore points with size, contents and encryption state — fenced to the
customer's own domains
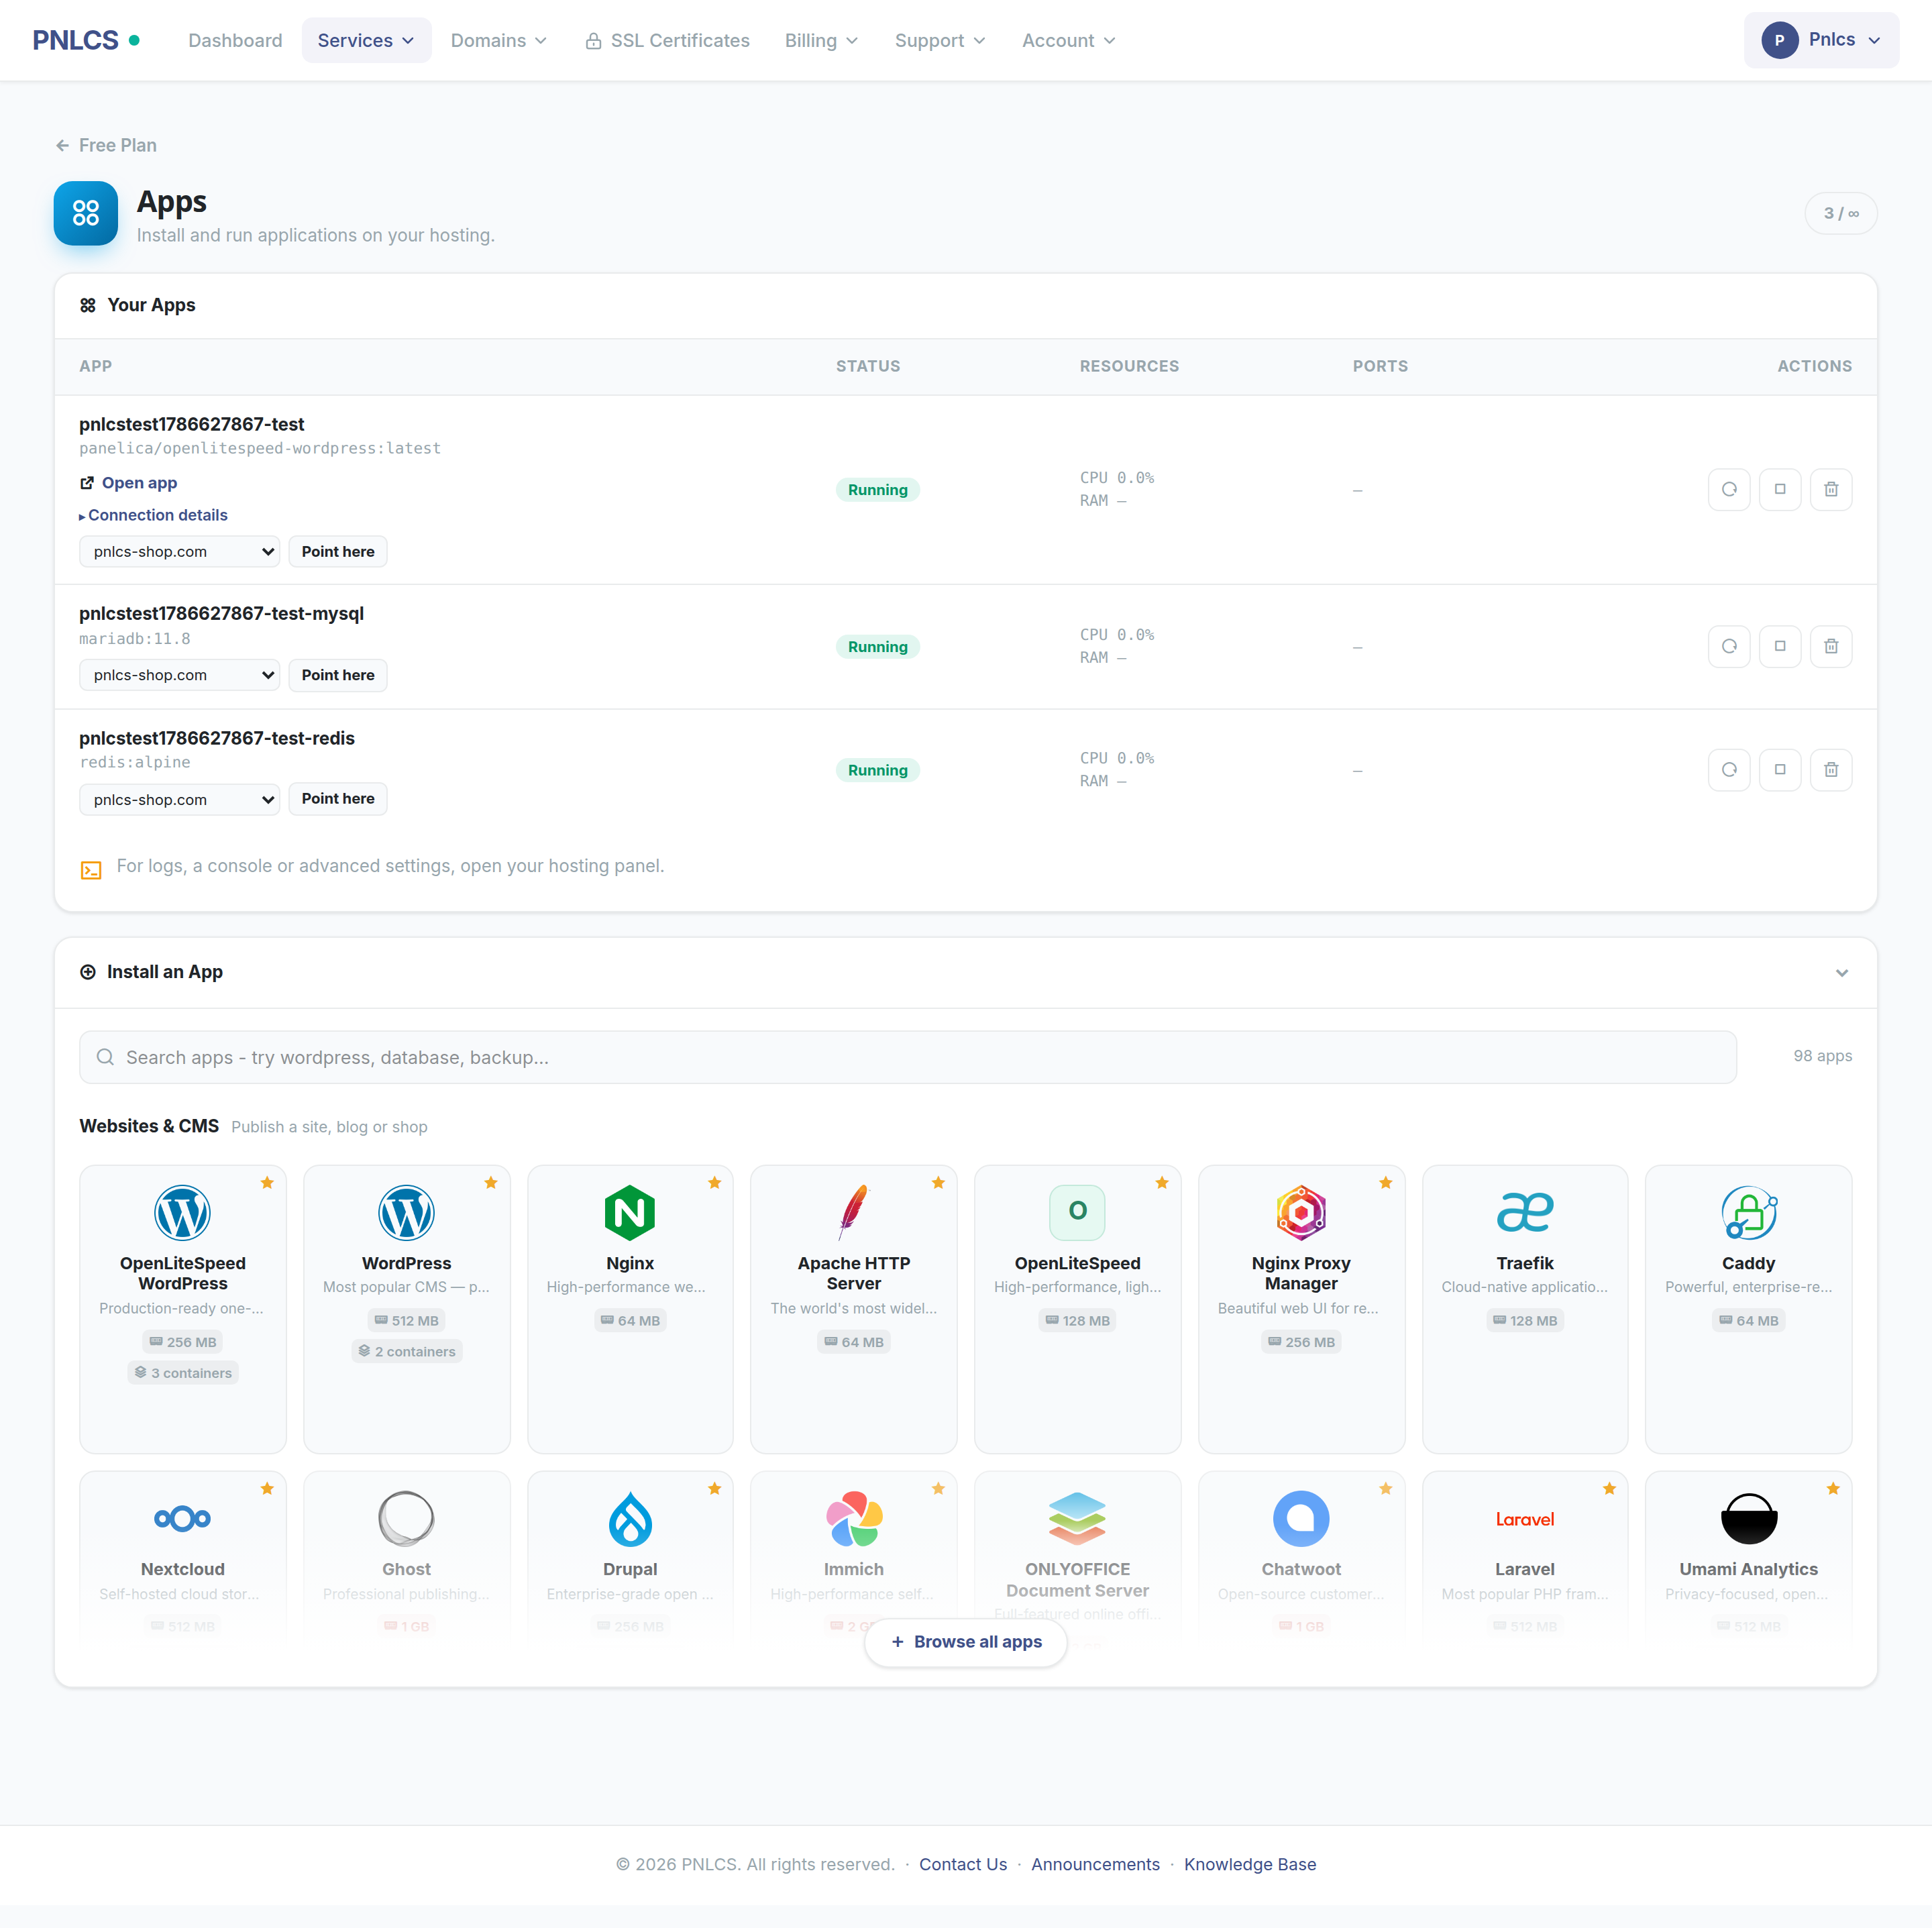 Installing an app from the customer's own control panel: searchable, grouped
the way people shop, and every card states the memory the app needs and how
many containers it starts. An app that wants more than the plan allows is
marked before it is chosen, not after it fails
Hosting Billing Features
💼 Client Portal
- Shop & checkout — browse plans, configure service, apply coupons, pay
- Service management — upgrade, downgrade, cancel, auto-renew toggle
- Domain management — register, transfer, renew, EPP code, WHOIS
- Invoicing — view, pay online, download PDF, add-funds, credit balance
- Quotes — review, accept (auto-converts to invoice) or decline pre-sales quotes
- Payment methods — save bank-transfer references, set a default
- Bank-transfer notifications — report an offline payment with receipt upload
- Email history — read every email the system has sent you
- Network status — live view of active incidents and scheduled maintenance
- Support tickets — attachments, priority, department routing
- Knowledge base & announcements — searchable, categorized
- SSL certificates — CSR generation, approver emails, auto-install
- Affiliate program — referral tracking, commission payouts
- Account security — 2FA (TOTP), login alerts, session history
- Hosting management — files, mailboxes, databases, FTP, subdomains, cron, DNS and backups, without leaving billing (details below)
🛡️ Admin Panel
- Dashboard — revenue, new signups, pending orders, open tickets at a glance
- Client management — profiles, impersonation, notes, billing summary
- Orders & invoices — manual create, bulk actions, mass mail, PDF export
- Products & bundles — configurable options, addons, pricing matrices
- Ticket system — internal notes, escalation rules, spam filter
- Reports — income, forecasts, tax liability, customer retention and churn, tickets, affiliates (27 built-in reports)
- Bulk operations — mass email, bulk invoice, bulk service status update
- Calendar — events, reminders, scheduled tasks
- Quotes & projects — WHMCS-style pre-sales flow
🌐 Internationalization
- 30 locales, English active by default
- Complete in English, Turkish, German, Polish and Simplified Chinese; the other languages are community translations and show English for any text they do not have yet
- In-browser editor — your edits override the shipped texts and survive updates
- AI-assisted bulk translate for missing texts
- Export / import JSON per locale — see the translation guide to contribute a language
🎨 Theme System
- 16 built-in themes — colour presets on the shared layout (Arctic, Aurora, Coral, Ember, Flavor, Forest, Midnight, Mint, Neon, Ocean, Panelica, Royal, Slate, Starter, Sunset, Terra); Aurora and Flavor also bring their own page layout
- WordPress-style install / activate / delete workflow
- Homepage builder with reorderable sections
- Per-site white-label options (logo, favicon, footer copyright)
- Dark mode toggle per theme
🔐 Security & Access Control
- RBAC with over 45 fine-grained permissions
- 2FA (TOTP) for both admin and client portals
- Rate-limited login, 2FA verify, password reset, email resend
- IP allow-list per API credential — addresses and CIDR ranges a key may be used from (optional)
- Session timeout and force logout support
- Activity log — every admin action recorded
- Banned IPs & emails at the application level
💳 Billing & Automation
- Recurring billing — monthly, quarterly, semi-annually, annually, biennially, triennially
- Auto-suspend unpaid services after configurable grace period
- Late fees, promotions, coupons, tax rules by country and state
- Overage billing — disk / bandwidth metering, opt-in per product
- Credit balances & add-funds flow
- Automated reminders — invoice, payment, CC expiry, domain renewal
- Auto-renew services and domains with billing integration
- Unified payment engine — one path for gateways, manual and credit, with partial-payment and overpayment-to-credit handling
- Reliable provisioning — a service only activates after the server module succeeds; failures are queued and retried automatically with admin alerts
- Refunds — reverse a payment via the gateway API (or offline), full or partial
- Exchange-rate auto-update, automated database backups, and log retention on a schedule
⚙️ Developer Features
- REST API with API-key auth for external integrations
- Webhooks — inbound (gateway callbacks) and outbound (events)
- Queue workers for email and background jobs
- Scheduled commands — invoice generation, reminders, polling
- Hook system — WHMCS-compatible
add_hook()/run_hook()with 20+ hook points; a failing hook can never break billing or provisioning - Email piping — inbound IMAP/POP3 mailboxes turn emails into tickets and replies
- Modular architecture — add server / gateway / registrar modules without touching core
- Eloquent everywhere — no raw SQL, no string concatenation
Hosting Management from Inside Billing
Most billing platforms stop at "here is your control panel password." PNLCS does the day-to-day hosting work in the billing portal itself, so a customer who wants to add a mailbox or a DNS record never has to learn a second interface.
A hosting service in the client portal — live CPU/memory/disk/bandwidth from the
server, and eight working tools underneath
Available on services provisioned through the Panelica server module (the module tells the portal which tools that account may use):
| Tool | What the customer can do |
|---|---|
| File Manager | Browse, upload, download, edit, rename, create folders and delete |
| Email Accounts | Create and delete mailboxes, change passwords, open webmail |
| Databases | Create MySQL databases and users, reset user passwords, open phpMyAdmin |
| FTP Accounts | Create accounts, change passwords, delete — with host/port shown |
| Subdomains | Create and remove subdomains; the panel provisions the real vhost, document root, PHP-FPM pool, SSL and DNS |
| DNS Zone | Add, edit and delete A / AAAA / CNAME / MX / TXT / SRV / CAA records |
| Cron Jobs | Schedule commands, run one immediately and read its output, pause/resume, delete |
| Backups | Take restore points, see size and contents, delete old ones |
Everything is fenced to the customer's own account
The server API key a billing platform holds is operator-wide — it can see every account on the box. That is exactly the mistake this integration does not make: every list is filtered against the domains that belong to the service being viewed, and every write is checked the same way before it is sent.
- A backup archive that also covers somebody else's domain is not shown, and cannot be deleted.
- A cron job, subdomain or DNS record on a foreign domain is rejected before a request leaves the billing server.
- Plan limits are read from the customer's hosting plan —
max_subdomains,max_cron_jobs,cron_jobs_enabled,backup_enabled— and the create form is gated on them (the panel enforces them again, independently).
The records that keep a site online stay read-only
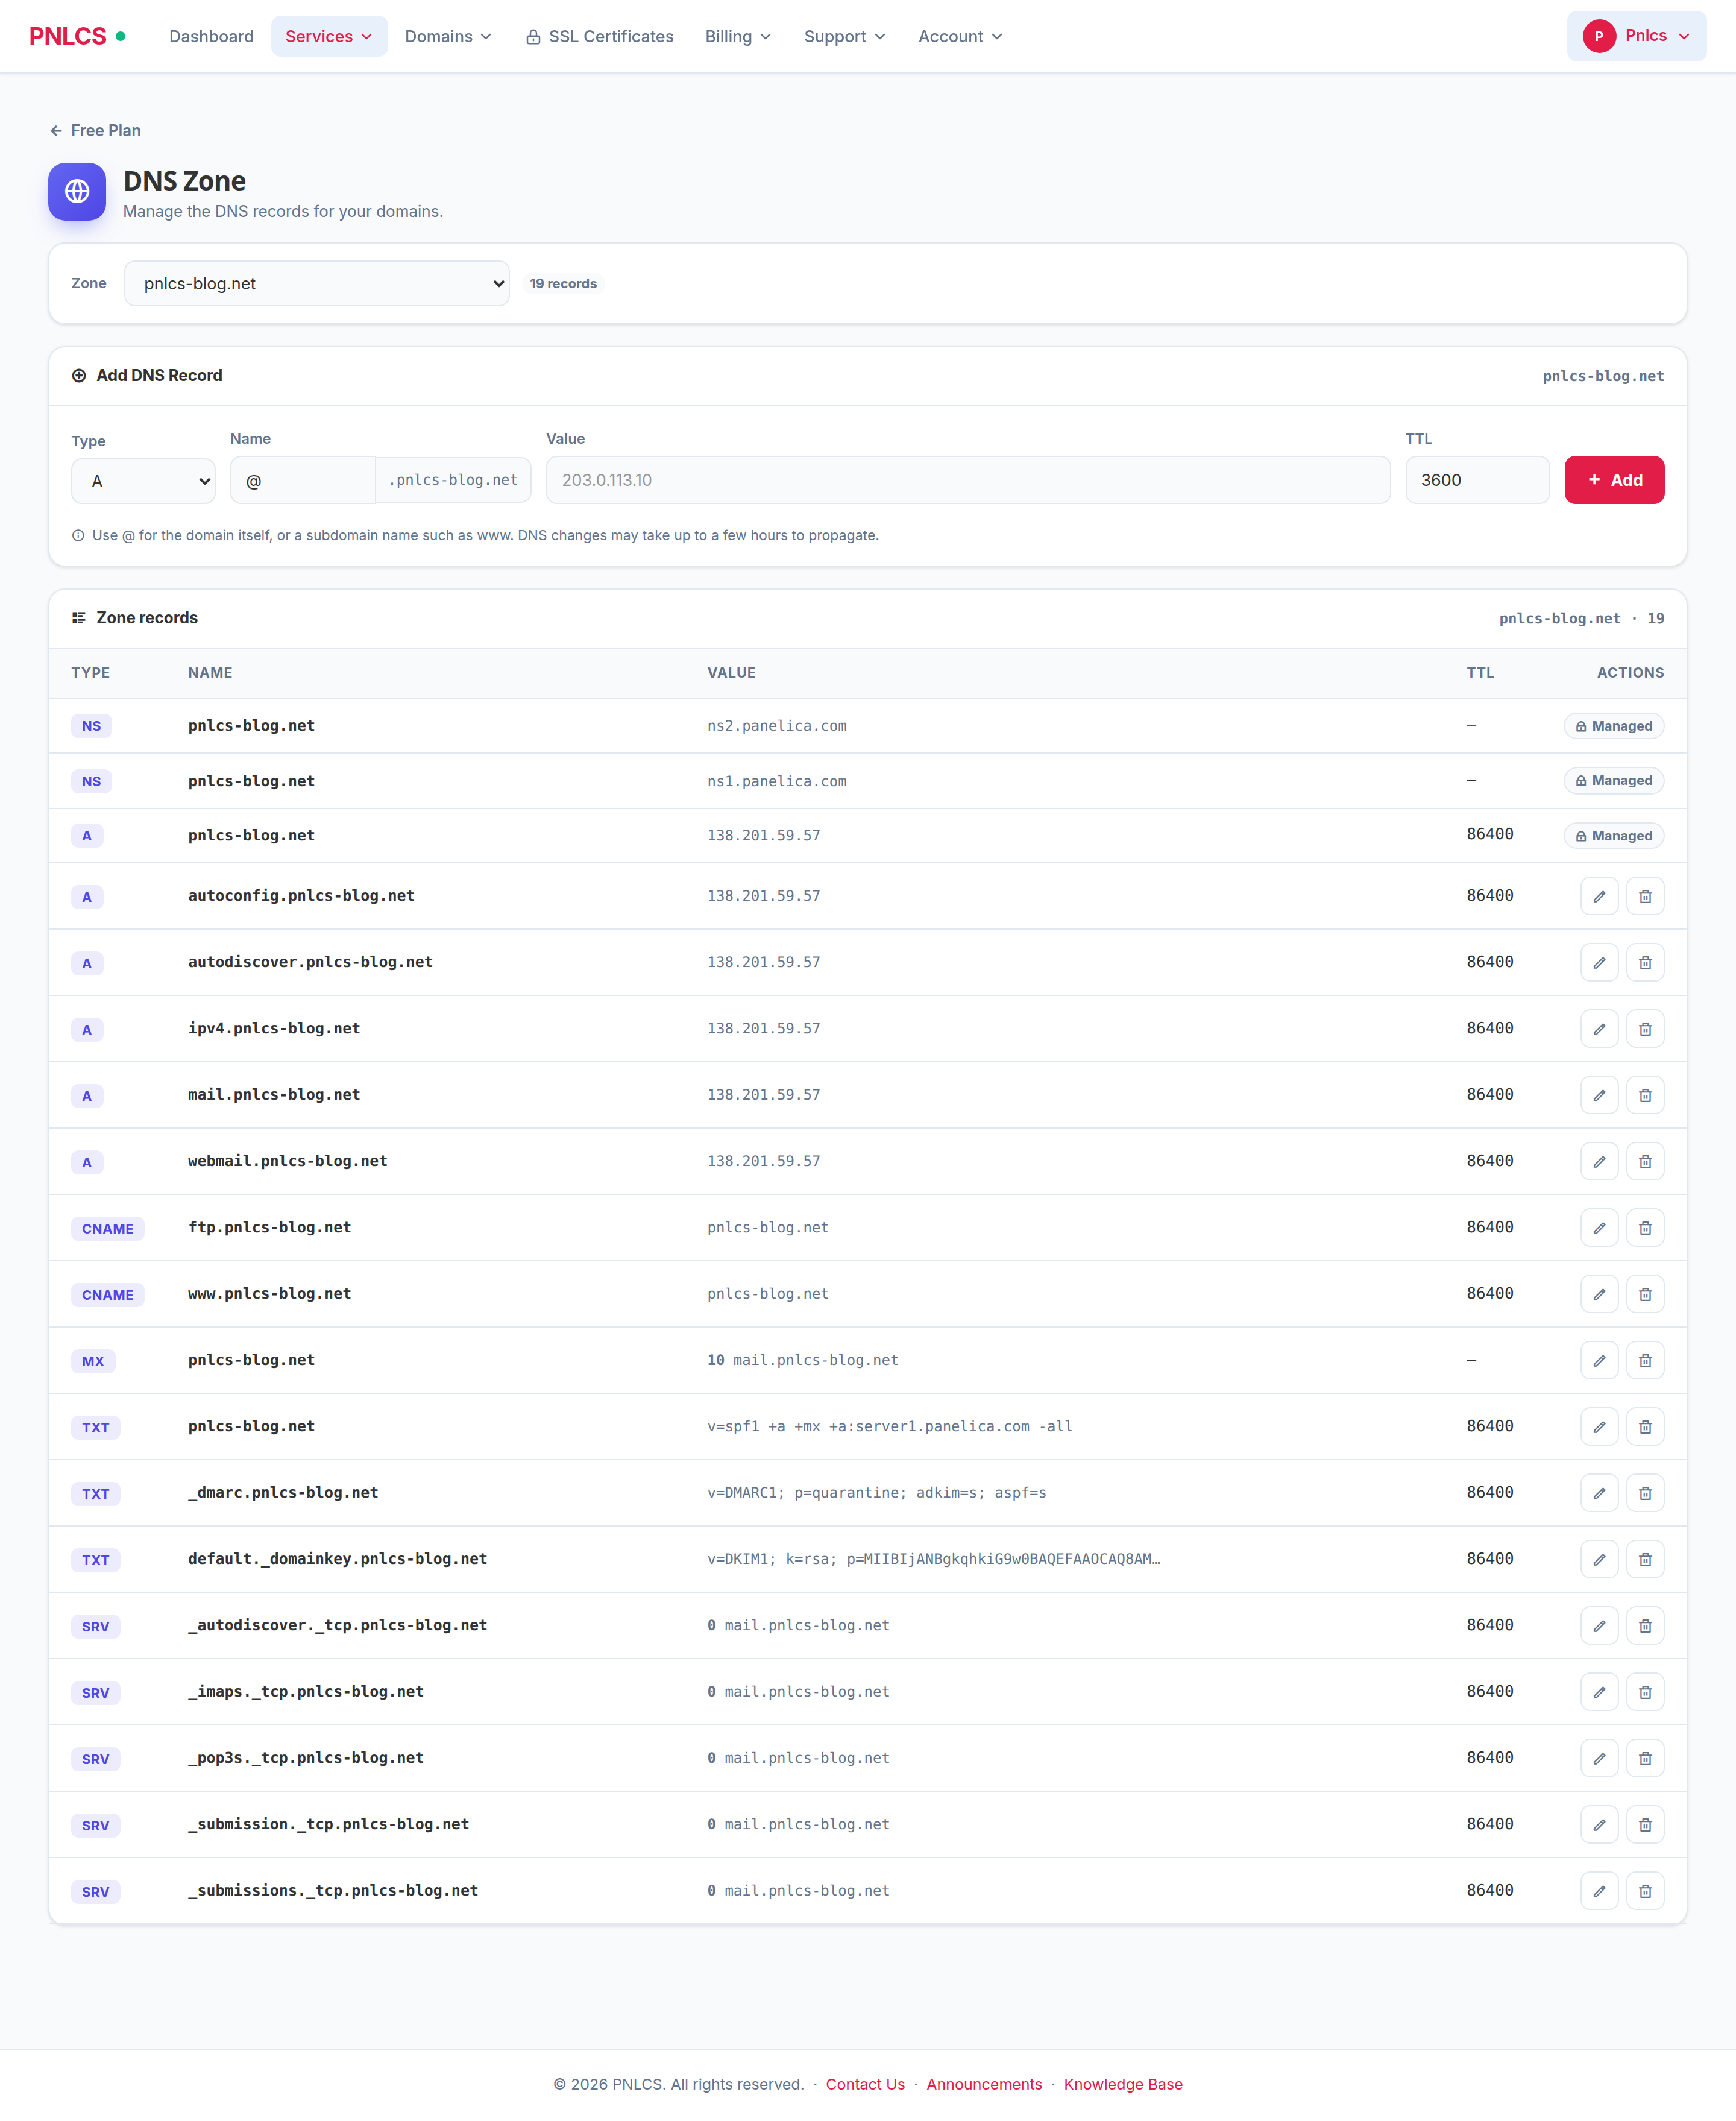 One zone at a time, records ordered the way an operator reads them, and the
delegation and apex records locked
A zone editor in a billing panel is a fast way for a customer to take their own
site offline. So the records the hosting itself depends on — SOA, NS, and the
apex/www A records pointing at the server — are shown as Managed and
cannot be edited, renamed into, or deleted here. Renaming an ordinary record
into one of those names is blocked too. The hosting panel remains the place to
override that deliberately.
The same restraint applies elsewhere: restoring a backup is not offered in billing (it silently discards everything written since the archive was taken), and cron commands run as the account's own unprivileged system user inside the panel's namespace and cgroup isolation — never as root.
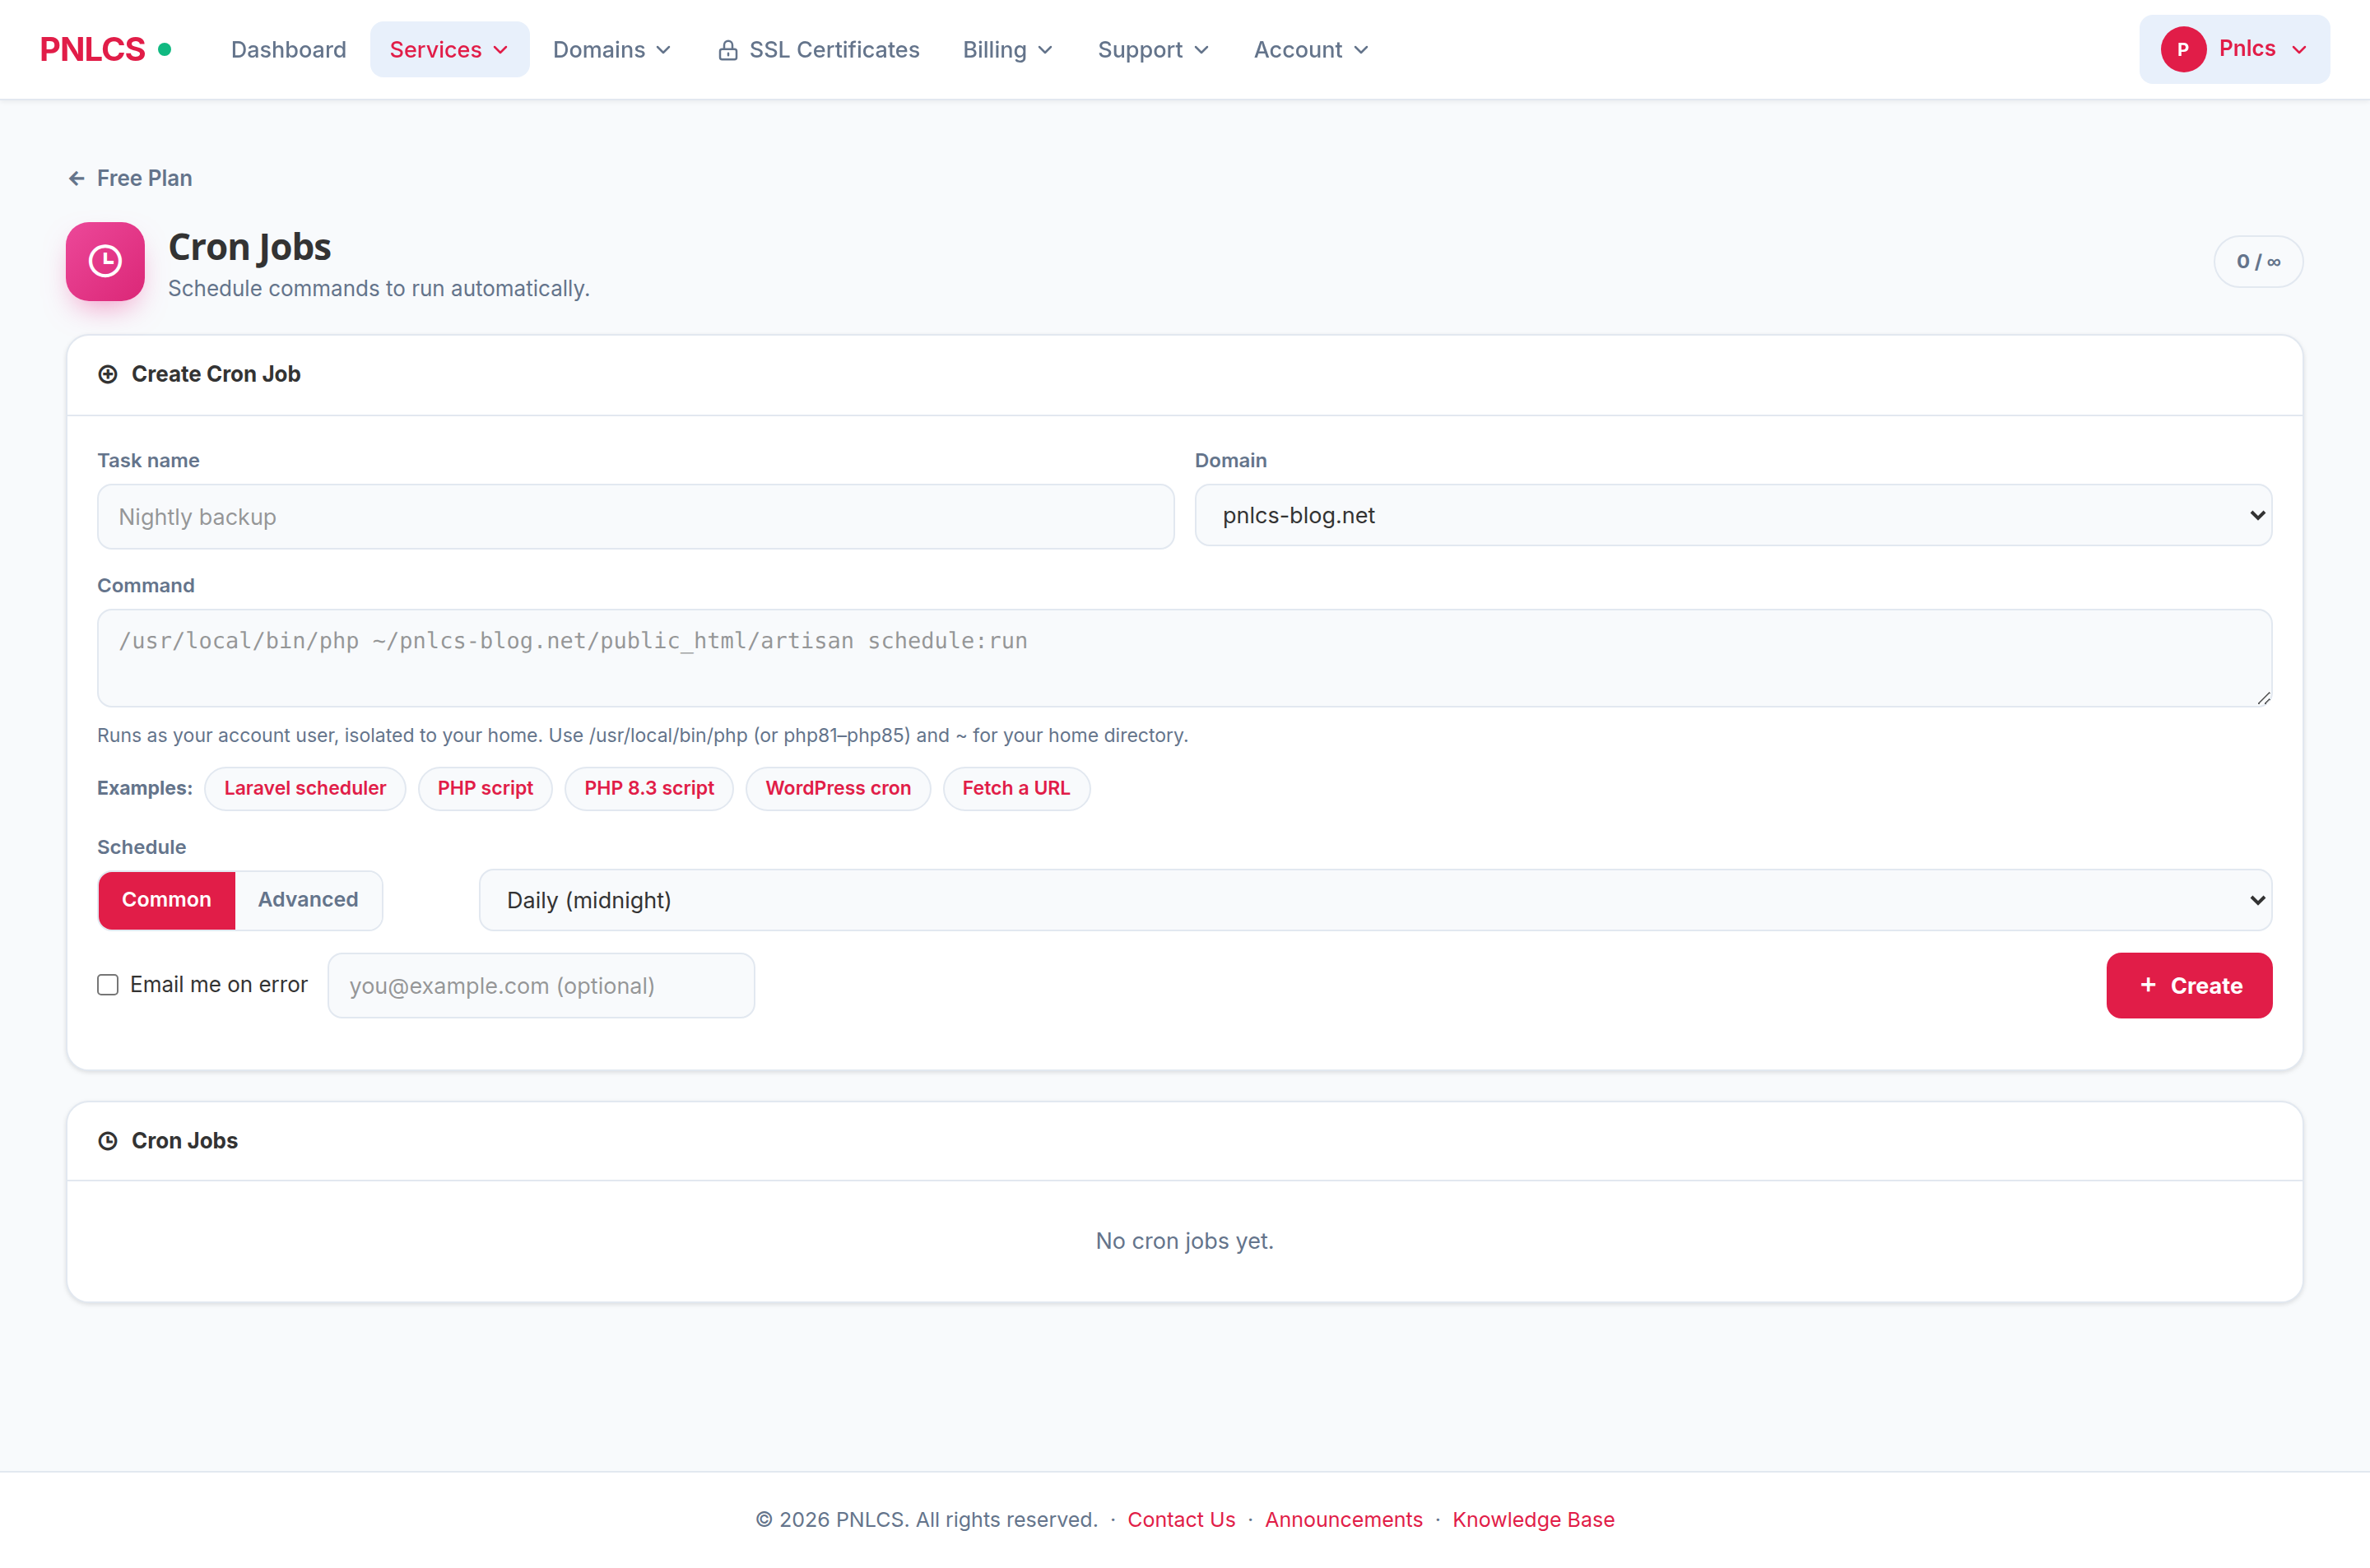 Common schedules or a full five-field expression, with example commands that
fill in the customer's real domain path
Selling VPS on Proxmox VE
PNLCS sells KVM virtual machines and LXC containers on Proxmox VE, from the first order to termination. The customer picks the operating system and size at checkout; when the invoice is paid, the server is cloned from a template, sized, given an address and started; the customer then runs it from the billing portal.
📖 Full step-by-step guide: docs.pnlcs.com → Sell VPS on Proxmox VE
The customer's virtual server: power (with reset), live CPU, memory, disk
fill and uptime, addresses, and graphs for the last hour, day, week, month or
year with axes, times and values on hover
From zero to the first sale
1. Prepare Proxmox (once, ~10 minutes). Create a resource pool, a role with exactly the rights billing needs, a user and an API token, and a small cloud-init snippet that lets customers sign in with their password. You do not need to work these out: add the server in PNLCS and press Test — it prints the exact commands for your cluster. (Guide)
2. Connect the server. Setup → Servers → Add Server, type Proxmox
VE: hostname, port 8006, the token ID (pnlcs@pve!billing) and secret. No
nameservers are needed. Optionally a node, the pool, a VM id range, IPv4
addresses to hand out, the backup storage and the snippet.
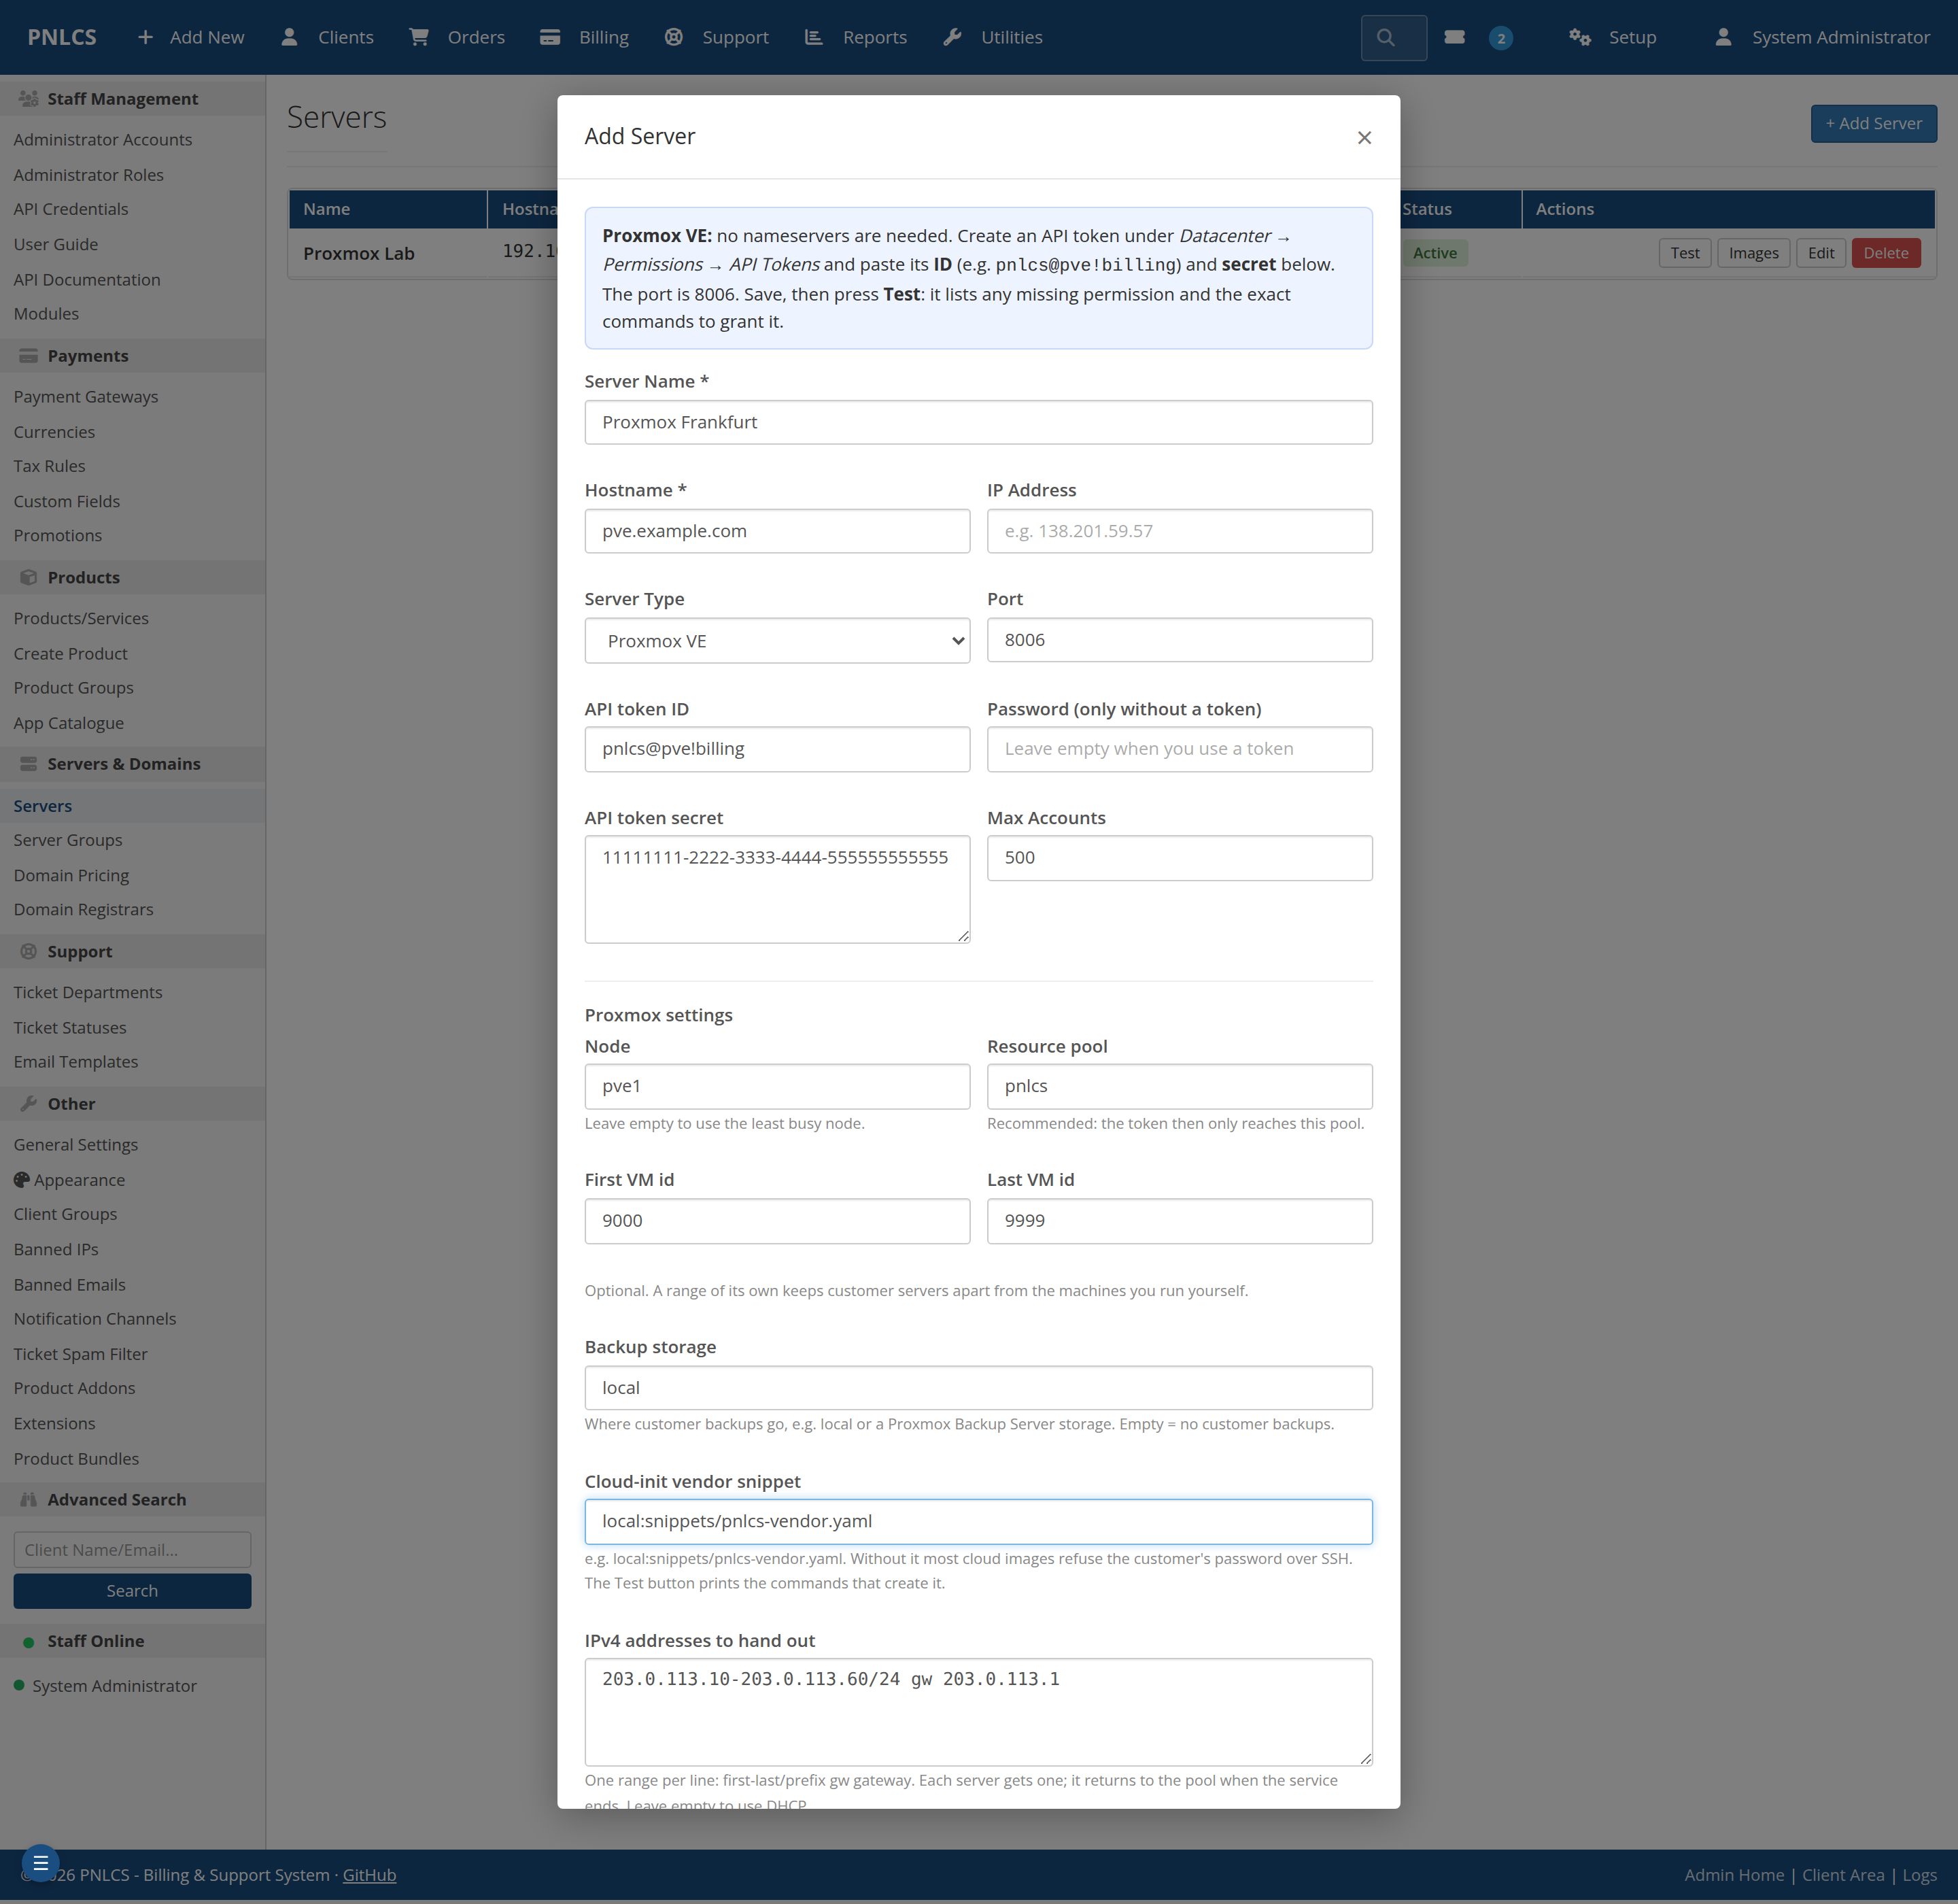
Test reads the token's real permissions and reports what is missing — and what is more than billing needs — with the commands that fix it. A token made in the Proxmox UI with Privilege Separation signs in but has no rights at all; the check says so instead of letting the first order fail.
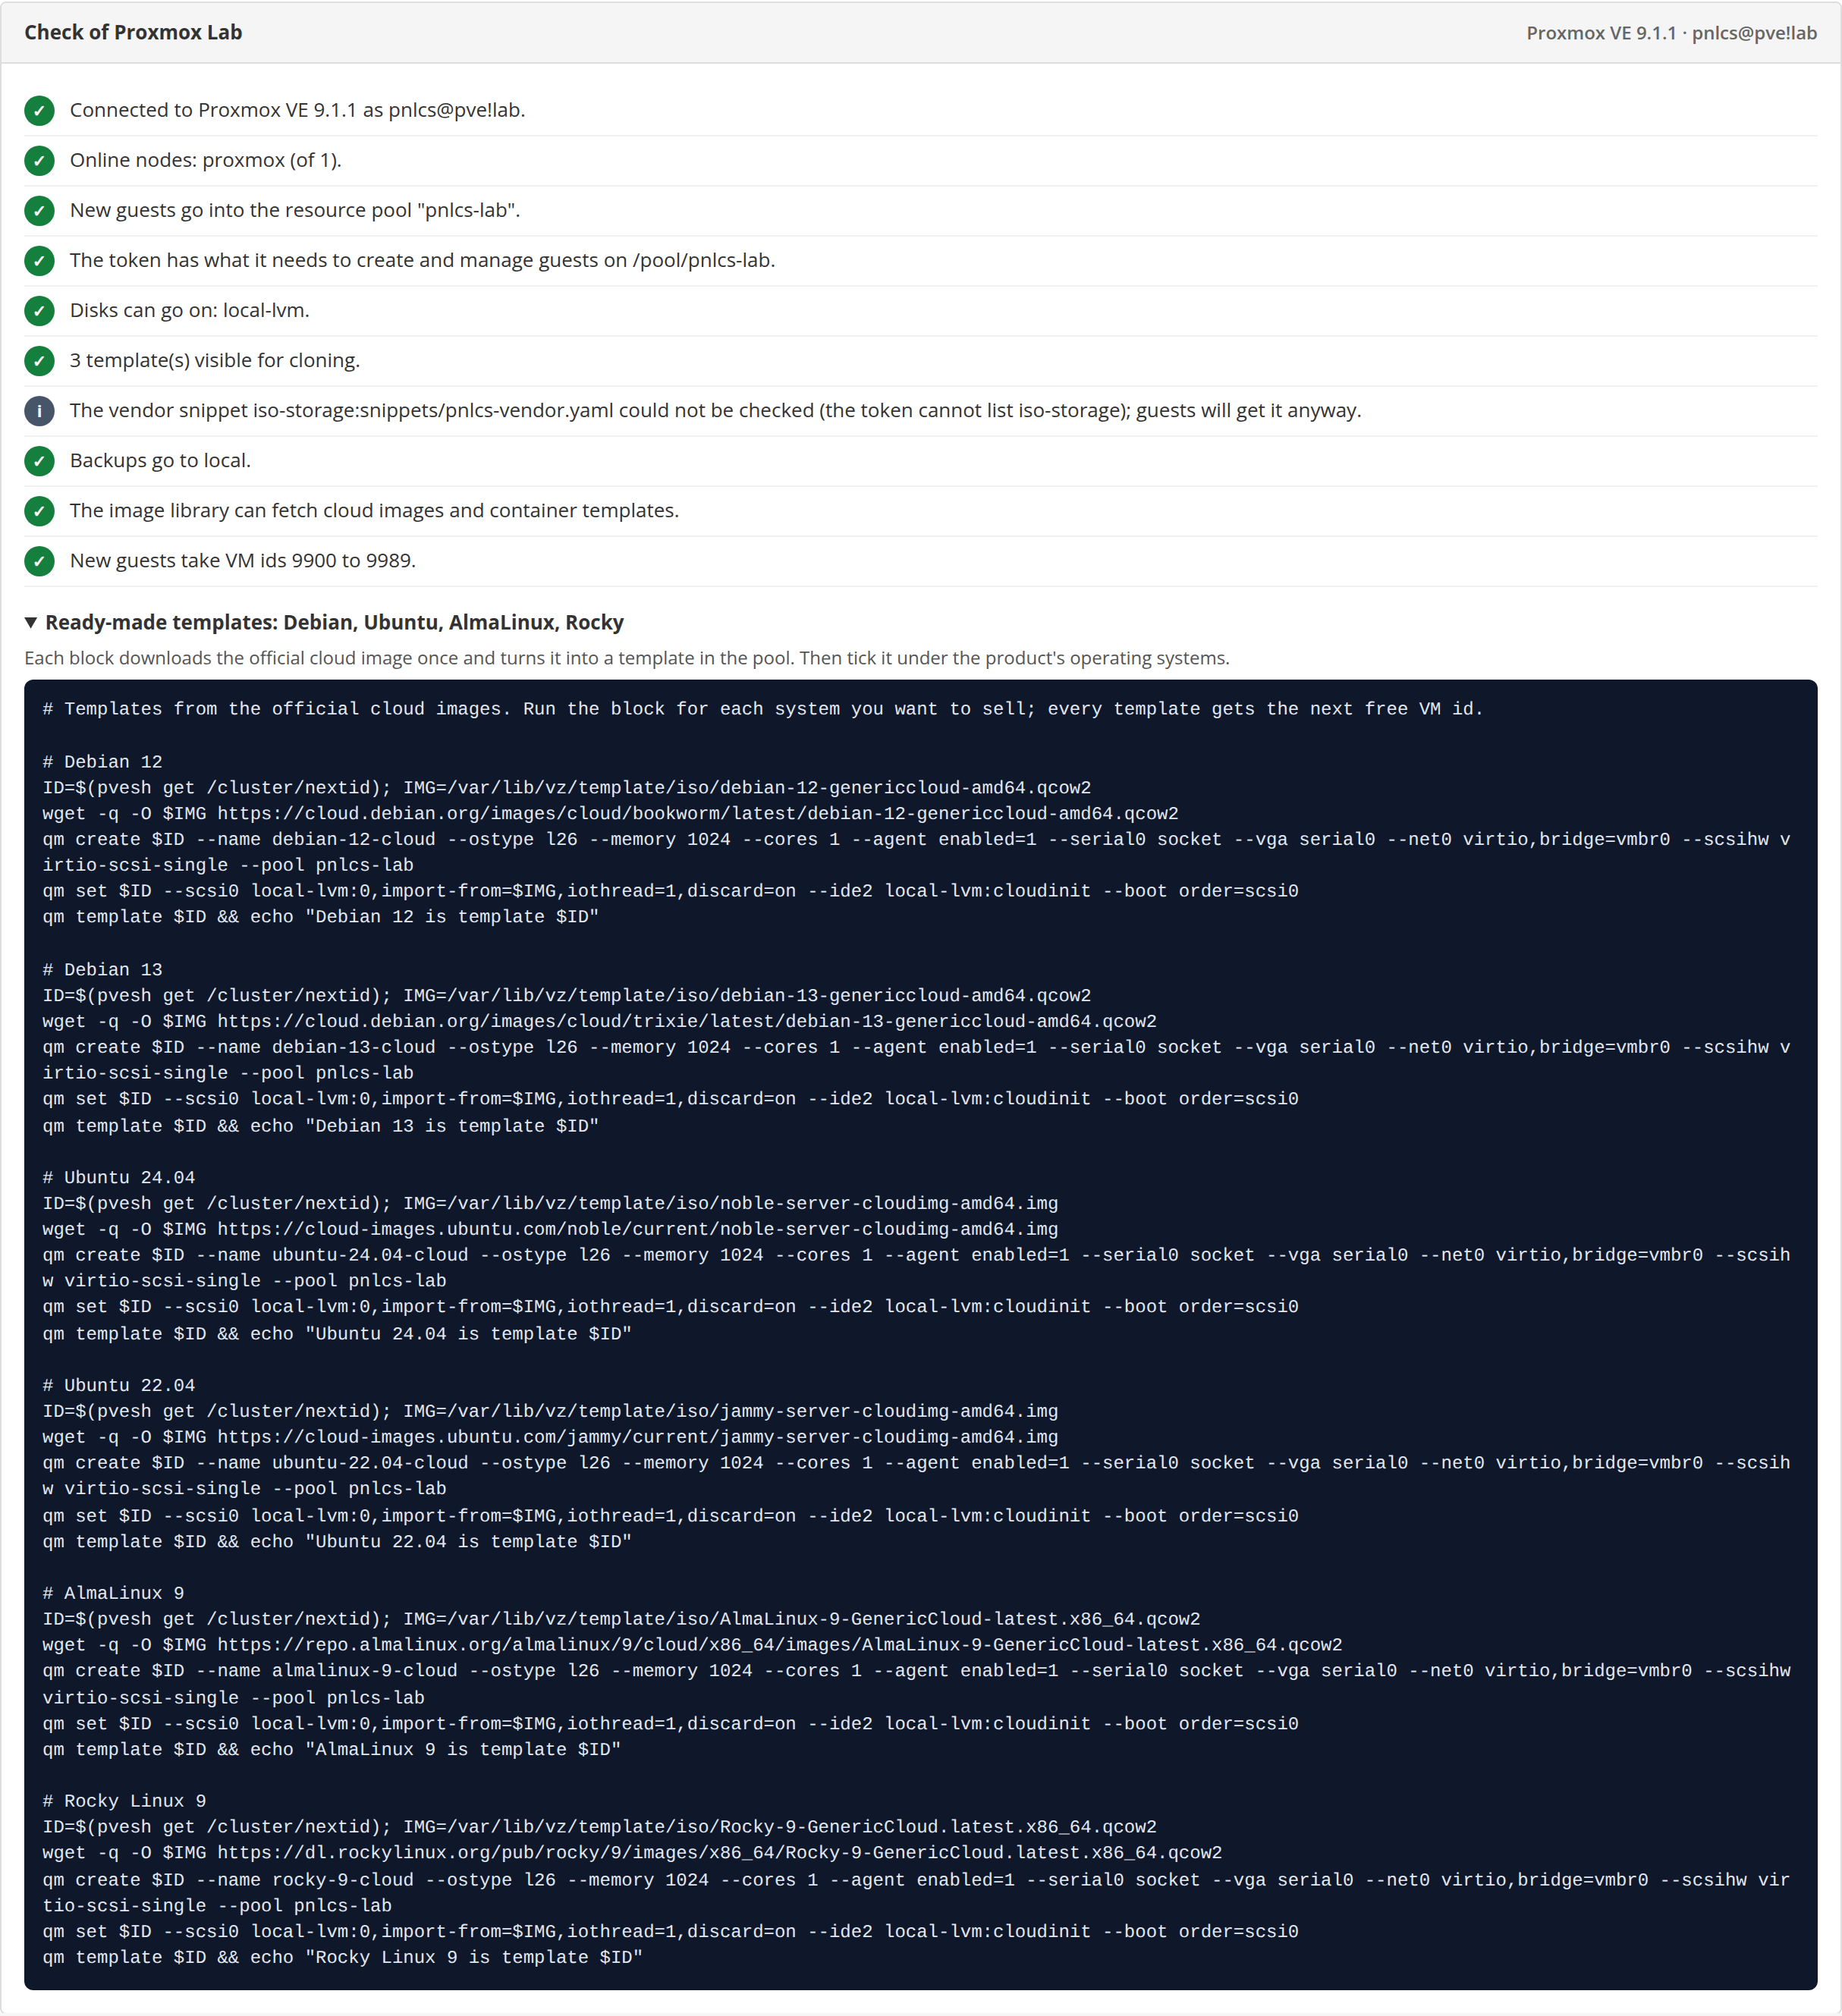
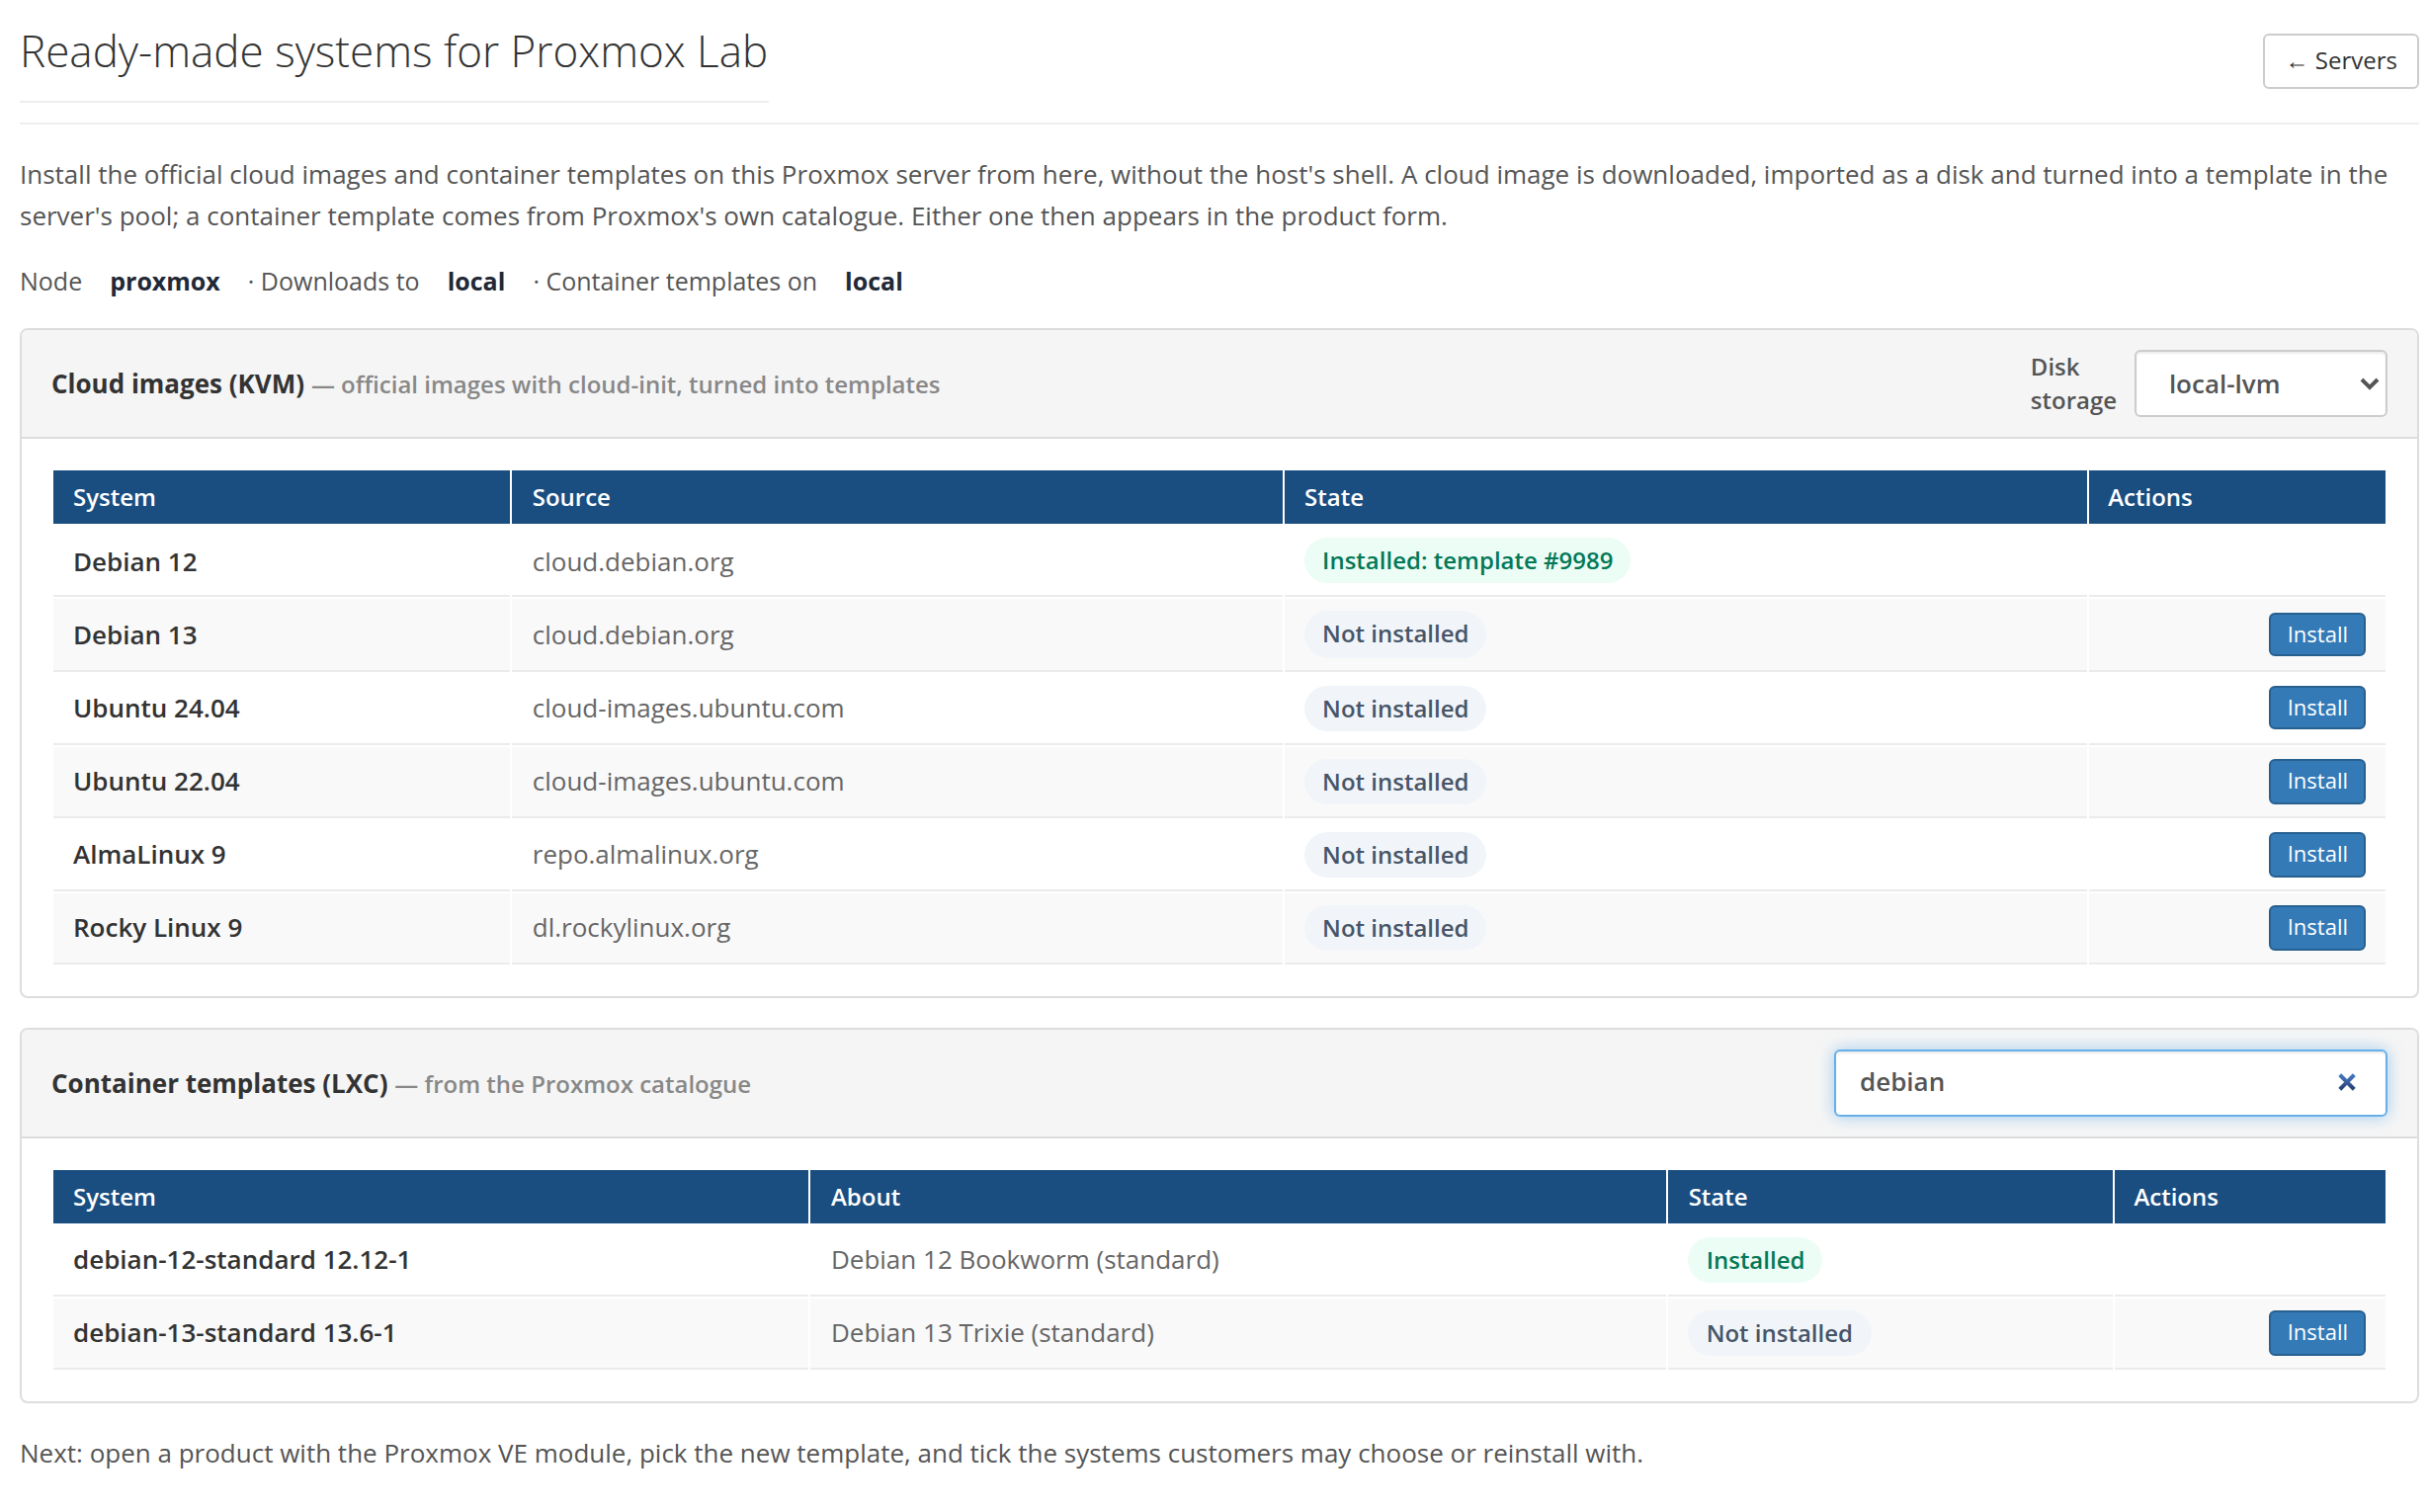
3. Install operating systems — one click each. The image library (Servers → Images) downloads the official Debian 12/13, Ubuntu 24.04/22.04, AlmaLinux 9 and Rocky Linux 9 cloud images, imports them as disks and turns them into templates in the pool — through the Proxmox API, no shell. Every amd64 container template from Proxmox's catalogue installs the same way. Measured: Debian 12 downloaded, imported and ready as a template in about a minute. Templates you built yourself work too.
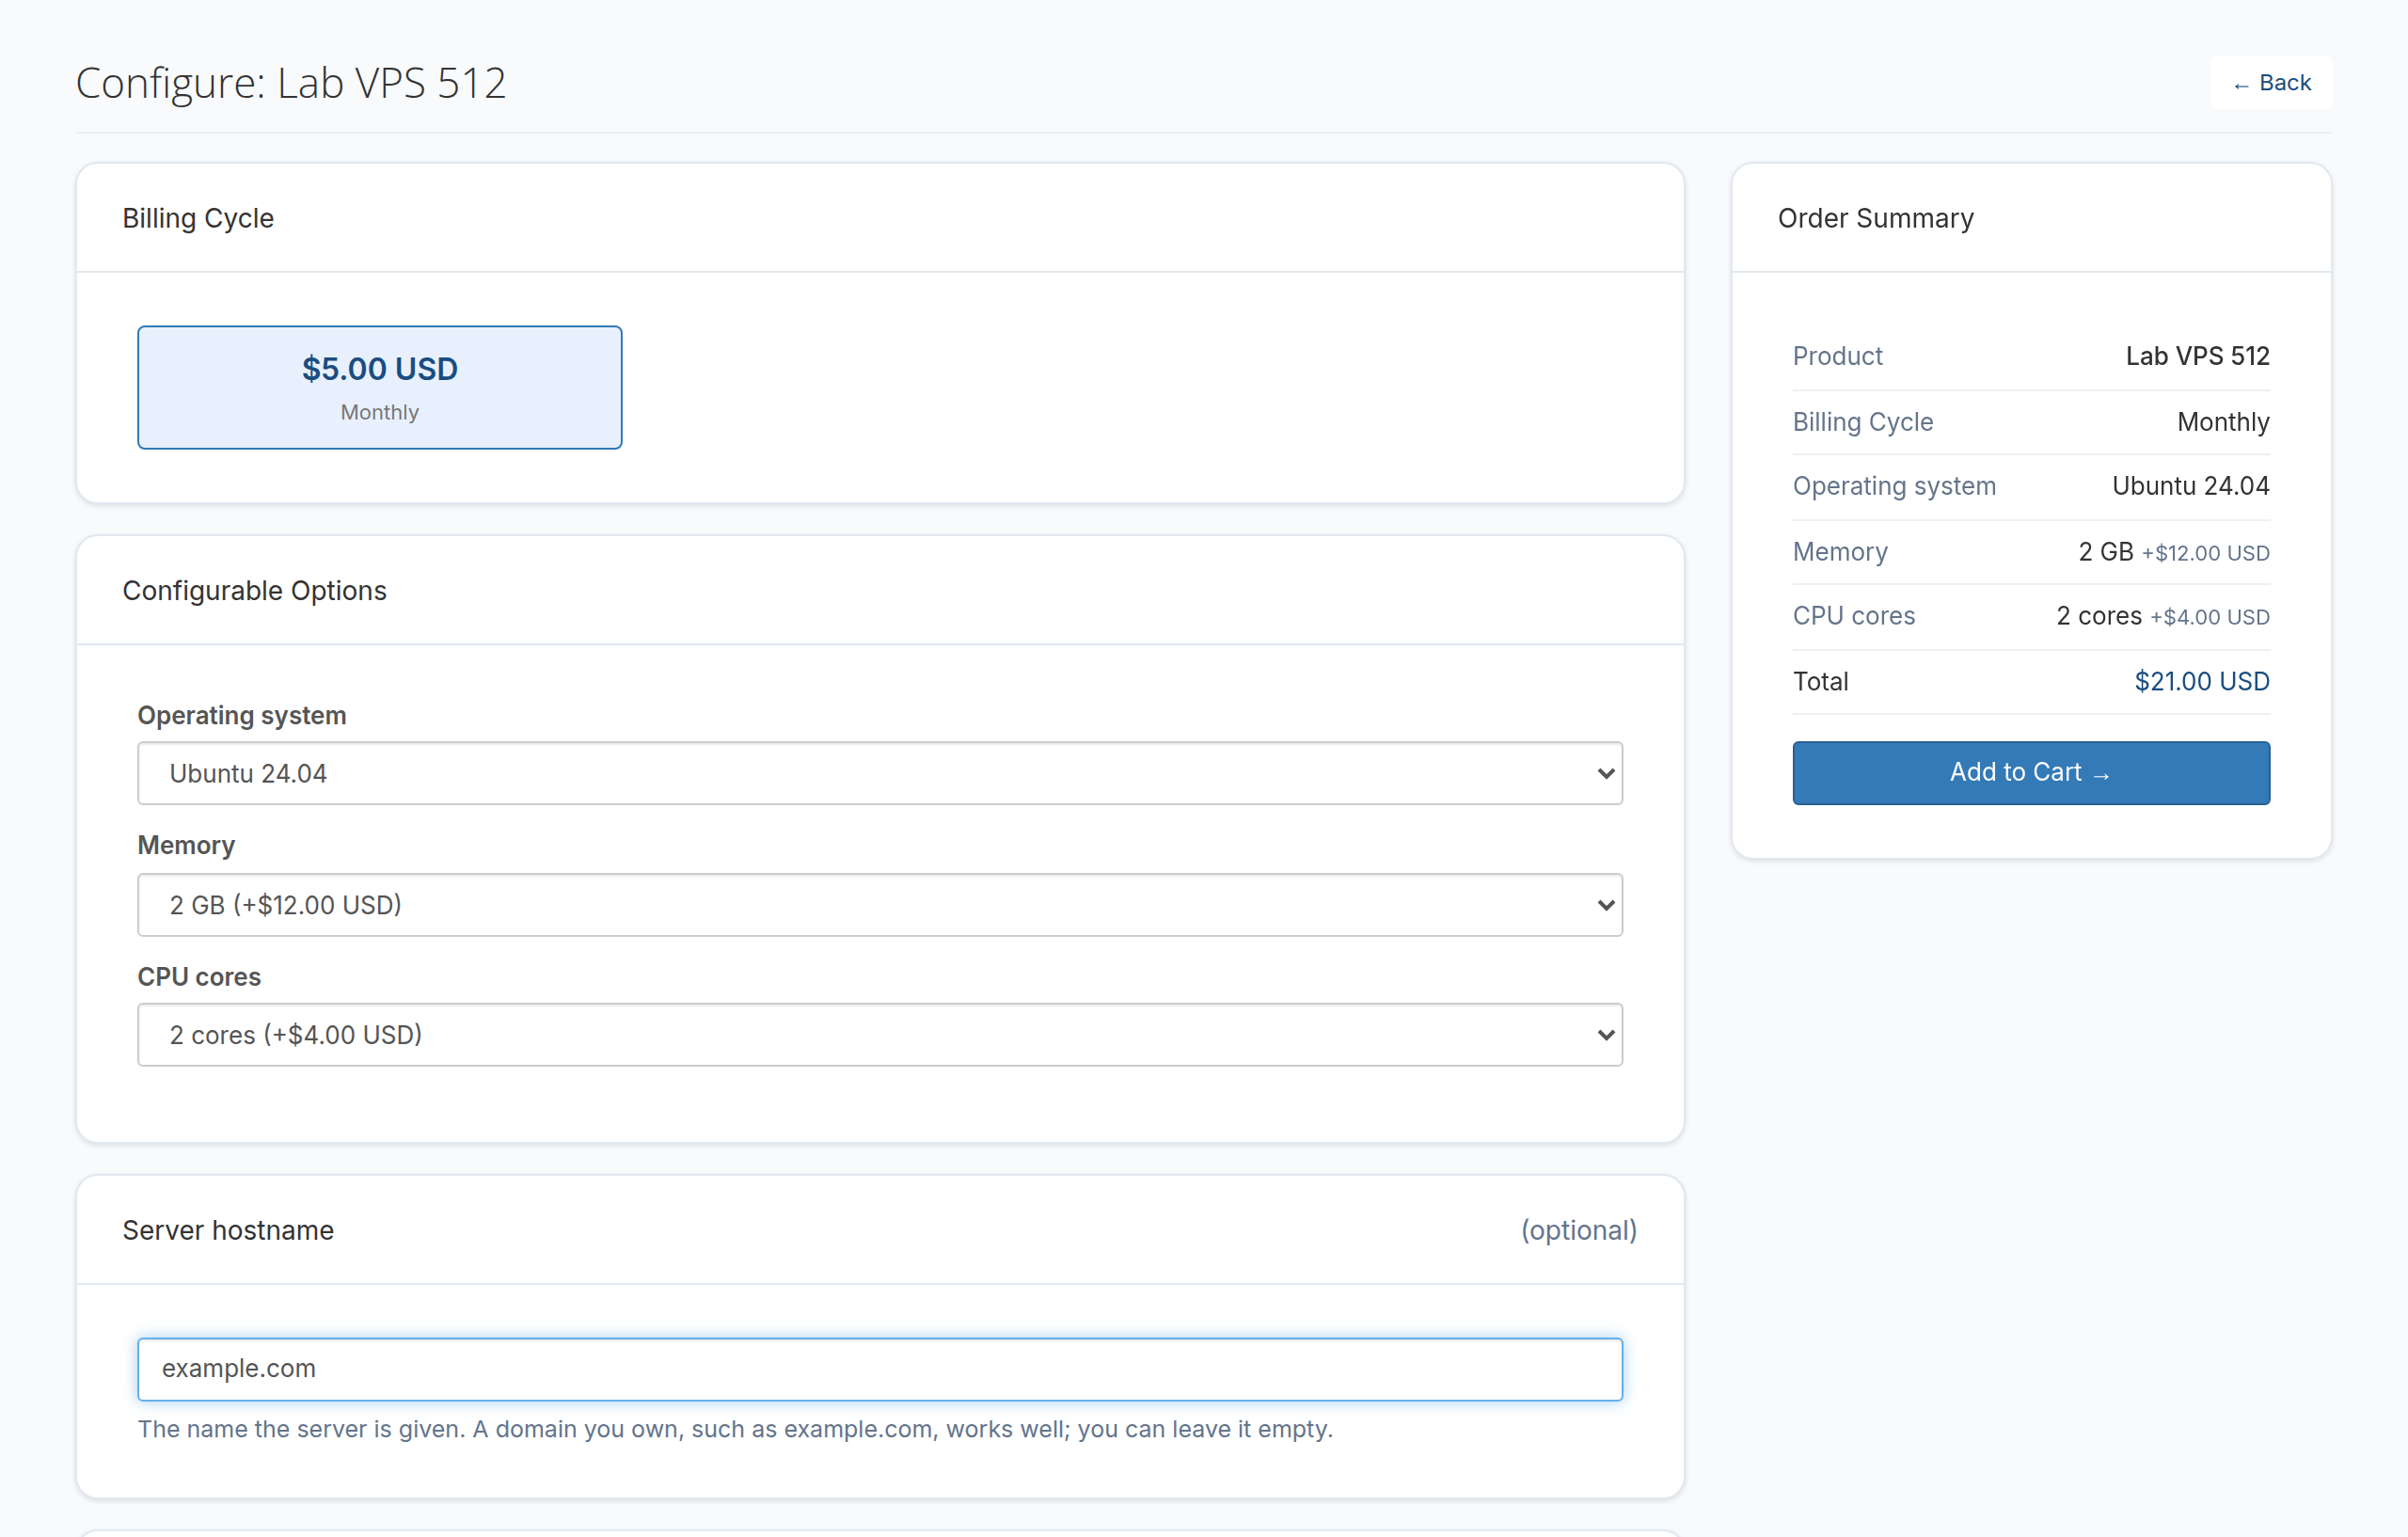
4. Create the product. Five clear sections — resources (with quick-fill sizes), image and placement (lists read live from the cluster), network (DHCP or a public IPv4 pool, IPv6, VLAN, speed limit), what the customer may keep (snapshots, backups, systems to reinstall with) — and checkout options built in one step: operating system, memory, cores and disk with their monthly prices.
5. Customers order. They choose the system and size, see each choice and the total in the summary, and give the server a hostname.
What the customer can do
| Area | What happens |
|---|---|
| Power | Start, reboot, shut down (forced after a minute if the system ignores it), force off, reset |
| Live status | CPU, memory, uptime, addresses; how full the root filesystem is (read through the QEMU guest agent) |
| Graphs | CPU, memory, network in/out, disk read/write from Proxmox's own statistics |
| Root password | Set at once through the guest agent, otherwise at the next boot |
| Reinstall | Any system the product offers; the VM id, MAC and IP address stay |
| Snapshots | Take, roll back, delete — up to the plan's number |
| Backups | Back up to the server's backup storage (local or Proxmox Backup Server), restore, delete |
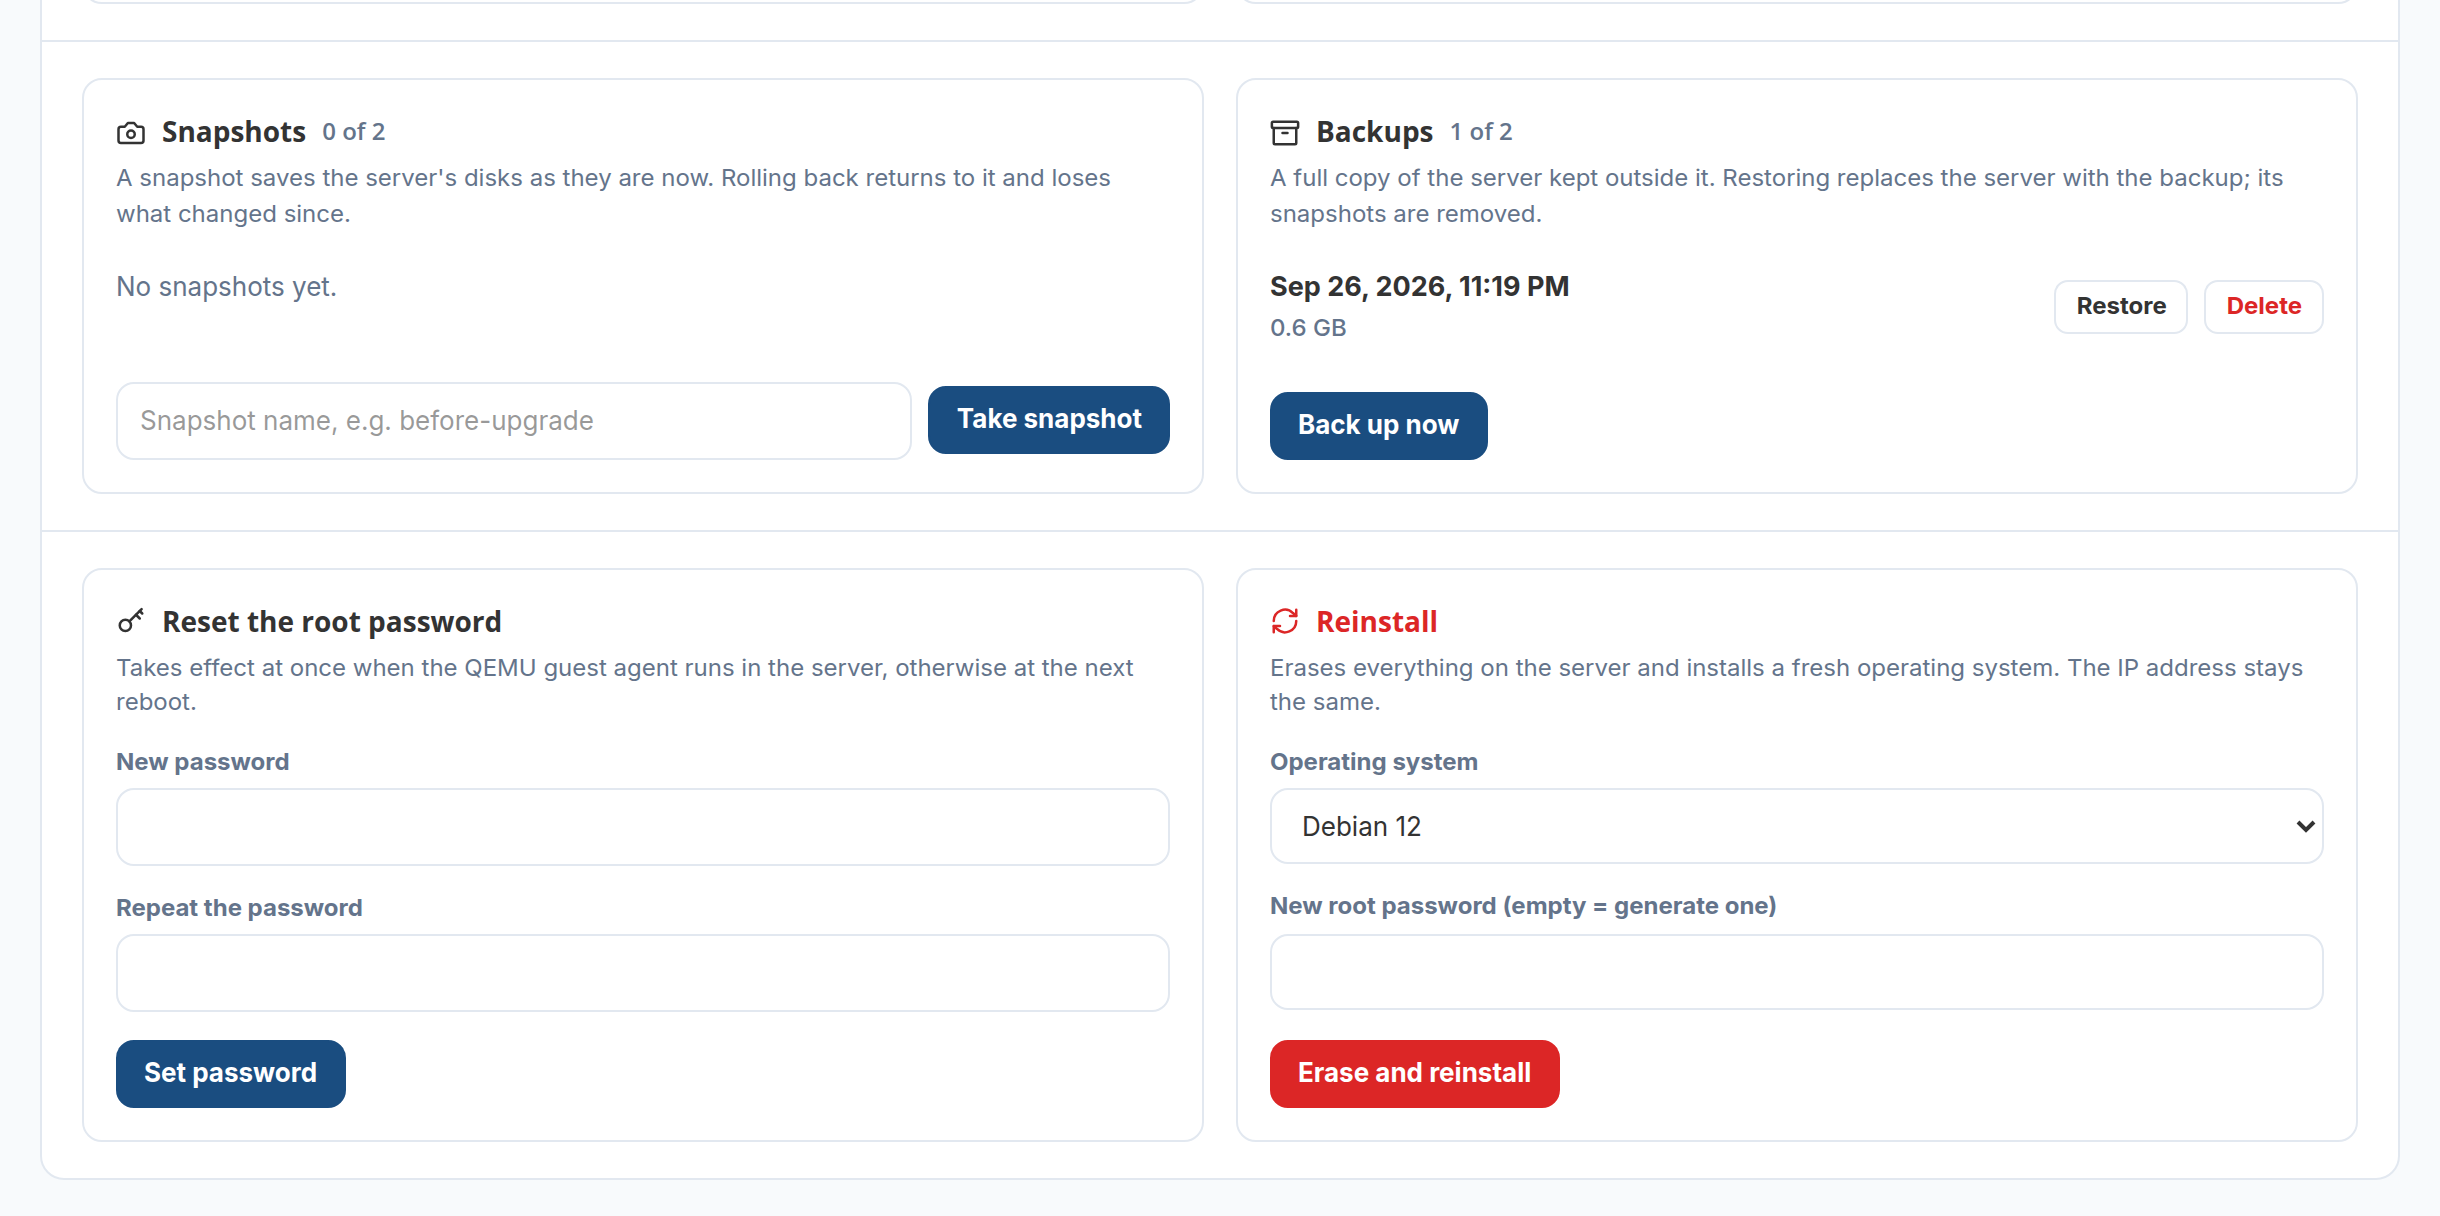 Anything that wipes data asks for the server's name first. Long jobs — a
reinstall or a restore — run in the background and the scheduler finishes
them even if the page is closed
What the admin can do
The admin's service page shows the same panel, plus the VM id and node, the pool address, an Open in Proxmox link and a field to link an existing machine. Staff may work on a suspended customer's server (for example to take a backup before termination).
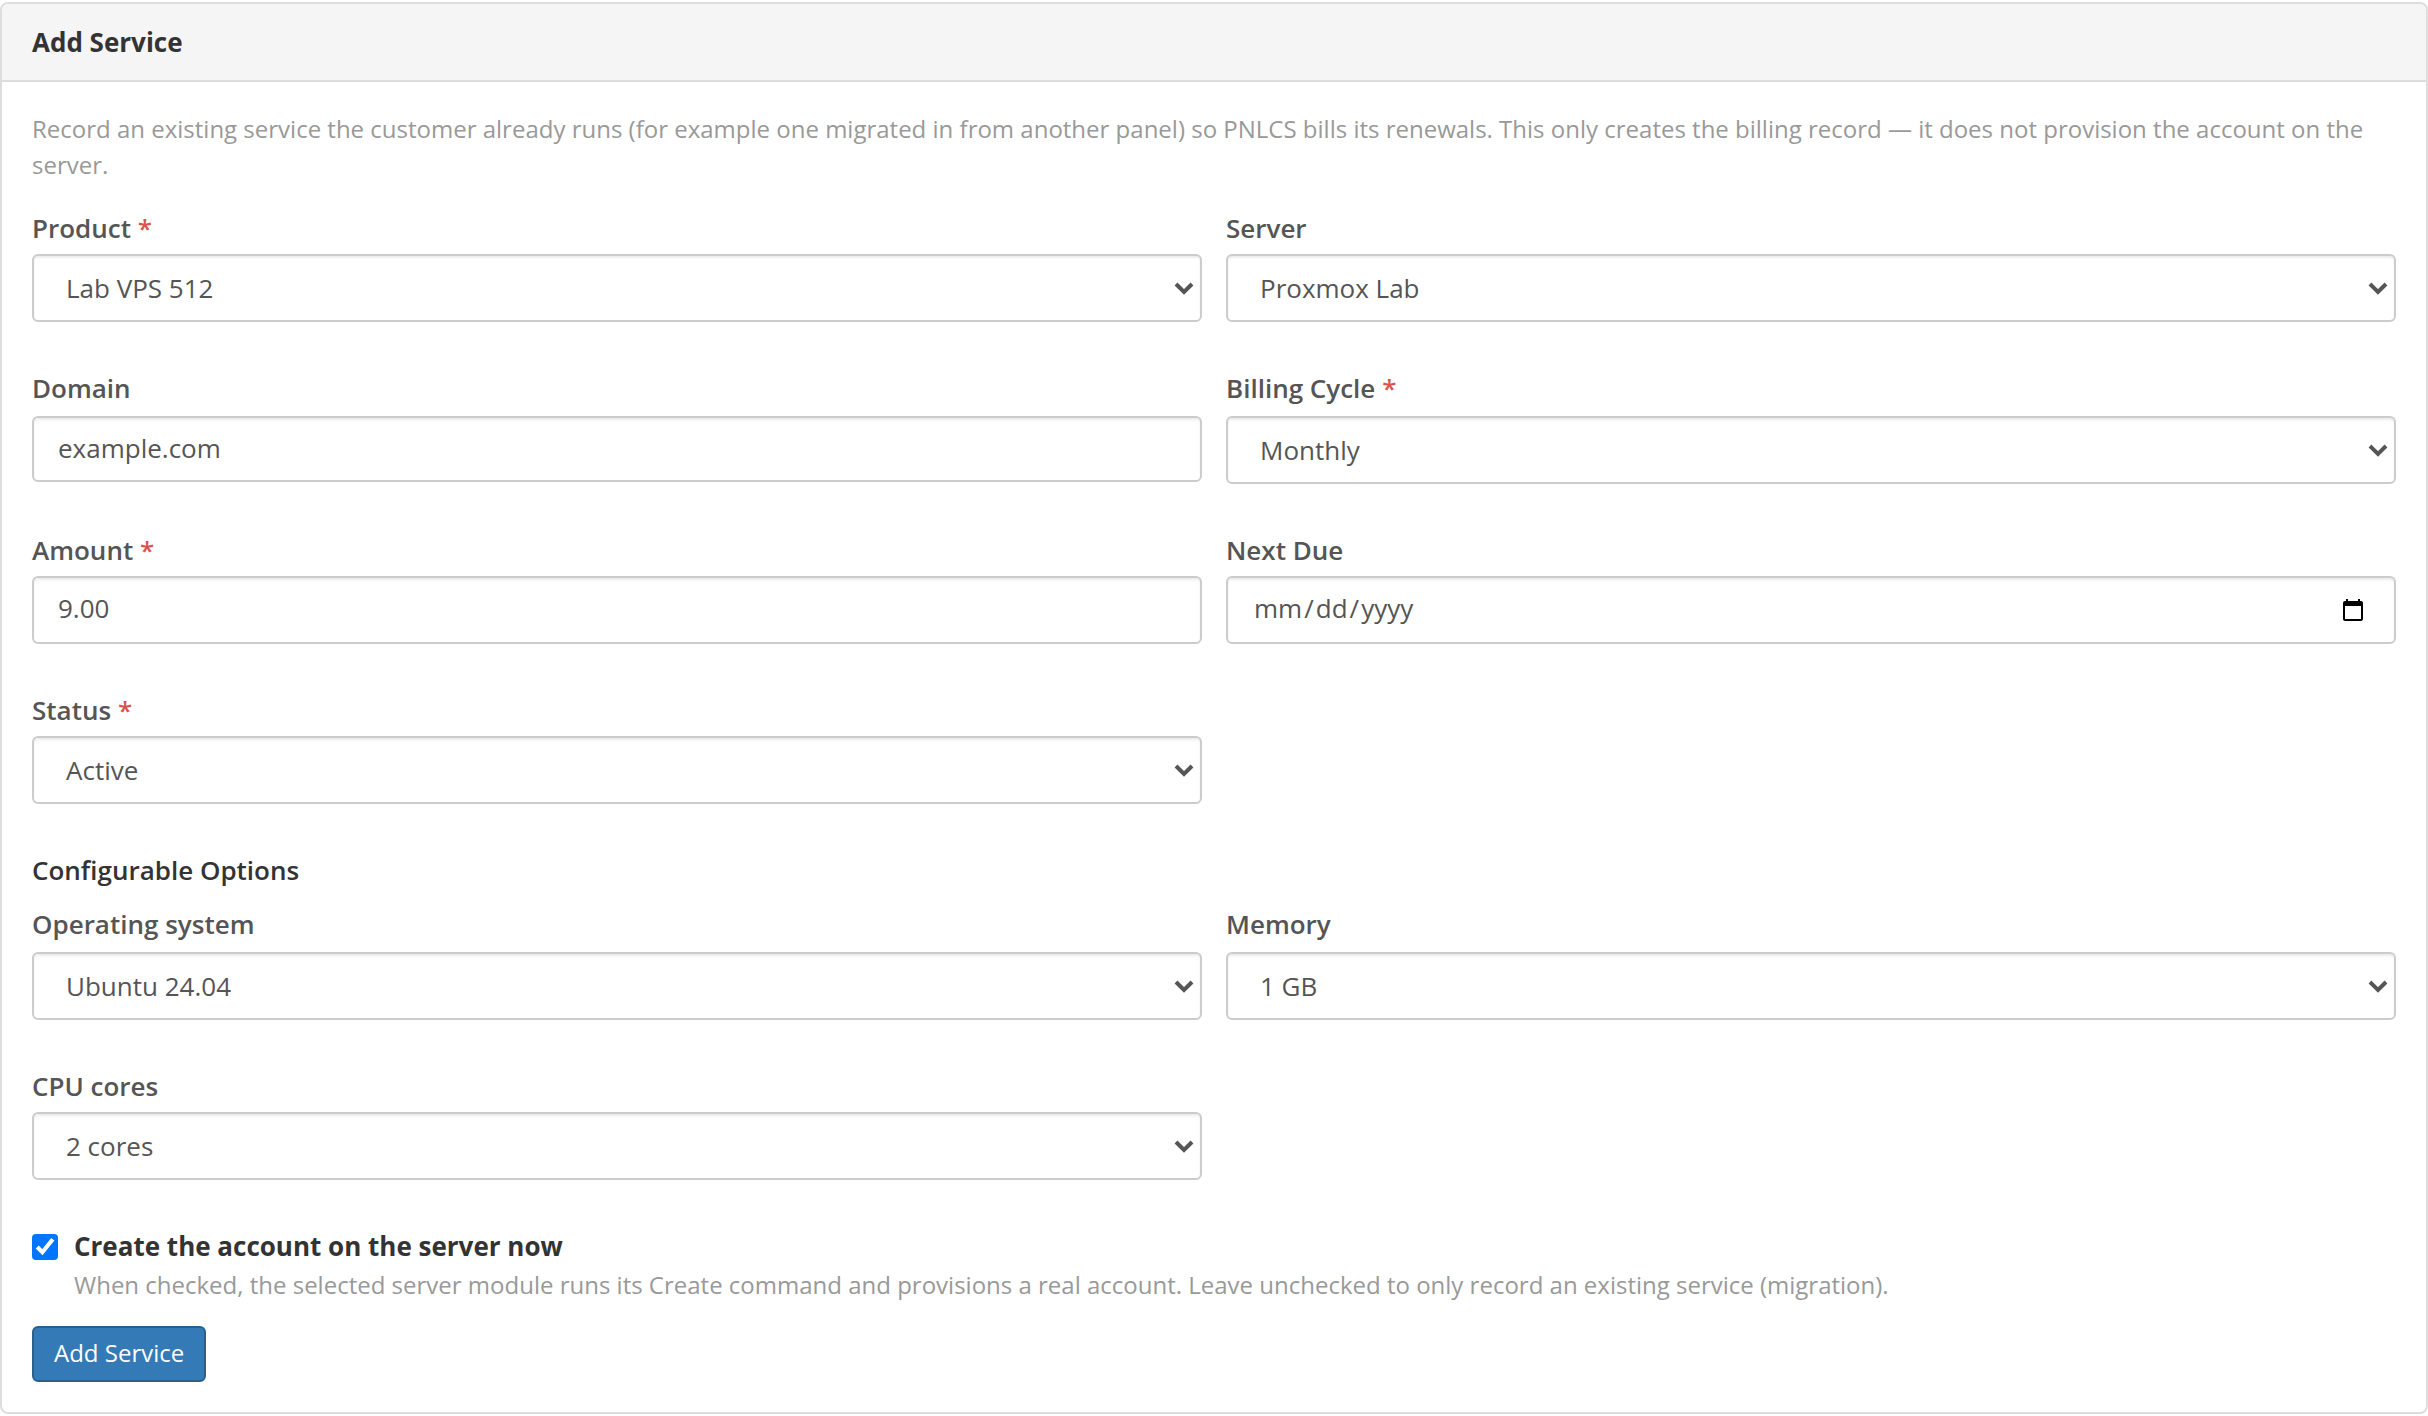
Adding a VPS by hand (Clients → Services → Add Service): choose the product and its options and let PNLCS build it — or pick a machine that already runs from the list the token can see, and PNLCS tags it for the new service and manages it from then on.
| Event | On Proxmox |
|---|---|
| Order paid | Clone into the pool with the next VM id in the range, cloud-init (password, address, DNS, snippet), disk grown, protection on, started |
| Suspend | Start at boot off, then shut down — a host reboot does not bring it back |
| Unsuspend | Start at boot on, started |
| Terminate | Stopped, protection lifted, deleted with its disks; its address goes back to the pool |
| Upgrade / downgrade | New cores and memory; the disk grows and is never shrunk |
| Every hour | Disk usage and this month's traffic (from Proxmox's statistics, so reboots do not reset it) |
Built not to touch what it does not own
- Every server PNLCS creates carries a tag and a note naming its service. It stops, reinstalls or deletes a machine only when that mark is there — a VM id in the billing records is never enough on its own.
- The recommended token reaches only its own pool; the Test button warns
about rights such as
Sys.Modifythat billing never needs. - Servers are created with Proxmox's deletion protection on; it is lifted only for the moment a service is terminated.
- The customer is not shown the hypervisor's address.
Requirements
| Component | Minimum |
|---|---|
| PHP | 8.4 (the locked Symfony 8 dependencies require it — 8.3 installs, then answers every request with a 500) |
| Database | MySQL 8.0 or MariaDB 10.6+ |
| Node.js | 20.19+ or 22.12+ — only needed to build the frontend assets |
| Composer | 2.x |
| Web server | Nginx or Apache with PHP-FPM |
| Tools | git, unzip, curl, cron |
| Disk | ~130 MB for the app itself (code + PHP dependencies + built assets); the Docker image is ~410 MB. Allow at least 2 GB free for the database, ticket/backup uploads and logs as they grow. node_modules (~100 MB) is only needed while building and can be removed afterwards. |
| RAM | 1 GB works for a small install; 2 GB is comfortable with the database on the same box |
| PHP extensions (required) | bcmath, curl, dom, fileinfo, gd, intl, mbstring, openssl, pdo_mysql, tokenizer, xml, zip — the install wizard checks each one |
| PHP extensions (optional) | imap — only for turning emails in a mailbox into support tickets (Setup → Ticket Departments → mail import). Everything else works without it. |
Optional but recommended: an SMTP server or relay for email delivery, Redis for session/cache, and a TLS certificate (Let's Encrypt) before you take payments.
Quick Start with Docker
The fastest way to try PNLCS is the official Docker image
panelica/pnlcs-runtime.
It bundles PHP-FPM 8.4 + nginx + supervisor, and on its first start installs
the newest stable release: a signed package, verified before it is
unpacked, with its PHP dependencies and frontend already built.
docker network create pnlcs-net

docker run -d --name pnlcs-db --network pnlcs-net \
  -v pnlcs_db:/var/lib/mysql \
  -e MYSQL_ROOT_PASSWORD=choose-a-root-password \
  -e MYSQL_DATABASE=pnlcs -e MYSQL_USER=pnlcs -e MYSQL_PASSWORD=choose-a-password \
  mariadb:11

docker run -d --name pnlcs --network pnlcs-net -p 8090:80 \
  -v pnlcs_app:/var/www/pnlcs \
  -e DB_HOST=pnlcs-db -e DB_DATABASE=pnlcs \
  -e DB_USERNAME=pnlcs -e DB_PASSWORD=choose-a-password \
  -e APP_URL=http://localhost:8090 \
  panelica/pnlcs-runtime:1.5
The two named volumes keep your database and your installation (with its
.env and uploaded files) when the container is replaced. The first start
takes about a minute; then visit http://localhost:8090/install to run the
in-app install wizard. It checks the requirements, creates the administrator
with the username and password you choose, and closes itself for good. The
container runs the scheduler and a queue worker itself: there is no cron line
to add.
To update to the newest release later (your changes are kept, and an update that is interrupted rolls itself back):
docker exec pnlcs /usr/local/bin/update.sh
📦 Full image documentation, environment variables, screenshots, and production deployment notes: 👉 https://hub.docker.com/r/panelica/pnlcs-runtime
Self-Hosted Installation (without Docker)
One command
On a fresh Ubuntu 22.04/24.04, Debian 12/13, AlmaLinux 9 or Rocky Linux 9 server:
curl -fsSL https://raw.githubusercontent.com/Panelica/pnlcs/main/install.sh | sudo bash -s -- --domain billing.example.com
It installs nginx, PHP 8.4 and MySQL or MariaDB, downloads the newest release and verifies its signature, creates the database, and sets up nginx, the scheduler, the firewall and SELinux. Then it prints the address of the install wizard, where you create your administrator account. It never touches an existing installation. Options and details: docs/install/native.md.
Upload the release package (no command line)
On shared hosting, or any panel with a file manager: download
pnlcs-X.Y.Z.tar.gz from the
latest release, extract
it next to the webroot, point the domain's document root at pnlcs/public
and open the site. The install wizard starts by itself: it writes .env,
asks for the database, creates the tables, then your administrator account.
Details: docs/install/hosting-panel.md.
Step by step
This is a plain Laravel install on your own server: PHP-FPM, MySQL or MariaDB, and Nginx. Every command below was run, in this order, on freshly created servers:
| Operating system | PHP | Database | Result |
|---|---|---|---|
| Ubuntu 24.04.5 LTS | 8.4.25 (ondrej PPA) | MySQL 8.0.46 | ✅ installed, wizard completed, scheduler and update tested |
| Debian 13 (trixie) | 8.4.24 (Debian) | MariaDB 11.8.6 | ✅ installed, wizard completed, scheduler and update tested |
| AlmaLinux 9.8 | 8.4.26 (Remi) | MySQL 8.0.46 (AppStream) | ✅ installed with SELinux enforcing (0 denials), wizard completed, scheduler and update tested |
Rocky Linux 9 uses the same commands as AlmaLinux 9.
The one rule that prevents most install problems: the whole PNLCS directory belongs to the web server user, and every
composer,php artisanandnpmcommand runs as that user. The install wizard writes.env, the application writesstorage/, and updates rungit,composerandnpminside the tree. When the tree is owned byrootyou get a 500 on the last step of the wizard (.envnot writable),fatal: detected dubious ownershipfromgit pull, andEACCESfromnpm— we reproduced all three by following the old instructions on a clean Ubuntu server.
The values that differ between the two families, used throughout this guide:
| Ubuntu / Debian | AlmaLinux / Rocky | |
|---|---|---|
| Web server user | www-data | apache (PHP-FPM runs as apache, Nginx can reach its socket) |
| PHP-FPM socket | /run/php/php8.4-fpm.sock | /run/php-fpm/www.sock |
| PHP-FPM service | php8.4-fpm | php-fpm |
| Database service | mysql (Ubuntu) / mariadb (Debian) | mysqld |
| Nginx site file | /etc/nginx/sites-available/pnlcs | /etc/nginx/conf.d/pnlcs.conf |
| SELinux | not used | enforcing — step 10 is required |
The guide uses /var/www/pnlcs as the install directory and
example.com as the address — replace both with your own.
0. Prepare the server
Skip this if PHP 8.4, a database, Node and Composer are already installed (a control panel such as Panelica gives you all of them — see Installing inside a hosting-panel account).
Ubuntu 24.04
Ubuntu 24.04 ships PHP 8.3, which is not enough, so PHP 8.4 comes from the ondrej PPA.
sudo apt update
sudo apt install -y software-properties-common git unzip curl cron
sudo add-apt-repository -y ppa:ondrej/php
sudo apt update
sudo apt install -y php8.4-fpm php8.4-cli php8.4-mysql php8.4-mbstring \
  php8.4-xml php8.4-curl php8.4-zip php8.4-gd php8.4-bcmath php8.4-intl php8.4-imap
sudo apt install -y mysql-server nginx

# Node.js 20 LTS (only for building the frontend assets)
curl -fsSL https://deb.nodesource.com/setup_20.x | sudo -E bash -
sudo apt install -y nodejs

# Composer
curl -sS https://getcomposer.org/installer | php
sudo mv composer.phar /usr/local/bin/composer
Debian 13
Debian 13 carries PHP 8.4 itself — no extra repository. Two differences from Ubuntu, both found on a clean Debian 13 server:
- There is no
php8.4-imappackage. Leave it out: if you put it in the list,aptrefuses the whole line and installs no PHP at all.imapis optional (mailbox → ticket import only). - There is no
mysql-serverpackage. Debian ships MariaDB, which PNLCS supports. cronis not installed on the Debian 13 cloud image — without it the scheduler in step 13 never runs. It is in the list below.
sudo apt update
sudo apt install -y git unzip curl cron
sudo apt install -y php8.4-fpm php8.4-cli php8.4-mysql php8.4-mbstring \
  php8.4-xml php8.4-curl php8.4-zip php8.4-gd php8.4-bcmath php8.4-intl
sudo apt install -y mariadb-server nginx

curl -fsSL https://deb.nodesource.com/setup_20.x | sudo -E bash -
sudo apt install -y nodejs

curl -sS https://getcomposer.org/installer | php
sudo mv composer.phar /usr/local/bin/composer
AlmaLinux 9 / Rocky Linux 9
PHP 8.4 comes from the Remi repository. The zip extension is a separate
package here (php-pecl-zip), and unlike Debian-based systems the services
are not started for you.
sudo dnf install -y epel-release https://rpms.remirepo.net/enterprise/remi-release-9.rpm
sudo dnf module reset php -y
sudo dnf module enable php:remi-8.4 -y
sudo dnf install -y php php-fpm php-mysqlnd php-mbstring php-xml php-gd \
  php-bcmath php-intl php-imap php-pecl-zip \
  mysql-server nginx git unzip cronie policycoreutils-python-utils

curl -fsSL https://rpm.nodesource.com/setup_20.x | sudo bash -
sudo dnf install -y nodejs

curl -sS https://getcomposer.org/installer | php
sudo mv composer.phar /usr/local/bin/composer

# Start the services now and on every boot.
sudo systemctl enable --now php-fpm mysqld nginx
Check what you have:
php -v          # PHP 8.4.x — 8.3 will 500 at runtime
php -m | grep -E '^(bcmath|curl|dom|fileinfo|gd|intl|mbstring|openssl|pdo_mysql|tokenizer|xml|zip)$' | wc -l   # 12
mysql --version # MySQL 8.0 / MariaDB 10.6 or newer
node -v         # v20.19 or newer
composer -V     # Composer version 2.x
Firewall. The cloud images we tested had no firewall enabled. If yours
does, open HTTP and HTTPS — sudo ufw allow 'Nginx Full' on Ubuntu, or
sudo firewall-cmd --permanent --add-service=http --add-service=https && sudo firewall-cmd --reload
on AlmaLinux/Rocky.
1. Get the code and hand it to the web server user
sudo git clone https://github.com/Panelica/pnlcs.git /var/www/pnlcs
sudo chown -R www-data:www-data /var/www/pnlcs     # AlmaLinux/Rocky: apache:apache
cd /var/www/pnlcs
Define a short helper for the rest of this guide. It runs a command as the web
server user, with a writable home for the Composer and npm caches (the web
user's own home, /var/www, belongs to root):
# Ubuntu / Debian
pn() { sudo -u www-data HOME=/tmp/pnlcs-home COMPOSER_HOME=/tmp/pnlcs-home/composer "$@"; }

# AlmaLinux / Rocky
pn() { sudo -u apache HOME=/tmp/pnlcs-home COMPOSER_HOME=/tmp/pnlcs-home/composer "$@"; }
The helper only lives in your current shell — define it again if you log in later.
2. Install PHP dependencies
pn composer install --no-dev --optimize-autoloader --no-interaction
AlmaLinux/Rocky:
sudothere does not search/usr/local/bin, so the line above answerssudo: composer: command not found. Use the full path:pn /usr/local/bin/composer install --no-dev --optimize-autoloader --no-interaction
3. Create the database
Open the database console as root — on a fresh server root signs in through
the system account, so there is no password to type:
sudo mysql
Then create the database and a user for PNLCS (MySQL and MariaDB accept the same statements):
CREATE DATABASE pnlcs CHARACTER SET utf8mb4 COLLATE utf8mb4_unicode_ci;
CREATE USER 'pnlcs'@'localhost' IDENTIFIED BY 'choose-a-strong-password';
GRANT ALL PRIVILEGES ON pnlcs.* TO 'pnlcs'@'localhost';
FLUSH PRIVILEGES;
EXIT;
4. Configure the environment
pn cp .env.example .env
sudo nano .env
Set at least these values (editing the existing file keeps its owner):
APP_NAME="Your Company"
APP_URL=https://example.com
APP_ENV=production
APP_DEBUG=false

DB_CONNECTION=mysql
DB_HOST=127.0.0.1
DB_PORT=3306
DB_DATABASE=pnlcs
DB_USERNAME=pnlcs
DB_PASSWORD=choose-a-strong-password

MAIL_FROM_ADDRESS="[email protected]"
MAIL_FROM_NAME="Your Company"
Then make .env readable by the web user only — it holds your database
password and application key, and the install wizard must be able to write it:
sudo chown www-data:www-data .env     # AlmaLinux/Rocky: apache:apache
sudo chmod 640 .env
Notes
- Keep
DB_CONNECTION=mysqlfor MariaDB too; do not switch tosqlite(some migrations use MySQL-specific SQL). - If the site starts on plain HTTP while you set up TLS, use
http://inAPP_URLfor now and change it in step 15. - Mail server settings (SMTP host, user, password) are entered in the admin panel later, not here.
5. Generate the application key
pn php artisan key:generate
6. Run the database migrations
pn php artisan migrate --force
Do not run php artisan db:seed here. The install wizard you will open
in step 12 runs the seeder itself and renames the seeded administrator to the
username and password you choose. Seeding by hand creates an administrator
first - and the wizard, seeing one, locks itself before you ever reach it,
leaving you with an admin account whose password only the seeder's
output shows.
The wizard's seeding provides everything an installation starts with: four starter currencies (USD, EUR, GBP, TRY), ticket departments and statuses, 33 email templates, 30 languages, the full translation set, the knowledge base, and default homepage sections.
Headless installs only: if you are scripting an installation with no
browser step at all, php artisan db:seed --force is how you seed - the
administrator is then admin, with a random password the seeder prints
once (set PNLCS_ADMIN_PASSWORD beforehand to choose it). The wizard stays
closed by design, and signing in to change that password is your first job.
7. Build the frontend assets
pn npm ci
pn npm run build
8. Link public storage
pn php artisan storage:link
9. Cache configuration, routes and views
pn php artisan optimize
10. SELinux (AlmaLinux / Rocky only)
SELinux is enforcing on AlmaLinux and Rocky. Without these lines every page
answers 500: PHP-FPM may not write to storage/, and may not connect to
the database. We measured exactly those two denials in the audit log of a
clean AlmaLinux 9 server.
sudo semanage fcontext -a -t httpd_sys_rw_content_t "/var/www/pnlcs/storage(/.*)?"
sudo semanage fcontext -a -t httpd_sys_rw_content_t "/var/www/pnlcs/bootstrap/cache(/.*)?"
sudo semanage fcontext -a -t httpd_sys_rw_content_t "/var/www/pnlcs/\.env"
sudo restorecon -R /var/www/pnlcs

sudo setsebool -P httpd_can_network_connect_db 1   # PHP → MySQL/MariaDB
sudo setsebool -P httpd_can_network_connect 1      # PHP → payment gateways, server and registrar APIs, SMTP
Do not switch SELinux off to make the errors go away — these rules give the application exactly what it needs and nothing more.
11. Point Nginx at public/
The document root must be the public/ directory, never the project root —
pointing it at the project root exposes .env.
Ubuntu / Debian — create /etc/nginx/sites-available/pnlcs:
server {
    listen 80;
    server_name example.com;
    root /var/www/pnlcs/public;      # note: /public

    index index.php;
    charset utf-8;
    client_max_body_size 64M;        # ticket + backup uploads

    location / {
        try_files $uri $uri/ /index.php?$query_string;
    }

    location ~ \.php$ {
        fastcgi_pass unix:/run/php/php8.4-fpm.sock;
        fastcgi_index index.php;
        fastcgi_param SCRIPT_FILENAME $realpath_root$fastcgi_script_name;
        include fastcgi_params;
    }

    location ~ /\.(?!well-known).* { deny all; }
}
Enable it and remove the default site — otherwise a request to the server's IP address keeps landing on the "Welcome to nginx" page:
sudo ln -s /etc/nginx/sites-available/pnlcs /etc/nginx/sites-enabled/
sudo rm -f /etc/nginx/sites-enabled/default
sudo nginx -t && sudo systemctl reload nginx
AlmaLinux / Rocky — create /etc/nginx/conf.d/pnlcs.conf with the same
block, changing only the PHP-FPM socket:
fastcgi_pass unix:/run/php-fpm/www.sock;
sudo nginx -t && sudo systemctl reload nginx
Check it before you open a browser:
curl -sI http://example.com/install | head -1      # HTTP/1.1 302 Found  (→ the wizard)
curl -sI http://example.com/.env | head -1         # 403 or 404 — never 200
Using Apache or Caddy instead? The same rule applies: document root =
public/, PHP handled by PHP-FPM 8.4, and every request that is not a file
rewritten to index.php.
12. Run the install wizard
Open http://example.com/install in your browser. The wizard walks through:
- Requirements — PHP version, every required extension, and whether
storage/,bootstrap/cache/and.envare writable. Everything must be green before Continue appears; a red line names exactly what to fix. - Database — skipped automatically, because you already ran the migrations in step 6.
- Administrator — the username, email and password you choose. There is no default password to change afterwards.
- Application — the public URL, the company name and the default language.
- Finish — the wizard writes a lock file and closes itself permanently;
/installanswers 404 from then on.
Sign in at http://example.com/admin/login.
13. Schedule the cron runner
Everything that happens by itself — invoice generation, payment reminders, suspensions, SSL polling, backups, queued mail — is driven by one cron line for the web server user:
sudo crontab -u www-data -e # AlmaLinux/Rocky: -u apache
* * * * * cd /var/www/pnlcs && php artisan schedule:run >> /dev/null 2>&1
Check that the schedule is there and runs cleanly:
pn php artisan schedule:list
pn php artisan schedule:run
14. Queue: no separate worker needed
.env.example ships QUEUE_CONNECTION=sync: mail and background jobs run
inline, which is the right shape for a single server.
If you switch to QUEUE_CONNECTION=database, the cron line from step 13
already processes the queue: the scheduler starts a worker every minute
that drains the queue and stops. We verified this on a clean server — a
queued email was in the jobs table before schedule:run, and sent after
it, with no supervisor installed. Jobs therefore wait up to a minute.
Add a permanent worker only if you want queued jobs to run instantly. A
supervisor entry for that:
[program:pnlcs-worker]
command=php /var/www/pnlcs/artisan queue:work database --sleep=3 --tries=3 --max-time=3600
autostart=true
autorestart=true
user=www-data
15. Turn on HTTPS
Checkout and the admin login must never run over plain HTTP. With Certbot
(Ubuntu/Debian: sudo apt install -y certbot python3-certbot-nginx):
sudo certbot --nginx -d example.com
Then make sure APP_URL in .env starts with https:// and refresh the
cache:
pn php artisan optimize
16. Final check
curl -sI https://example.com/install | head -1   # 404 — the wizard is closed
curl -sI https://example.com/.env | head -1      # 403 or 404
ls -l /var/www/pnlcs/.env                                  # owned by the web user, mode 640
pn php artisan schedule:run                                # finishes without errors
Then continue with First Steps After Installation.
Installing inside a hosting-panel account (Panelica, cPanel, …)
If the server runs a control panel, you do not need root or any of step 0 - the panel already carries PHP, MySQL and (on Panelica) Node. This is the exact shape our own production installs use:
- Create the hosting account and its domain in the panel, and set the
domain's PHP version to 8.4 - this is the step that bites: if the
site's PHP-FPM stays at 8.3 while you ran composer with a 8.4 CLI, every
request answers
500 - Composer detected issues in your platform. - Create the MySQL database and user from the panel. Panels prefix names
(
account_pnlcs) - put the prefixed name in.env. - As the account user, clone into the site directory - next to the
webroot, not inside it:
cd ~/example.com && git clone https://github.com/Panelica/pnlcs.git pnlcs composer install,.env,key:generate,migrate --forceas in steps 2-6, using the panel's PHP 8.4 binary (on Panelica:php84). If MySQL listens on a socket, addDB_SOCKET=with the panel's socket path.- Build the assets with the panel's Node (on Panelica, install one under
Node.js Versions and use its
npm). - Point the webroot at
pnlcs/publicwith a same-owner symlink:mv public_html public_html.default && ln -s pnlcs/public public_html. A symlink owned by the same account passes the panel'sdisable_symlinks if_not_ownerprotection. - Add the cron line from step 13 as a panel cron job for the account.
- Open
https://example.com/installand finish the wizard.
Updating
PNLCS is updated from signed releases, never from the code under
development. An update keeps everything that belongs to your installation —
.env, storage/, the database's data, your own theme, modules and hook
files, the email templates and translations you edited. It stops and asks
when one of your changes clashes with the new version, and puts every file
and the database back by itself if anything goes wrong.
There are two channels, chosen on Setup → Updates: Stable (the default) and Beta, which gets new releases about a week earlier. PNLCS looks for a newer release once a day and tells you; nothing is installed until an administrator asks for it.
From the admin area
- Setup → Updates → Check this update. The release is downloaded, its signature is verified, and it is compared with your installation. Nothing is changed yet: you see what will be updated and which of your changes are merged or kept.
- If you changed a file the new version changes in the same place, choose for each one: the new version, yours, or the merged text.
- Update now. The site goes into maintenance for the few seconds it takes, a snapshot of the database is taken, the files are written, the migrations run and the new version is checked. If any step fails, everything is put back and the site returns on the version it had.
From the command line
Run as the web server user (the owner of the PNLCS files):
php artisan pnlcs:update --check     # compare, change nothing
php artisan pnlcs:update             # update to the newest release on your channel
php artisan pnlcs:update-rollback    # put back an update that was cut off
Docker
docker exec pnlcs /usr/local/bin/update.sh            # update
docker exec pnlcs /usr/local/bin/update.sh --check    # compare only
update.sh runs the same updater, then reloads PHP. Your database and
uploaded files live on the volumes and are left untouched. Set AUTO_UPDATE=1
on the container to apply the newest release on every start.
It updates PNLCS, not the image: nginx, PHP and the entrypoint come from
the image, and a fix to any of them arrives by pulling the tag again and
recreating the container with the same volumes. Images before 1.5 reset
the code to the development branch on every update and discarded changes made
inside the container; pull panelica/pnlcs-runtime:1.5 and recreate the
container before you update.
Installations cloned with git
An installation cloned with git is compared with the commit it was cloned at,
so your changes are kept just the same, and from its first update on it is a
release installation. Keep using the updater, not git pull: main is the
code under development, not a release.
Conflicts, cut-off updates, ZIP installations and bringing an installation older than 1.3 up to date by hand are covered in docs/install/updating.md.
First Steps After Installation
📖 New to hosting billing? The full user guide walks you through every concept and task in plain language — start with Your First Sale for an end-to-end walkthrough. The steps below are the quick version.
Once the site loads and you can reach /admin/login, do these in order:
1. Sign in
- URL:
https://example.com/admin/login - Use the administrator username and password you chose in the install
wizard. (Only a headless install that seeded by hand has the account
admin, with the passworddb:seedprinted - if that is you, changing it is the first job.) - (Recommended) Enable Two-Factor Authentication from My Account (the menu under your name) → Turn on.
2. Configure General Settings
Setup → General Settings
- Company name, support email, logo, favicon
- Default language, currency, timezone
- Date format, invoice pay terms, tax behavior
3. Configure Email Delivery
Setup → General Settings → Mail Configuration
- Choose SMTP and fill in the host, port, username, password and encryption of your mail server or relay
- Set the sender address and name
- Save, then press Send Test Email and check the inbox
These settings are stored in the database and override the MAIL_* values in
.env. Until mail is configured, .env.example's MAIL_MAILER=log is in
effect: nothing is delivered, and with the default LOG_LEVEL=warning the
messages are not written to the log either.
4. Customize Appearance
Setup → Appearance
- Pick a theme from the 16 built-in options
- Upload your logo and favicon
- Configure homepage sections (hero, features, pricing, testimonials)
- Set up white-label footer text
5. Add Payment Gateways
Setup → Payment Gateways
- Stripe — paste your API keys, enable
- PayPal — client ID + secret (sandbox or live)
- Bank Transfer — set instructions shown to clients
- Test each gateway with a small order before going live
6. Add Server Modules (if you sell hosting)
Setup → Servers
- Add your server: Panelica, cPanel, Plesk, DirectAdmin, HestiaCP, aaPanel, Proxmox VE or Vultr
- Test the API connection from the server edit page
- Assign servers to server groups if you have multiple
7. Create Your First Product
Setup → Products/Services
- Create a product group (e.g. "Shared Hosting")
- Create a product, link it to a server and a module
- Set pricing for monthly / quarterly / annually
- Enable auto-setup if you want provisioning on payment
8. Configure Domain Pricing (if you sell domains)
Setup → Domain Pricing
- Add TLDs you sell (
.com,.net, ...) - Set registration, transfer, and renewal prices
- Link to a registrar module (or use Manual)
9. Set Up Tax Rules
Setup → Tax Rules
- Add rates per country, or per state within a country, and a global default
- Rates are added on top of prices; a client marked tax exempt pays none
- See the Tax Rules guide
10. (Optional) Invite Staff and Define Roles
Setup → Admin Roles and Setup → Admin Accounts
- Create custom roles (e.g. "Billing Manager", "Support Agent")
- Pick permissions per role from the 45+ available
- Add staff members and assign roles
11. Enable Email Verification for Signups (recommended)
Setup → General Settings → Email Verification
- Tick New customers must confirm their email address
- New signups will receive a verification link before they can order
12. Test the Full Flow End-to-End
- Open an incognito browser
- Visit
/client/registerand create a test client - Place a test order for one of your products
- Pay with the test mode of your gateway
- Verify the invoice, service, and email flow all work
Modules — Servers, Payment Gateways & Domain Registrars
PNLCS ships with modular server, gateway, registrar, and SSL
provider integrations under the modules/ directory. Add control-panel
servers (cPanel, Plesk, DirectAdmin, HestiaCP, aaPanel, Proxmox, Vultr, Panelica),
configure payment gateways (Stripe, PayPal, iyzico, Authorize.Net, Razorpay,
Mollie, Tpay, bank transfer), and connect domain registrars (Enom, Namecheap,
ResellerClub, OpenProvider, HRD, DomainNameAPI, OVH) — and add your own modules without touching
core code (see Writing your own module).
💡 Choosing a panel to sell on? The Panelica server module provisions instantly. Panelica is a modern cPanel / Plesk alternative with built-in per-user isolation (no CloudLinux) and universal migration from cPanel, Plesk, DirectAdmin, and CyberPanel.
These are the server, gateway, registrar and SSL modules in modules/
(addons and reports live there too):
| Module | Type |
|---|---|
| Panelica | Server |
| cPanel | Server |
| Plesk | Server |
| DirectAdmin | Server |
| Proxmox | Server |
| HestiaCP | Server |
| aaPanel | Server |
| Vultr | Server |
| Panelica licences | Server |
| Custom | Server |
| Stripe | Gateway |
| iyzico | Gateway |
| PayPal | Gateway |
| Authorize.Net | Gateway |
| Razorpay | Gateway |
| Mollie | Gateway |
| Tpay | Gateway |
| BankTransfer | Gateway |
| Enom | Registrar |
| Namecheap | Registrar |
| ResellerClub | Registrar |
| OpenProvider | Registrar |
| DomainNameAPI | Registrar |
| HRD | Registrar |
| OVH | Registrar |
| Manual | Registrar |
| GoGetSSL | SSL |
Managing modules — Setup → Modules
Setup → Modules lists every installed server, payment gateway, registrar, SSL and addon module on one screen, each with an on/off switch:
- Switching a gateway off removes it from checkout; switching a registrar off removes it from the domain search; switching an addon off deactivates it. These are the same switches as on each module's own settings page — flipping one here or there is the same thing.
- Switching a server or SSL module off removes it from the forms that choose a module (new servers, new products). A server or SSL module that a server or product still uses cannot be switched off; the screen shows how many records use it.
- Modules you added yourself are marked Third-party.
Credentials and options stay on each type's own page (Setup → Payment Gateways, Servers, Domain Registrars, SSL Modules, and the Extensions page for addons); the Configure button on each section takes you there.
Writing your own module
A module is a folder under modules/. Drop it in, add a pnlcs.json
manifest, and PNLCS registers it on the next request — no edit to the core,
nothing to re-register after an update, because your folder is not part of
this repository.
1. Folder layout — exactly two levels below modules/:
modules/
└── Gateways/                 ← Gateways, Servers, Registrars or Ssl
    └── AcmePay/
        ├── AcmePayModule.php
        └── pnlcs.json
The namespace follows the path (PSR-4, Modules\ → modules/), so the class
above is Modules\Gateways\AcmePay\AcmePayModule.
2. The manifest — pnlcs.json:
{
    "name": "acmepay",
    "type": "gateway",
    "class": "Modules\\Gateways\\AcmePay\\AcmePayModule",
    "version": "1.0.0",
    "display_name": "AcmePay",
    "description": "AcmePay card payments",
    "author": { "name": "Your Company" }
}
| Field | Required | Meaning |
|---|---|---|
name | yes | Unique key, stored on invoices, products and settings. Lower-case, no spaces. |
type | yes | gateway, server, registrar or ssl |
class | yes | Fully qualified class name of the module |
provider | no | Fully qualified class of a Laravel service provider in the module's folder, for its own routes, views, migrations and scheduled tasks |
version, display_name, description, author | no | Informational |
Two rules are enforced when the manifest is read, so a broken module cannot break a working installation:
- A built-in module always wins. A manifest named
stripe(or any other built-in name) is ignored — it cannot replace a module that ships with PNLCS. - The class must be the type it claims. The class must implement the
interface for its
type(table below). A server class announced as a gateway is not registered at all, instead of failing at checkout.
A manifest that does not parse, names a class that does not exist, or leaves
out name, type or class is skipped silently.
3. The interface — implement the one for your type (app/Contracts/):
type | Interface | Methods |
|---|---|---|
gateway | App\Contracts\GatewayModuleInterface | capture, refund, getPaymentForm, processWebhook, getConfigFields, getModuleName, isTokenised |
server | App\Contracts\ServerModuleInterface | create, suspend, unsuspend, terminate, changePassword, changePackage, usageUpdate, testConnection, getConfigFields, getModuleName |
registrar | App\Contracts\RegistrarModuleInterface | register, transfer, renew, getNameservers, saveNameservers, getEPPCode, getLockStatus, toggleLock, checkAvailability, getConfigFields, getModuleName |
ssl | App\Contracts\SslModuleInterface | purchaseCertificate, getCertificateStatus, renewCertificate, revokeCertificate, reissueCertificate, resendValidationEmail, changeValidationMethod, getApproverEmails, getWebServerTypes, getCertificateTypes, decodeCsr, generateCsr, testConnection, getConfigFields, getModuleName |
A gateway that can store a card and charge it later (automatic payment) also
implements App\Contracts\TokenizableGatewayInterface (beginVaulting,
confirmVaulting, detachStoredMethod, chargeStoredMethod); the Stripe,
iyzico and PayPal modules are complete examples.
Actions return an array with at least success (bool) and message
(string) — for example ['success' => true, 'message' => 'Account created'].
4. Settings — for gateway, registrar and SSL modules,
getConfigFields() describes the fields on the module's settings page; PNLCS
draws the form and stores the values. A gateway is only offered at checkout
once every field marked required has a value. (Server modules get their
connection details — hostname, port, username, password or API key, access
hash — from the Setup → Servers form instead.)
public function getConfigFields(): array
{
    return [
        ['name' => 'api_key',  'label' => 'API Key',   'type' => 'password', 'required' => true],
        ['name' => 'mode',     'label' => 'Mode',      'type' => 'select',   'options' => ['live' => 'Live', 'test' => 'Test']],
        ['name' => 'debug',    'label' => 'Debug log', 'type' => 'yesno',    'default' => '0'],
        ['name' => 'note',     'label' => 'Note',      'type' => 'textarea'],
    ];
}
Field types: text, password (never echoed back into the page), textarea,
select (with options) and yesno. A gateway reads its saved values from
App\Models\GatewaySettings (gateway = your name, setting = the field
name); the Mollie and Tpay modules show the pattern in a few lines.
5. Start from a working module. The simplest complete examples are
modules/Servers/Custom (a server module where every action succeeds) and
modules/Gateways/BankTransfer (an offline gateway). Copy one, rename the
folder, namespace and class, write the manifest, and open Setup → Modules
— your module appears there marked Third-party.
Gateway callbacks. A gateway without a route of its own receives its
provider's confirmations at /gateway/<name>/callback (GET or POST, no CSRF
token). For its own pages, webhooks or tables, name a service provider in the
manifest (provider). See docs/developer/modules.md.
Addons (modules/Addons/<Name>/<Name>Module.php, implementing
App\Contracts\AddonModuleInterface) need no manifest: any addon folder is
listed on the Extensions page (/admin/config/addons/modules, in the
settings sidebar) and on the Modules screen, where it is activated. The Staff Board and Project Management addons are working
examples.
Tests. tests/Feature/ModuleDiscoveryTest.php shows how to exercise a
module through the same discovery the application uses. Pull requests that add
a module with tests are reviewed first.
AI Assistants — MCP Server
PNLCS ships a first-party Model Context Protocol
server, pnlcs-mcp on npm. Connect
any MCP-compatible AI client — Cursor, VS Code and others — to your install and
ask it things in plain English: which invoices are overdue, any orders held
as fraud, open a ticket for this client. Fifteen read tools are always
available; the seven write tools exist only when you opt in with
PNLCS_ALLOW_WRITES=1. Zero dependencies, nothing to install on the PNLCS
side — it speaks to the same admin API your screens use, with an API
credential you create under Setup → API Credentials.
Most clients take the same JSON block:
{
  "mcpServers": {
    "pnlcs": {
      "command": "npx",
      "args": ["-y", "pnlcs-mcp"],
      "env": {
        "PNLCS_URL": "https://example.com",
        "PNLCS_IDENTIFIER": "your_identifier",
        "PNLCS_SECRET": "your_secret"
      }
    }
  }
}
Client-by-client setup lives in mcp/README.md.
Security
- All admin routes require authentication via the
admin.authmiddleware - Over 250 admin endpoints are gated by fine-grained permissions
- CSRF protection on every form
- Rate limiting on login, 2FA, password reset, and verification email resends
- Webhook routes are CSRF-exempt but validated by HMAC signatures
- Eloquent ORM everywhere (no raw SQL concatenation)
Please report security issues privately to [email protected] rather than opening a public GitHub issue; see SECURITY.md.
Backups
PNLCS backs up its database automatically. The scheduled task
pnlcs:db-backup runs daily at 04:30 (through the cron runner from
installation step 13), dumps the database to a gzip file and rotates old ones.
- Where:
storage/app/backups/db/pnlcs-YYYYMMDD-His.sql.gz - Retention: the last 7 backups are kept (setting
db_backup_retention) - On/off: controlled by the
db_backup_enabledsetting (on by default)
Run one by hand:
php artisan pnlcs:db-backup                 # uses the defaults above
php artisan pnlcs:db-backup --dir=/mnt/backups --retention=30
php artisan pnlcs:db-backup --php           # pure-PHP dump if mysqldump is missing
It uses mysqldump when present and falls back to a PHP dump with --php.
Restore a backup:
gunzip < storage/app/backups/db/pnlcs-20260101-043000.sql.gz | mysql -u pnlcs -p pnlcs
The scheduled job covers the database. Uploaded files (ticket attachments, invoice PDFs, branding) live under
storage/— include that directory in your server-level backup, and copy the.sql.gzfiles off the box (or point--dirat mounted/off-site storage) so a lost disk is not a lost backup.
Payment Gateways
Configure gateways under Setup → Payment Gateways. Open a gateway, fill in its keys, save, enable it, then test with a small order before going live. Checkout must run over HTTPS.
| Gateway | What you enter |
|---|---|
| Stripe | Publishable Key, Secret Key, Webhook Signing Secret |
| PayPal | PayPal Email, Client ID, Client Secret, Sandbox on/off |
| Mollie | Mollie API Key, Test Mode on/off |
| Razorpay | Key ID, Key Secret, Webhook Secret, Test Mode on/off |
| Authorize.Net | API Login ID, Transaction Key |
| iyzico (Turkey) | API key, Secret key, Sandbox on/off, instalments offered |
| Tpay (Poland) | Open API Client ID + Secret, security code, Sandbox on/off |
| Bank Transfer | Your bank/account details — shown to the client, confirmed by hand |
Webhooks
Card gateways confirm a payment by calling back, so set the webhook URL in the provider's dashboard to:
https://example.com/gateway/<gateway>/webhook
for example …/gateway/stripe/webhook or …/gateway/paypal/webhook (also
authorize, mollie, razorpay, tpay; iyzico needs none). For Stripe, copy the
signing secret the dashboard shows for that endpoint into the gateway's
Webhook Signing Secret field — without it, incoming webhooks are rejected.
Bank Transfer has no webhook; you mark those invoices paid yourself.
Troubleshooting & FAQ
Common install & update errors
500 — Composer detected issues in your platform: PHP >= 8.4.0
The site's PHP-FPM is older than the PHP that ran composer install. Because
the dependencies are locked against PHP 8.4 the page dies before Laravel even
boots, so storage/logs stays empty. Point the site (or FPM pool) at PHP
8.4 — on a control panel, change the domain's PHP version; on raw nginx, fix
the fastcgi_pass socket.
Application encryption key has not been specified / MissingAppKeyException
You skipped the key step. Run php artisan key:generate (it writes APP_KEY
into .env), then reload.
SQLSTATE… Base table or view not found
Migrations have not run, or .env points at the wrong database. Check the
DB_* values, make sure the database exists, then run
php artisan migrate --force.
Composer stops with … does not exist and could not be created (writing to vendor/)
Something under vendor/ is owned by another user (usually a past
sudo composer), so the site user cannot write there. Fix ownership and retry:
chown -R <site-user>:<site-user> vendor && composer install --no-dev.
fatal: detected dubious ownership in repository
Git refuses a repo owned by a different user. Mark it safe:
git config --global --add safe.directory /path/to/pnlcs.
Blank or unstyled page, or the old UI after an update
The compiled assets or cached views are stale. Run npm run build, then
php artisan optimize (or php artisan view:clear).
.env is reachable in the browser
The web root points at the project folder instead of public/. Point the
document root at pnlcs/public — nothing above it should be web-served.
Invoices/emails never send, but nothing errors Three causes, in order of likelihood:
- Mail is not configured. Until SMTP is set under Setup → General
Settings → Mail Configuration,
MAIL_MAILER=logis in effect and nothing leaves the server. - The cron line is missing. With
QUEUE_CONNECTION=database, queued mail is sent by the scheduler (installation step 13), which starts a worker every minute. No cron, no worker: jobs stay in thejobstable. Check withcrontab -u www-data -l. - Mail is switched off in the panel settings — the log then says
Outgoing mail suppressed: mail is disabled in the panel settings.
The last step of the install wizard answers 500
storage/logs/laravel-*.log says file_put_contents(/var/www/pnlcs/.env): Failed to open stream: Permission denied. The wizard writes .env, and the
file belongs to root. Give it to the web user and reload the page:
sudo chown www-data:www-data .env && sudo chmod 640 .env (AlmaLinux/Rocky:
apache:apache). Current versions of the wizard show this on the requirements
page (".env ✗ not writable") before you start.
AlmaLinux / Rocky: every page is a 500, and storage/logs is empty
SELinux is blocking PHP-FPM. sudo grep denied /var/log/audit/audit.log | tail
shows { write } … name="logs" (cannot write storage/) and
{ name_connect } … dest=3306 (cannot reach the database). Run the commands
in installation step 10.
AlmaLinux / Rocky: sudo: composer: command not found
sudo there does not search /usr/local/bin. Call Composer by its full path:
sudo -u apache /usr/local/bin/composer install --no-dev --optimize-autoloader.
git pull says detected dubious ownership, or npm fails with EACCES
Part of the tree belongs to root while the command runs as the web user
(usually an older install that ran sudo git clone / sudo npm install and
only handed storage/ over). Give the whole directory to the web user once:
sudo chown -R www-data:www-data /var/www/pnlcs, then re-run.
The server's IP address shows "Welcome to nginx!" instead of PNLCS
The distribution's default site is still enabled and answers every request
that does not match your server_name. Remove it:
sudo rm /etc/nginx/sites-enabled/default && sudo systemctl reload nginx.
apt installs no PHP at all on Debian 13 (Unable to locate package php8.4-imap)
Debian 13 does not package the imap extension; one missing package makes
apt refuse the whole line. Install the list without php8.4-imap — see
installation step 0.
Mailbox import does nothing, and the log says the PHP imap extension is not installed
Ticket import from a mailbox (Setup → Ticket Departments) needs PHP's
imap extension, which PHP 8.4 no longer bundles. Install php8.4-imap
(Ubuntu, ondrej PPA) or php-imap (AlmaLinux/Rocky, Remi) and reload PHP-FPM.
The rest of PNLCS does not need it.
A page shows Route [...] not defined right after an update
PHP-FPM is still serving the previous code from its opcode cache. Reload it:
sudo systemctl reload php8.4-fpm (AlmaLinux/Rocky: php-fpm).
The /install wizard is already locked, or you never got to choose a password
You ran php artisan db:seed by hand before opening the wizard; seeing an
administrator, it locks itself. Sign in as admin with the password
db:seed printed and change it from your profile, or reinstall without
seeding by hand.
Frequently asked
How do I offer a free (zero-cost) plan?
Create the product and set Payment Type → Free (the dropdown offers
Recurring / One-time / Free). Do not put 0 in the price — that leaves the
product with no sellable price.
How do I bring an existing customer/account into PNLCS? Open the client → Services tab → Add Service. Leave the options empty for a billing-only record; use "Link to an existing account" to attach the account that already runs on the server (PNLCS then bills and manages it); or tick "Create the account on the server now" to provision a brand-new one.
How does PNLCS know which server account belongs to which service?
It stores the panel's internal account ID on the service (in module_data)
and every action — suspend, terminate, password — uses that ID. It does not
rely on usernames matching, so names can differ freely.
How do I update to the latest version?
Setup → Updates in the admin area, or php artisan pnlcs:update as the
web server user. Docker: docker exec pnlcs /usr/local/bin/update.sh. See
Updating. Your data is left untouched either way.
Contributing
Issues and pull requests are welcome.
Ways to help:
- Test a module against a real provider account — see the module table — and file an issue with what you found.
- Report a bug with reproduction steps — screenshots help a lot.
- Answer a question on the community and help other people running PNLCS.
- Improve a translation via the admin UI's export, edit a JSON file, and send us a PR.
- Write a module — see Writing your own module.
- Write documentation — installation on other distributions or hosting panels, and anything this README gets wrong.
Please keep in mind:
- The PNLCS team is small. We'll get to issues as quickly as we can but same-day responses are rare.
- PRs that include tests are prioritized.
- Please match the existing coding style (Laravel Pint + conventional commits).
Support & Community
Need help, have an idea, or want to show what you built?
- 💬 PNLCS Community — the place to start:
- Help — installation, configuration and "how do I…" questions, with solved answers marked
- Feature requests — post ideas and vote on them; the team posts its plans in the Roadmap
- Modules & themes and Developers — building on PNLCS
- Show & tell — your shop on PNLCS
- Announcements — releases and news from the team
- 📖 Documentation — docs.pnlcs.com, starting with the installation guide
- 🐛 Bug reports — GitHub Issues, with steps to reproduce
- 🌐 Website — pnlcs.com
- 📧 Email — [email protected]
- 🔒 Security disclosures — [email protected] (please do not open public issues for security)
Questions get the fastest answer on the community, where other PNLCS users can help as well as the team. The PNLCS team is small, so your patience with email is appreciated.
Credits
- Panelica — the modern hosting control panel and a cPanel / Plesk alternative that needs no CloudLinux; PNLCS began there and integrates natively with it
- Laravel by Taylor Otwell and the Laravel community
- WHMCS — for inspiring much of the data model and workflow
- Every contributor who opens an issue or a pull request
Translators
PNLCS ships in 30 languages, and most of them are completed by the people who use them. Everyone whose translation is merged is listed here, by language, for good. To join them, see Translations.
- Chinese (Simplified): @Harry326485
- German: Dirk Mehmke; Dejan Wolf (WHOST, Austria)
- Italian: @vvezzola
- Polish: Grzegorz (@hedon77)
- Spanish: @wmedia
License
Released under the MIT License. See LICENSE for details.
Keywords: WHMCS alternative · open-source hosting billing · self-hosted billing platform · Laravel billing · PHP client portal · hosting management software · free WHMCS · invoicing system · reseller hosting software · domain management · SSL management · support ticket system · hosting CRM · cPanel alternative · Plesk alternative · CyberPanel alternative · CloudLinux alternative · Panelica hosting control panel