
jentic-one
Self-hosted execution layer for AI agents: connect any agent to real APIs, scope exactly what it can touch, and keep credentials out of the agent's hands.
Automatically checked · GitHub checked 2026-11-12
Overview

A self-hosted execution layer for AI agents.
Connect an agent to any API you need, and enforce exactly what it is allowed to call.
Quickstart · Docs · Security · API Directory · Discussions



[!NOTE] Public beta. Schemas and CLI commands can change between 0.x releases — pin a version if you need stability.
What it is
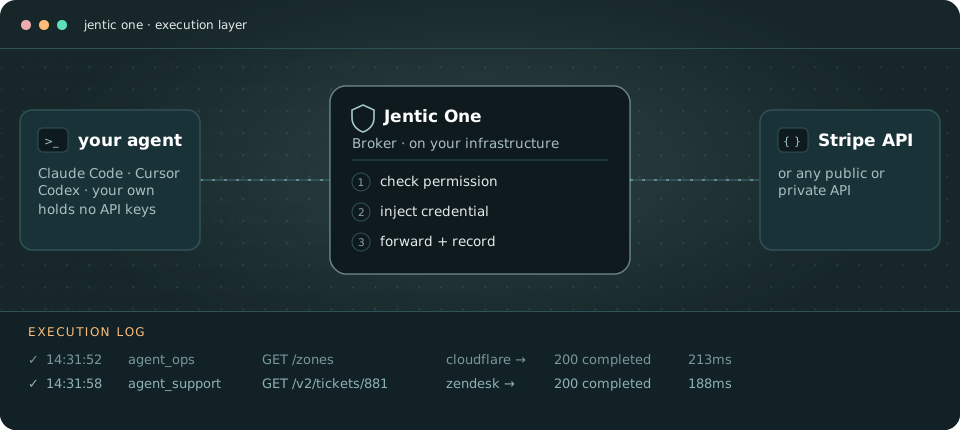
Giving an agent API access normally means giving it an API key. Jentic One removes that step: you store each credential once, on your own infrastructure, and the agent calls APIs through the Broker. The Broker checks what the agent is allowed to do, attaches the credential, and records the call. The agent never sees your keys — and you can cut off one agent without rotating anything.
Agents connect through the jentic CLI, a generated skill, an MCP server, or plain HTTP.
Who it's for: developers giving a coding agent (Claude Code, Codex, Cursor, Cline, …) real API access; teams running agents inside a private network; anyone who has to pass a security review before an agent touches production credentials.
Quickstart
Sets up a self-hosted Jentic One instance on your machine with Docker. Run your agents in a separate environment from the
stack (a different machine, VM or user), and connect them over HTTP or MCP. The key that encrypts
your credentials lives in ~/.config/jentic-one/.env: back it up.
- For Windows, use the Windows guide. For other deployment methods, see Alternative deployments.
- By default, the quickstart enables anonymous telemetry. For more information and how to opt out, see Telemetry.
- Something failed? See Troubleshooting.
Start the instance
# Download the quickstart compose file
curl -fsSLO https://raw.githubusercontent.com/jentic/jentic-one/main/deploy/docker/quickstart/docker-compose.yaml

# Generate the credential-encryption key (once; a re-run keeps the existing key)
mkdir -p ~/.config/jentic-one
(umask 077; set -C; echo "JENTIC_ENCRYPTION_KEY=$(openssl rand -base64 32)" > ~/.config/jentic-one/.env)

# Start the stack. Open the webapp at http://127.0.0.1:8000 (or your configured url) once it returns
docker compose up -d --wait
Connect your agent
Run these on the machine where your agent runs. For MCP setup, see Setting up your MCP client.
Install the CLIs
brew install --cask jentic/tap/jentic    # macOS / Linux

scoop bucket add jentic https://github.com/jentic/scoop-bucket   # Windows
scoop install jentic

# Or install directly from GitHub
curl -fsSL https://raw.githubusercontent.com/jentic/jentic-one/main/tools/clis/install.sh | sh
Register your agent
JENTIC_ONE_URL=http://127.0.0.1:8000   # where your Jentic One web app is running
jentic setup --url "$JENTIC_ONE_URL"   # registers the agent and installs its skill; approve it in the UI
Next: make your first brokered call.
Manage the instance
Run these in the folder with docker-compose.yaml.
# Stop the stack
docker compose down

# Start it again
docker compose up -d

# Restart it
docker compose restart
Alternative deployments
| If you want… | Go to |
|---|---|
| Production on Docker (Postgres, pinned image, TLS) | Docker · docker-compose · systemd |
| Kubernetes | Helm |
| Buy it on AWS Marketplace (runs on your EKS) | AWS Marketplace |
A trial without compose (plain docker run, SQLite) | Trial setup |
| From source, to develop on it | Local setup |
| CLI without a package manager | Installing the CLIs |
How it works
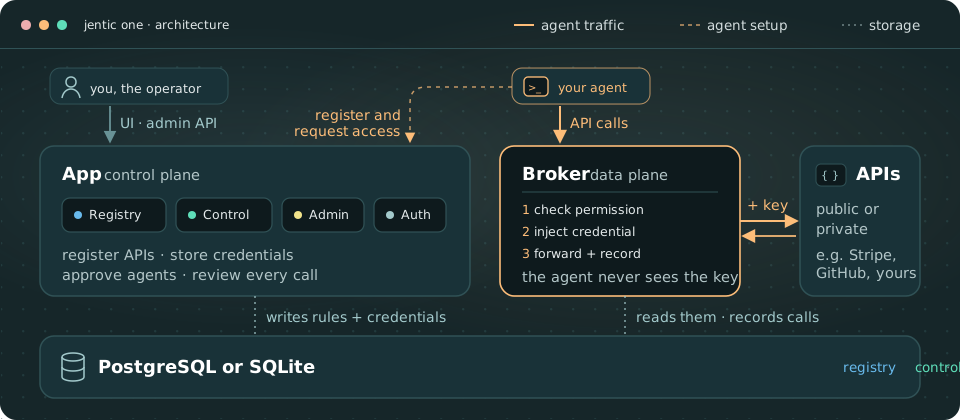
Jentic One runs as two units over one database. App (the control plane) is where you register APIs, store credentials and approve agents. Broker (the data plane) is what agents call: it checks permissions, injects the credential after the check, forwards the request and writes an execution record. More in Architecture.
One boundary to know: the Broker protects credentials from agents running as other OS users or on other machines. An agent running as the same OS user as its CLI state can read that state — see same-host setups.
Documentation
| I want to… | Start here |
|---|---|
| Install and run it | Installation |
| Make my first API call through it | First brokered call |
| Connect my agent | Connecting agents |
| Deploy it securely | Security |
| Keep it running (upgrades, backups, monitoring) | Operations |
| Understand how it's built | Architecture |
| Look up a config key, endpoint or CLI flag | Reference |
| Contribute | CONTRIBUTING.md · Local setup |
Everything else is in the documentation index. AI agents can start from
llms.txt.
Community
Questions and ideas go to Discussions; bugs and contributions to the issues. Security reports: SECURITY.md. Support options: SUPPORT.md. For commercial use: jentic.com/contact.
License
Apache 2.0; third-party attributions in NOTICE.